
Introduction: Why Electrical Grounding Matters—Especially in Older Homes
Electrical grounding is a safety cornerstone of every modern home. It’s what keeps stray electricity from becoming a hazard, protects sensitive electronics, and ensures that your electrical system meets code. Yet, in older homes—especially those built before the 1970s—grounding systems are often outdated, incomplete, or altogether missing. This leaves residents exposed to electrical shocks, surges, and even fire risks. If you’re living in or renovating an older property, understanding how and why to upgrade your grounding is not just good practice—it’s essential for safety, insurance compliance, and peace of mind.
This guide delivers a thorough look at the practicalities and requirements of upgrading electrical grounding in older homes. We’ll break down costs, clarify compliance issues, and walk you through a step-by-step upgrade process. Whether you’re a serious DIYer or planning to hire a pro, you’ll walk away with the insights and actionable know-how to make your home’s electrical system safer and more reliable for years to come.
Understanding Electrical Grounding: The Basics
What Is Electrical Grounding?
Electrical grounding provides a safe pathway for excess electricity to discharge into the earth. In a properly grounded system, faults such as short circuits or lightning strikes can safely dissipate, minimizing the risk of shocks, equipment damage, or fires. Grounding also stabilizes voltage levels, protecting your home’s appliances and electronics.
Common Grounding Methods in Homes
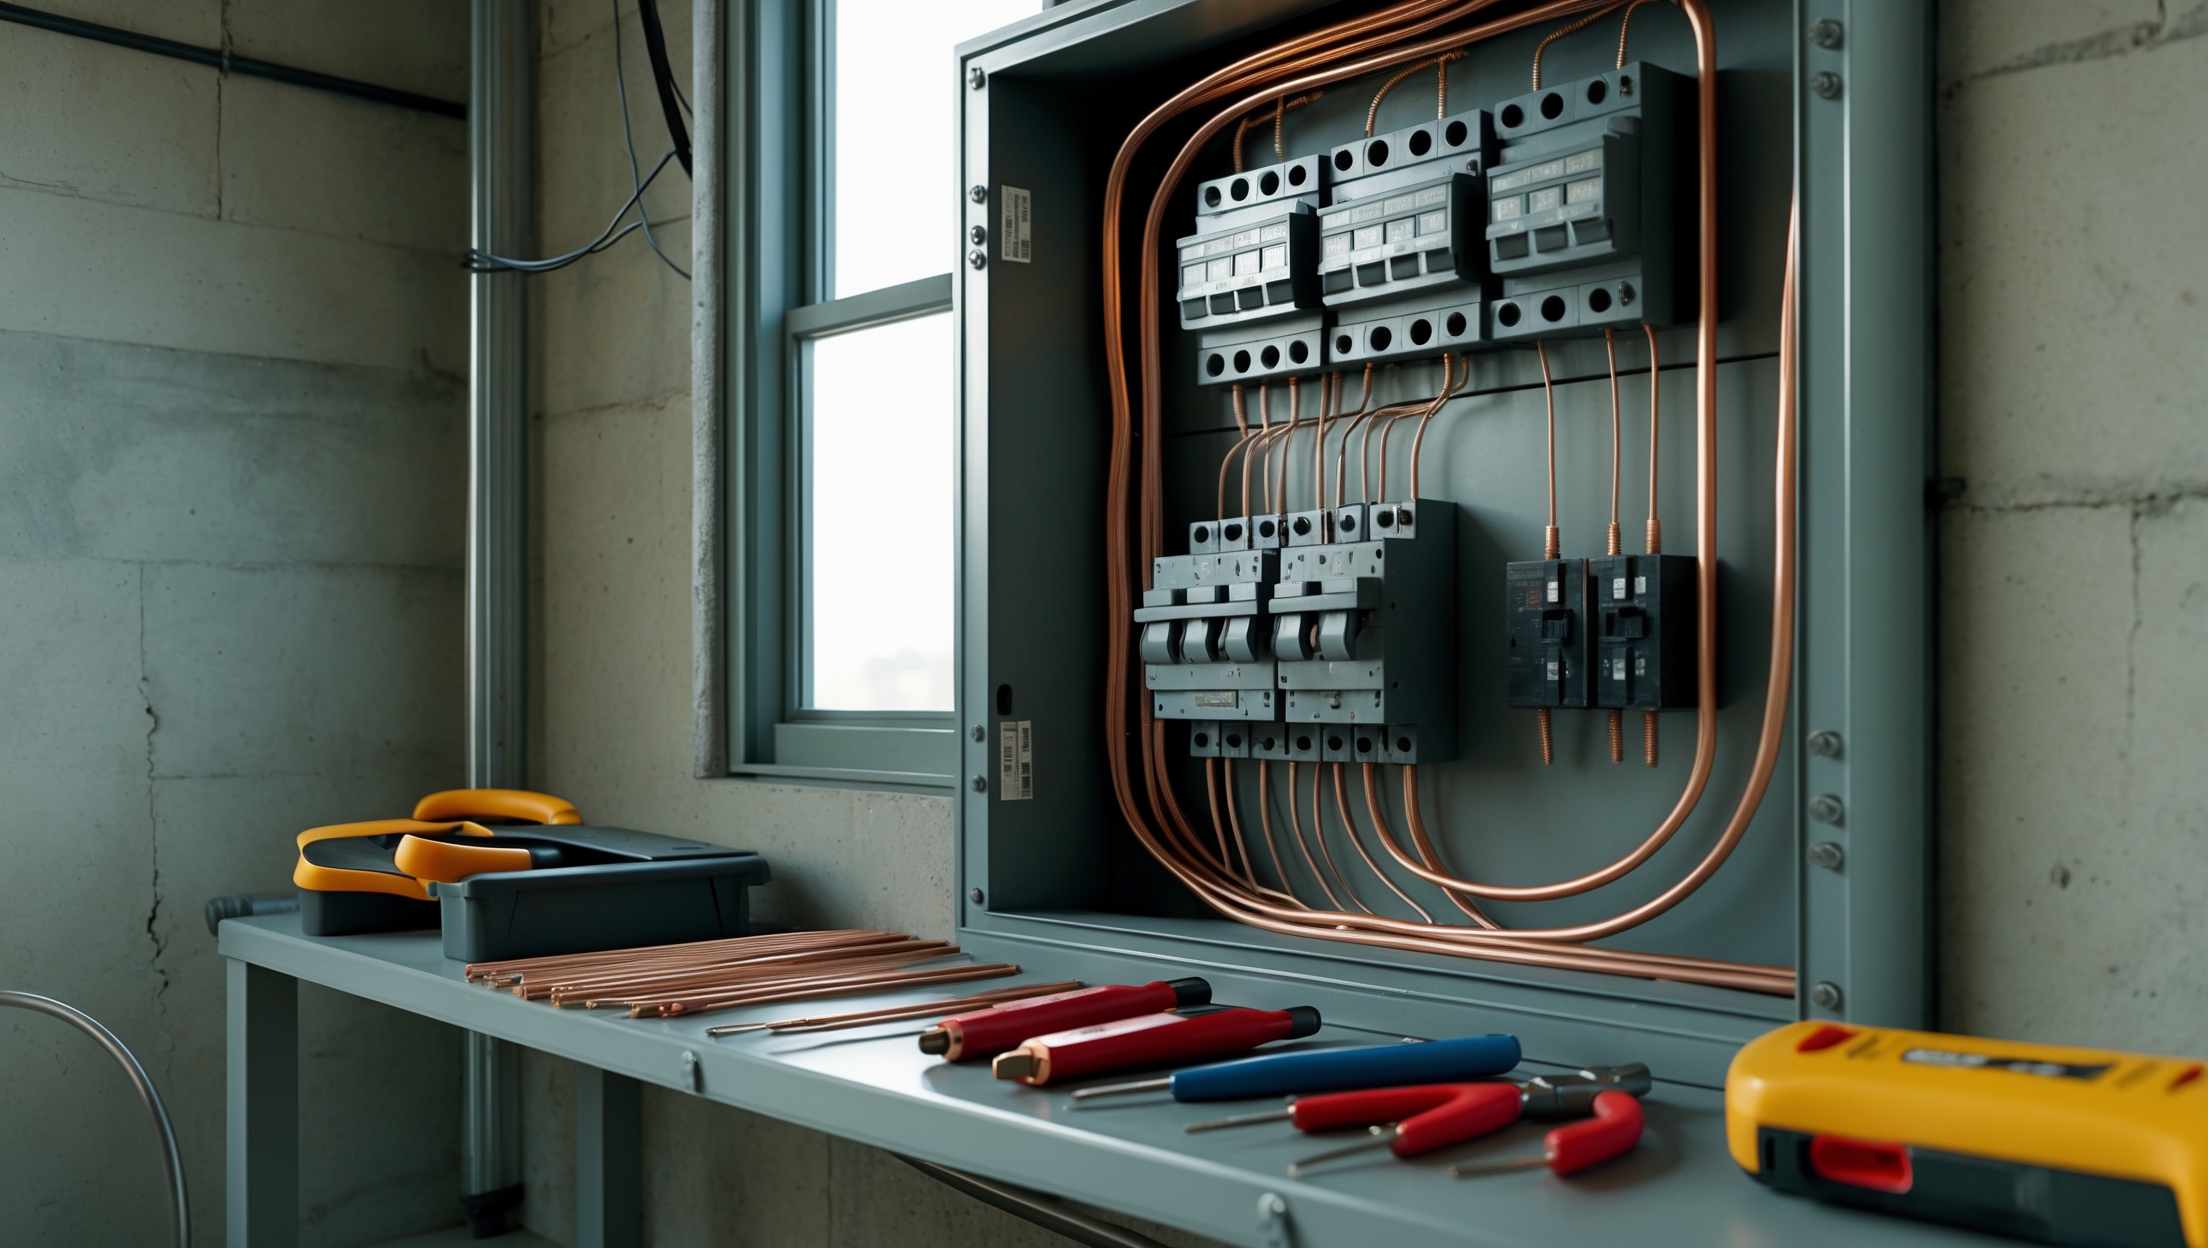
- Ground Rod: A copper or galvanized steel rod driven into the earth, connected to the main panel with a thick copper wire.
- Ufer Ground (Concrete-Encased Electrode): Uses rebar in concrete footings as a grounding electrode.
- Metal Water Pipe: Metal water pipes extending underground can serve as a grounding electrode—if uninterrupted by plastic sections.
Why Older Homes Fall Short
Many homes built before the 1970s rely on two-prong outlets and lack dedicated grounding wires. Some have obsolete methods, like grounding to a cold water pipe that’s since been replaced with plastic. Others may have no grounding at all, making electrical upgrades a matter of urgent safety.
Is Your Home Properly Grounded? Identifying Warning Signs
- Two-Prong Outlets: Most modern appliances require a ground. Two-prong outlets signal no ground wire is present.
- Frequent Tripped Breakers or Blown Fuses: Indicates electrical faults and possible grounding issues.
- Shocks from Appliances: A clear warning sign that grounding is inadequate or missing.
- Old Electrical Panels: Outdated fuse panels often lack true grounding connections.
If you’re unsure, a licensed electrician can test your outlets and panel for proper grounding using specialized testers.
Compliance and Code Requirements: Bringing Grounding Up to Standard
National Electrical Code (NEC) Guidelines
The NEC requires every residential electrical system to have a proper grounding electrode system and continuous grounding conductors. Key requirements include:
- At least two grounding electrodes (e.g., rods) spaced a minimum of 6 feet apart, unless a single electrode achieves sufficiently low resistance.
- Continuous copper or aluminum grounding wire from the main panel to the electrode(s).
- Bonding of metal water pipes, gas pipes, and other conductive systems to the electrical ground.
Local Codes and Permits
Local regulations may have additional or stricter requirements. Always check with your municipal building department and obtain the necessary permits before starting any electrical grounding work.
Insurance and Inspection Considerations
Insurance carriers may deny coverage or claims if your home lacks code-compliant grounding. Homes for sale may fail inspection without a proper upgrade, affecting resale value or delaying transactions.
Cost Breakdown: Budgeting for a Grounding System Upgrade
Materials
- Ground Rods: $15–$25 each (most homes require two)
- Grounding Wire (6 AWG copper recommended): $1.50–$2.50 per foot
- Acorn Clamps and Connectors: $5–$10 each
- Bonding Jumpers: $10–$20
- Meter Base Bonding Hardware: $15–$30 (if needed)
Labor
- Licensed Electrician: $75–$125 per hour (typical grounding system installation: 2–4 hours)
- Total Labor Cost: $200–$500, depending on access and complexity
Permits and Inspection Fees
- Permit: $50–$150, depending on location
- Inspection: Often included in permit fee
Total Estimated Cost
For most older homes, expect an all-in cost of $350–$800 for a professional upgrade (including materials, labor, and permits). DIYers can save on labor but must still budget for materials and permits.
Tools and Equipment: What You’ll Need
- Safety glasses and gloves
- Hammer drill or rotary hammer (for concrete)
- Sledgehammer (for ground rod installation)
- 6 AWG copper grounding wire
- Ground rods (8 ft, copper preferred)
- Ground rod clamps (acorn type)
- Wire stripper/cutter
- Screwdrivers and adjustable wrench
- Voltage tester or multimeter
- Tape measure
- Cable staples or supports
- Permit and inspection paperwork
Step-by-Step Guide: Upgrading Grounding in an Older Home
Step 1: Pull Permits and Notify Authorities
Contact your local building department to secure the necessary permits for electrical work. Most jurisdictions require inspection after installation.
Step 2: Choose Grounding Locations
- Locate a spot near your main service panel with at least 8 feet of soil depth for ground rods.
- If using Ufer or water pipe grounding, identify accessible, code-approved locations.
Step 3: Drive the Ground Rods
- Drive the first 8-foot ground rod into the earth (ideally within 12 inches of the exterior wall).
- Space the second rod at least 6 feet away.
- Use a sledgehammer or hammer drill with a ground rod driver bit for hard soil.
Step 4: Attach Grounding Wire
- Cut sufficient 6 AWG copper wire to run from the service panel to the ground rods.
- Strip ends and attach securely to each rod using an acorn clamp.
- Run the wire neatly along the wall, securing it with cable staples every 12–18 inches.
Step 5: Connect to the Main Service Panel
- Turn OFF main power at the main disconnect.
- Open the service panel. Locate the grounding bus bar (often labeled ‘GND’).
- Attach the wire with an approved lug or screw terminal.
- If required, bond the metal panel enclosure and any water or gas pipes to this ground using bonding jumpers.
Step 6: Inspection and Testing
- Schedule a final inspection with your local authority.
- Use a multimeter to verify continuity between the panel, ground rods, and bonded systems.
- Test outlets for proper grounding using a plug-in tester.
Step 7: Restore Power and Document
- Once passed, restore main power.
- Document the upgrade with photos and keep permit paperwork for insurance and resale purposes.
Bonding Metal Water and Gas Pipes: Essential Safety Step
Even if your home uses plastic supply lines, any remaining metal pipes should be bonded to the new ground. This ensures no stray voltage remains on conductive plumbing, preventing shock hazards.
- Use a #6 copper bonding jumper with appropriate pipe clamps.
- Bonding connections should be tight, corrosion-free, and accessible for inspection.
- Never use gas pipes as the sole ground electrode; bond only as a supplementary safety measure.
Special Considerations: Upgrading Outlets and Circuits
Once the main grounding upgrade is complete, consider upgrading two-prong outlets to three-prong grounded outlets. This may require running new wiring with a ground conductor from the panel to each outlet. Alternatively, install GFCI outlets for added safety where rewiring isn’t feasible (e.g., in finished walls), but remember this does not provide a true ground—only improved shock protection.
Maintenance Best Practices for Your Upgraded Grounding System
- Inspect visible grounding wires annually for corrosion, damage, or disconnection.
- Check ground rod connections after severe weather or landscaping work.
- Test outlets periodically for proper grounding with a plug-in tester.
- Keep documentation accessible for insurance or inspection purposes.
When to Call a Professional
Grounding upgrades involve serious safety risks, including electrical shock and fire if done incorrectly. Call a licensed electrician if:
- You’re uncomfortable working inside the main service panel.
- Your home has aluminum wiring or other outdated systems.
- You’re unsure about local code requirements or permit processes.
- Major rewiring or panel upgrades are required.
Conclusion: Invest in Safety, Compliance, and Peace of Mind
Upgrading electrical grounding in an older home is one of the most impactful safety improvements you can make. Not only does it protect against electrical shocks and fire, but it also ensures your system meets current codes—critical for insurance, resale, and long-term reliability. While the process involves careful planning, some upfront cost, and strict compliance with local regulations, the long-term benefits far outweigh the investment. A properly grounded system will protect your family, your property, and your valuable electronics for decades to come.
If you have the know-how, the right tools, and a clear understanding of code requirements, this is a manageable upgrade for experienced DIYers. Otherwise, partnering with a licensed electrician is the safest route—especially when dealing with the heart of your home’s electrical infrastructure. No matter your approach, regular inspection and maintenance will keep your upgraded grounding system performing at its best. Don’t wait for a shock or insurance issue to highlight the need for grounding: take proactive steps, and enjoy the security of a safer, code-compliant home.
You mention that grounding is often outdated or missing entirely in homes built before the 1970s. If a house still uses metal water pipes for grounding but has some sections replaced by plastic, what steps would you recommend to ensure compliance and safety?
When metal water pipes are partially replaced with plastic, the continuity needed for effective grounding is lost. To ensure compliance and safety, it’s best to install a grounding electrode system using ground rods driven into the earth and connect them to the main service panel with proper grounding conductors. Also, confirm that all bonding and connections meet current electrical codes. Consulting a licensed electrician can ensure the upgrade is both safe and code-compliant.
If I hire a pro to upgrade my grounding system, how disruptive is the process for daily operations in my business, and are there any code compliance steps I should be prepared for from the start?
Upgrading your grounding system usually involves running new wires and connecting them to proper ground rods or water pipes, which may require access to electrical panels and some areas behind walls. The disruption is generally minimal, but some brief power shut-offs are likely. For code compliance, be ready for inspections and permits. Your electrician should handle permits, but having your original electrical drawings handy can speed things up.
Could you provide a rough estimate of what it might cost to fully upgrade grounding in an old home? I want to make sure I budget correctly, and I’m not sure if hidden issues like inaccessible wiring could add to the expense.
A full grounding upgrade in an older home typically ranges from $2,000 to $6,000, but the actual cost can vary. Homes with difficult-to-access wiring, plaster walls, or outdated electrical panels may see higher expenses due to extra labor and materials. It’s wise to get a detailed quote from a licensed electrician, as they can assess your home’s specific needs and identify any hidden issues that might affect your budget.
Could you explain the pros and cons between using a ground rod versus a Ufer ground when upgrading grounding in older homes? I’m interested in which method is more cost-effective and whether some cities have regulations favoring one over the other.
A ground rod is usually cheaper and easier to install, especially in existing homes, but its effectiveness can depend on soil conditions. A Ufer ground, which uses the building’s concrete foundation with rebar, provides a strong ground but is typically only practical during new construction or major renovations. Some cities prefer Ufer grounds for new builds, but allow ground rods for upgrades in older homes. Always check your local code, as preferences and requirements can vary.
Can you explain what the typical upgrade process looks like if I’m hiring an electrician for a full grounding update in a 1960s home? I’m wondering how long it usually takes and if I’ll need to move out while the work is being done.
When upgrading grounding in a 1960s home, the electrician will usually inspect the current system, run new ground wires and install proper grounding rods. The process often takes 1 to 3 days, depending on your home’s size and complexity. Most of the work is non-invasive, so you typically won’t need to move out. However, you might experience brief power outages while circuits are worked on.
You mention cost considerations when upgrading grounding in older homes. Could you provide a ballpark range for what a full grounding system upgrade might cost a small business owner, and what factors can make that price go up or down?
For a small business owner, a full grounding system upgrade typically costs between $2,000 and $6,000. The final price depends on factors like the building’s size, accessibility to electrical panels, how outdated the current wiring is, and local permit fees. If walls or floors need opening for new wires, labor costs will be higher. Upgrades in historic or larger properties can also drive the price up, while straightforward access and minimal code issues can help keep costs down.
I live in a house built in the early 1960s, and I’m trying to figure out if the metal water pipe method is still considered safe or up to code today, especially if some of my plumbing has been updated to PVC. Would I need to install a ground rod instead?
If your home’s metal water pipes have been partially replaced with PVC, they likely no longer provide a reliable grounding path, making the water pipe method unsafe and not up to modern code. Current electrical codes generally require installing one or more ground rods outside the home in these situations. It’s a good idea to have a licensed electrician assess your setup to ensure your grounding system is both safe and code-compliant.
You touched on insurance compliance when upgrading grounding in older homes. Are there certain grounding upgrades that are usually required for homeowners’ insurance to approve coverage, or does it vary a lot between companies?
Requirements for grounding upgrades can vary significantly between insurance companies. Some insurers may insist on grounding systems that meet current electrical codes, especially for older homes, while others might only require basic safety improvements. It’s a good idea to check your home’s existing grounding, then contact your insurance provider to ask about their specific standards before starting any upgrades.
I’m planning to DIY some updates, but I’m not sure where to begin with the actual grounding upgrade process. Could you break down what the first few steps typically look like for an older home with outdated or missing grounding?
To start upgrading grounding in an older home, first turn off the main power for safety. Next, inspect your main electrical panel to see if a ground wire is present and connected to a ground rod or metal water pipe. If grounding is missing or inadequate, plan to install a new ground rod outside and run a copper grounding wire from the rod to the panel. Make sure all outlets and circuits are connected to this new ground. Working with or consulting a licensed electrician is highly recommended for safety and code compliance.
You mention both ground rods and Ufer grounds for updating systems—if my older house doesn’t have rebar in the foundation, is a ground rod usually sufficient to meet code, or are there situations where I’d need more than one grounding method?
If your home lacks foundation rebar, a ground rod is the most common solution. Usually, a single ground rod is enough if it provides a resistance of 25 ohms or less. If not, code often requires installing a second rod at least six feet away. Some local codes or inspectors may have additional requirements, so it’s wise to check with your local authority or a licensed electrician to be certain.
I noticed you mention grounding with metal water pipes, but what happens if part of the water pipe system was replaced with plastic over the years? Would that affect the safety or compliance of the grounding, and is there an easy way to check for this?
If your metal water pipes have been replaced with plastic sections, the electrical grounding system could be compromised, as plastic doesn’t conduct electricity. This can definitely affect both safety and code compliance. To check, trace the grounding wire from your electrical panel and see if it connects to continuous metal pipe. If any part is plastic between the panel and the earth, grounding may not be effective. For safety, consider having a qualified electrician inspect and possibly upgrade your grounding system.
Can you give an idea of how much the whole grounding upgrade might cost for a typical 1950s single-family home, especially if you have to switch from old metal water pipe grounding to a modern ground rod setup?
For a typical 1950s single-family home, upgrading from old metal water pipe grounding to a modern ground rod setup generally costs between $500 and $2,000. The final price depends on the home’s size, accessibility, local code requirements, and any needed electrical panel updates. Labor and materials like copper wire and ground rods are the main expenses. Getting a quote from a licensed electrician will give you a clearer estimate for your specific home.
If my older home’s grounding seems to be just a metal water pipe, how can I check if it’s still providing enough protection given the possibility of newer plastic pipe sections? Should I have an electrician inspect it before considering an upgrade?
If your grounding is connected to a metal water pipe, it’s important to check whether any part of the pipe has been replaced with plastic, as this can interrupt the grounding path and reduce protection. Since this can be hard to verify on your own, it’s wise to have a licensed electrician inspect the system. They can confirm if your grounding is still effective and recommend upgrades if needed to ensure your safety.
When following your step-by-step grounding upgrade, how much disruption should I expect in terms of wall access or downtime for my business if the electrical panel needs grounding work?
If your electrical panel needs grounding work, some wall access is usually required, especially near the panel and any areas where new grounding rods or wires are installed. Electricians may need to cut small openings for access and repairs. For a business, expect some downtime—usually a few hours—while the panel is worked on and power is shut off for safety. The exact disruption depends on your building layout and the complexity of the job, so discussing specifics with your electrician will help you plan around it.
Could you explain a bit more about the step-by-step process for homeowners who want to upgrade to a ground rod system themselves, versus using a Ufer ground? Is one more reliable or easier to add to an older home during renovations?
Upgrading to a ground rod system is usually easier for older homes, especially during renovations. Homeowners can drive one or two ground rods into the earth near the main panel, connect them with grounding wire, and bond the wire to the panel. Ufer grounds involve embedding a conductor in concrete, which is trickier unless you’re already pouring a new foundation or slab. Both methods are code-compliant, but ground rods are generally more practical for retrofits, while Ufer grounds are more reliable in dry soils if concrete work is already planned.
You mentioned both DIY upgrades and hiring a pro for grounding improvements. For someone with basic electrical experience, which parts of the grounding process are usually safe or practical to handle personally, and at what point is it best to call in a licensed electrician to avoid compliance or safety issues?
If you have basic electrical experience, tasks like visually inspecting existing grounding wires, cleaning connections, and installing simple grounding rods might be manageable. However, anything involving your main electrical panel, bonding to gas or water pipes, or interpreting local code requirements is best left to a licensed electrician. This helps ensure compliance and keeps you safe from potential hazards or code violations.
For an older house that still has metal water pipes but some sections have been replaced with plastic, does that mean the existing grounding is no longer effective? Would we need to install a new ground rod, or are there safer alternatives?
When metal water pipes are partially replaced with plastic, the continuity needed for grounding can be lost, making the existing system less effective or even unsafe. In this case, installing a new ground rod is often necessary to ensure proper grounding. There are also alternative methods, like using a concrete-encased electrode (Ufer ground), but a licensed electrician should assess your setup to recommend the safest and code-compliant solution.
Can you give a rough estimate of the typical cost to upgrade grounding in an older home? I’m trying to budget for renovations and want to know what factors might make the price go up or down.
Upgrading grounding in an older home usually costs between $1,500 and $3,000, but this can vary. Factors that affect pricing include the size of your home, accessibility of wiring, local code requirements, and the condition of your existing electrical system. If your panel needs upgrades or there are issues with outdated wiring, costs can be higher. Getting a few quotes from licensed electricians in your area will give you a more precise estimate.
You mention that insurance compliance can be affected by outdated grounding. Are there specific grounding upgrades that insurers require, or does it vary from one company to another?
Insurance requirements for electrical grounding can vary depending on the company and your location. Some insurers may simply want to see that grounding meets current code, while others could ask for specific upgrades like installing ground rods or updating the main service panel. It’s a good idea to check directly with your insurer to find out their exact expectations before starting any upgrades.
I own an older building from the early 1950s, and I’m confused about whether adding a ground rod is always necessary or if using the existing metal water pipe is enough for code compliance today. Can you clarify how inspectors determine which method is acceptable in older homes?
Inspectors follow current electrical codes, which often require both a ground rod and a metal water pipe for grounding if the water pipe is metallic, continuous, and at least 10 feet underground from the entry point. If the existing water pipe does not meet these requirements or could be replaced with non-metallic sections, a ground rod is necessary. Inspectors will check for continuity, pipe length, and material before deciding what’s acceptable for that specific home.
Could you clarify the typical cost range for upgrading grounding in an older home versus a full rewiring? I’m trying to budget for my upcoming renovation but not sure how much just the grounding update might run if I hire a pro.
Upgrading grounding in an older home typically costs between $800 and $3,000, depending on your home’s size and accessibility. In contrast, a full electrical rewiring can range from $8,000 to $20,000 or more. A grounding update usually involves installing new grounding rods, bonding, and updated wiring at the panel, which is far less invasive and expensive than rewiring the entire house.
You mention that upgrading electrical grounding is important for insurance compliance. Could you explain what kind of documentation or proof insurance companies typically require after a grounding upgrade in an older home?
Insurance companies usually want to see documented proof that your electrical grounding upgrade was done safely and up to code. This often means providing a copy of the electrician’s invoice or work order specifying the grounding work, along with a certificate of compliance or a signed inspection report from a licensed professional. In some cases, they may also ask for a municipal inspection approval if a permit was required. It’s a good idea to check directly with your insurer about their specific requirements.
In the step-by-step upgrade process, is it usually possible for a confident DIYer to handle adding a new ground rod and running a wire to the panel, or are there certain code compliance steps that always require a licensed electrician to sign off?
A confident DIYer can often physically install a new ground rod and run the grounding wire to the panel, but local codes may require your work to be inspected or signed off by a licensed electrician. Key steps like connecting the ground wire inside the panel can be risky and may need professional handling to ensure safety and code compliance. Always check your local electrical codes before starting.
The article mentions that upgrading grounding helps with insurance compliance. Is there a way to estimate what the upgrade could cost for a typical 1950s home, or what steps I should take to figure out a realistic budget before starting?
Upgrading electrical grounding in a 1950s home typically costs between $1,500 and $3,000, depending on size and condition. To estimate your budget more accurately, start by having a licensed electrician inspect your current system. They’ll assess what upgrades are necessary and provide a detailed quote. Gathering two or three estimates can help you compare prices and understand the scope of work needed for compliance and insurance purposes.
The article mentions grounding rods and Ufer grounds, but how do I figure out which method is best or even allowed for my house? Is there a big cost difference between these grounding options when upgrading an older home?
To choose the right grounding method, you’ll need to check your local electrical codes—some areas require grounding rods, while others allow Ufer (concrete-encased) grounds, especially in newer or recently renovated foundations. There can be a moderate cost difference: rods are usually less expensive and easier to install, while Ufer grounds may cost more if your home needs foundation work. Consulting a licensed electrician familiar with local code is the best way to determine what’s both compliant and cost-effective for your situation.
If my house still has the original metal water pipe grounding but part of the pipe inside the house was replaced with plastic, does that mean my grounding is no longer effective? Should I upgrade to the ground rod method, and is that a big job for an electrician?
If the original metal water pipe was replaced with plastic in any section, your grounding may no longer be effective because plastic doesn’t conduct electricity. In this case, upgrading to a ground rod system is recommended for safety and code compliance. Installing a ground rod is a common job for electricians—they can typically complete it in a few hours and ensure your system meets current standards.
I’m planning some DIY upgrades. Is it safe or even allowed by code to try connecting modern grounding to existing metal water pipes if there are some sections replaced with plastic, or would I need to install a completely new grounding system?
Connecting a modern grounding system to metal water pipes is only effective if the entire water line is metal and continuous into the earth. If any sections have been replaced with plastic, the grounding path is interrupted, making it unsafe and not code compliant. In this case, you would need to install a new grounding system, such as ground rods or a UFER ground, to meet safety and code requirements.
I’m planning to upgrade the grounding in my 1960s house, but I’m worried about the cost. Can you give a ballpark figure for a typical DIY grounding upgrade versus hiring a professional electrician? Are there parts of the process that are safe for a DIYer to handle to save money?
For a typical grounding upgrade, hiring a professional electrician usually costs between $800 and $2,500, depending on your home’s size and condition. DIY costs are lower, often $200 to $500 for materials like grounding rods, wire, and clamps. However, only basic tasks—such as driving a new ground rod or attaching clamps—are safe for DIYers. Any work inside your panel or modifying your electrical system should be left to a licensed electrician for safety and code compliance.
If my older home still has some metal water pipes but also newer plastic sections, does that mean the existing grounding isn’t reliable anymore? How would I know if my grounding system needs a full upgrade versus just some improvements?
When older metal water pipes are replaced with plastic, your grounding system can become unreliable, since plastic doesn’t conduct electricity. A licensed electrician can test your current grounding to see if it’s effective. If the ground path is interrupted or insufficient, a full upgrade with new ground rods or appropriate wiring may be needed. Sometimes, small improvements are enough, but an inspection will determine what’s safest for your home.
When you break down the upgrade costs, what’s the average difference between installing a ground rod versus adding a concrete-encased electrode, especially for a small commercial property? I want to budget realistically for upcoming renovations.
For a small commercial property, installing a ground rod typically costs between $150 and $400 per rod, including labor and materials. In contrast, adding a concrete-encased electrode (Ufer ground) generally ranges from $300 to $800, depending on site access and concrete work required. The Ufer ground is pricier due to additional labor and materials, especially if retrofitting into existing concrete. These are average costs—local rates and site specifics might affect your final budget.
You mention that grounding is essential for insurance compliance in older homes. Are there specific insurance providers or policy types that require a particular grounding method, like a ground rod versus a Ufer ground, or is meeting local code typically sufficient?
Most insurance companies don’t specify which grounding method you must use; they generally require that your home’s electrical system meets current local code requirements. Whether you use a ground rod, a Ufer ground, or another approved method usually depends on local regulations and what the inspector deems compliant. It’s always a good idea to check with your insurer, but code compliance is typically the main requirement.
When considering the costs of upgrading grounding in a home built before the 1970s, what are the most significant expenses homeowners should budget for, and are there any potential hidden costs that could come up during the process?
The largest expenses typically include hiring a licensed electrician and purchasing new grounding equipment, such as grounding rods, conductors, and upgraded panels if needed. Hidden costs can arise if outdated wiring is discovered, walls need to be opened and repaired, or if unexpected code violations are found during inspection. It’s wise to budget extra for unforeseen issues, as older homes often have surprises once work begins.
If I’m planning a phased renovation in an older property, what are the critical steps I should prioritize first to ensure electrical grounding meets code and insurance requirements, even before the rest of the upgrades are completed?
Before starting other upgrades, begin with a professional assessment of your current grounding system to identify any deficiencies. Make sure the main service panel is properly grounded with an approved grounding electrode. Upgrade the main bonding and grounding conductors if they are outdated. Address grounding for critical circuits, especially those supplying kitchens, bathrooms, and HVAC equipment. Keeping documentation of these steps will help with insurance and code compliance.
Once the grounding is upgraded as described, are there any particular signs or tests I should look for to confirm everything was done correctly before I start using high-powered electronics again?
After upgrading your grounding, it’s important to have a licensed electrician test the system using a multimeter or a ground resistance tester to confirm the ground connection meets current code. You should also check that all outlets are properly grounded, especially those for high-powered appliances. If you notice any buzzing, hot outlets, or flickering lights, stop using your electronics and consult a professional.
If an older home only has metal water pipe grounding and parts of the pipe have been replaced with plastic over time, how would that impact overall safety and code compliance? Is running a new ground rod usually sufficient, or would you recommend completely redoing the system?
When metal water pipes are partially replaced with plastic, the grounding path can be interrupted, making the system unsafe and not code compliant. Installing a new ground rod is usually required, but you should also connect it properly to your main panel. In many cases, a new ground rod system is sufficient, but a licensed electrician should assess your setup to ensure full compliance and safety, as the specifics can vary.
For someone budgeting a DIY upgrade to their grounding system, what are the main costs to expect, and are there common pitfalls that could increase the total expense during the process?
When budgeting for a DIY grounding system upgrade, the main costs are materials like copper grounding rods, wire, clamps, and possibly a ground bus bar. You may also need tools like a hammer drill or post driver. Permit fees can add to the total. Common pitfalls that increase costs include buying the wrong materials, damaging existing wiring, or failing inspections due to code issues, which may require rework or hiring a professional to fix mistakes.
If I decide to tackle grounding upgrades myself in a pre-1970s home, what are some common mistakes homeowners make that could affect code compliance or safety, and how can I avoid them?
Some common mistakes include using undersized ground wires, failing to bond all metal boxes and water pipes, or not connecting the ground wire securely to the panel and grounding electrode. Skipping permits or inspections is another pitfall. To avoid these, always follow the latest NEC guidelines, use proper materials, and double-check all connections. If in doubt, consulting a licensed electrician is the safest route.
You mentioned that grounding upgrades are important for insurance and safety, but I’m curious about how much a typical DIY grounding upgrade might cost for a 1950s home. Are there any common unexpected expenses I should plan for?
For a 1950s home, a DIY grounding upgrade can cost anywhere from $200 to $800 if you’re just installing grounding rods, clamps, and adding grounding wires to outlets. However, unexpected costs can arise if you discover old or damaged wiring, need to replace ungrounded outlets with grounded ones, or have to upgrade your electrical panel. Hiring an electrician for certain parts might also be necessary if local codes require it.
I have an older house that might still be using metal water pipes for grounding, but I’m not sure if there are any plastic sections in the system now. How can I tell if my grounding is actually effective or if I need to upgrade to a different method?
To check if your grounding is effective, look for any plastic sections in your water pipe where the ground wire attaches. Plastic breaks the electrical connection, making the ground ineffective. If you find any plastic, or if you’re uncertain, it’s safest to have a licensed electrician test the continuity and effectiveness of your grounding. If your grounding is compromised, upgrading to ground rods or another approved method is recommended for proper safety.
For older homes that only have metal water pipes as grounding, how can I tell if plastic sections interrupt the connection, and what should I do if they do?
To check if plastic sections interrupt your water pipe grounding, look for any visible plastic pipe repairs or replacements along your water line. You can also use a continuity tester or multimeter to check electrical continuity between the grounding connection and the water main. If plastic does break the path, you’ll need to install a dedicated ground rod or upgrade your grounding system to ensure safe and code-compliant grounding.
For someone living in an older house who isn’t very experienced with electrical work, are there any initial checks or signs to look for to figure out if the grounding system might be unsafe or outdated before calling an electrician?
Yes, there are a few things you can safely check yourself. Look for two-prong outlets, which often indicate a lack of grounding. Check your main electrical panel for a ground wire—typically a bare or green wire running to a metal rod or pipe outside. Also, be alert for signs of trouble like frequent blown fuses, shocks when touching appliances, or flickering lights. If you notice any of these, it’s wise to call an electrician for a full inspection.
If I want to tackle some grounding upgrades myself, which steps from your guide are generally safe for a skilled DIYer to handle, and at what point should I definitely call in a licensed electrician to ensure code compliance?
A skilled DIYer can often safely handle tasks like replacing old outlet covers with grounded ones, testing outlets for grounding, and installing grounding adapters. However, if you need to run new grounding wires, upgrade your main service panel, or make any changes to the main electrical system, it’s best to call a licensed electrician. These jobs require expert knowledge to meet local codes and ensure your home’s safety.
I’m trying to budget for upgrading the grounding in my 1950s house. Could you give a rough estimate of how much it typically costs for a professional to install a ground rod and update the main panel connections?
For a typical 1950s house, having a professional electrician install a ground rod and update the main panel connections usually costs between $300 and $800. The price can vary based on your local rates, accessibility, and the condition of your current setup. It’s a good idea to get a few itemized quotes from licensed electricians to find out what applies to your specific situation.
I noticed you mentioned different grounding methods like ground rods and metal water pipes—are there situations where one method is preferred or safer than another for specific types of older homes?
Yes, the best grounding method can depend on the home’s age and construction. For older homes with metal water pipes that are in good condition and continuous to the street, grounding to the water pipe is often effective and code-compliant. However, if pipes have been replaced with plastic or are corroded, ground rods are safer and more reliable. Sometimes, both methods are used together for added safety and to meet local codes.
You mention that upgrading grounding is key for insurance compliance. Do insurance companies actually check grounding systems during home inspections, and could a lack of proper grounding impact coverage or claims?
Insurance companies often require proof that a home’s electrical system meets current safety standards, especially when issuing or renewing policies. During a home inspection, an inspector may check for proper grounding, particularly in older homes. If grounding is inadequate or not up to code, insurers might require upgrades before providing coverage, or they could exclude certain claims related to electrical issues. It’s always wise to confirm your home’s grounding meets local codes to avoid problems with insurance claims.
Could you give more detail on the typical costs for upgrading grounding in a home with a finished basement? I’m curious if having limited access to wiring or concrete affects the budget significantly.
Upgrading electrical grounding in a home with a finished basement can be more expensive than in unfinished spaces. Limited access often means electricians need to work around finished walls and concrete, which can increase labor time and may require patching afterward. Costs typically range from $1,500 to $3,500, depending on the home’s size and how accessible the wiring is. Concrete floors and finished ceilings may push costs higher due to the extra work involved.
You mention cost breakdowns for upgrading grounding systems—could you provide a ballpark range for what a pro might charge to bring an older home’s system up to current code, and whether certain methods like ground rods versus Ufer grounding tend to be more affordable?
For upgrading an older home’s grounding to current code, professional electricians typically charge between $800 and $2,500, depending on home size, accessibility, and local rates. Ground rod installations are usually on the lower end of this range since the materials and labor are straightforward. Ufer grounding (using concrete-encased electrodes) can cost more, especially if retrofitting is required, as it often involves more labor and materials. Prices can vary, so getting multiple quotes is a good idea.
I’m planning a DIY grounding upgrade and noticed you mention both ground rods and Ufer grounds. If my house has a concrete slab foundation, would it be better to try for a Ufer ground, or just stick with installing a traditional ground rod?
If your home has a concrete slab foundation, a Ufer ground (concrete-encased electrode) is often considered superior to a traditional ground rod because it offers better conductivity and durability, especially in dry soils. If your slab exposes at least 20 feet of rebar or wire within the concrete, it’s very effective and meets code. However, adding a Ufer ground after construction can be difficult. If you can’t access the rebar, installing one or more ground rods is a reliable and code-compliant option for most upgrades.
When budgeting for a grounding upgrade in an older house, what are the main factors that can cause costs to go up unexpectedly during the process? I’m trying to plan ahead before bringing in a pro.
Unexpected cost increases often come from discovering outdated or damaged wiring behind walls, needing to upgrade electrical panels, or finding that existing metal water pipes or ground rods aren’t up to current code. Access issues, like finished basements or tight crawl spaces, can also raise labor costs. Getting a thorough inspection before work starts can help you identify potential surprises and budget more accurately.
You mention costs are broken down, but could you give a ballpark estimate for upgrading the grounding system in a 1960s commercial space? I want to make sure I budget properly before bringing in a professional.
For a 1960s commercial space, upgrading the electrical grounding system typically ranges from $2,500 to $7,000, depending on factors like building size, existing wiring, accessibility, and local code requirements. Larger or more complex spaces may see higher costs. It’s wise to get a few professional quotes for a more accurate estimate tailored to your building’s specifics.
After upgrading the grounding system in an older home, are there any specific checks or inspections required to ensure it meets current electrical codes and insurance requirements?
Yes, after upgrading the grounding system in an older home, it’s important to have a licensed electrician perform a thorough inspection to confirm that the work meets current electrical codes. You may also need an official inspection by your local building authority, as many areas require this for code compliance and insurance purposes. Once inspected, keep records of the upgrade and approval, since insurance companies often request documentation to verify your home’s electrical safety.
You mentioned that older homes often have grounding systems that are incomplete or missing. If my house uses metal water pipes for grounding but some sections have been updated with plastic piping, does that compromise the safety of the system, and should I look into additional grounding methods?
Yes, using metal water pipes for grounding can be compromised if parts of the piping have been replaced with plastic. Plastic sections break the electrical connection needed for proper grounding, which can reduce safety and code compliance. You should have a qualified electrician assess your system and likely add a dedicated grounding electrode, such as a ground rod, to ensure your home is properly and safely grounded.
For older homes where the grounding system is missing or incomplete, how do you determine whether a ground rod, Ufer ground, or metal water pipe is the best method to use when upgrading, especially if the original construction details are unknown?
When upgrading grounding in older homes with unknown construction details, it’s best to assess available options at your property. If you have accessible, continuous metal water pipes that run underground, they can be used, but must meet code requirements. If not, ground rods are usually the easiest and most reliable method. Ufer grounds are ideal if you have concrete foundations with embedded rebar, but this is hard to verify without construction records. Consulting a licensed electrician ensures the chosen method meets local code and site conditions.
I live in a 1960s house and the main ground appears to be a metal water pipe, which I read can be outdated. If parts of the pipe have been replaced with plastic over the years, what’s the best way to verify that my system is properly grounded?
When metal water pipes have been partly replaced with plastic, the continuity of your ground path could be interrupted, making the grounding unreliable. To verify proper grounding, have a licensed electrician test your system with continuity and resistance checks from your panel to the grounding electrode. They may recommend installing a dedicated ground rod outside as a safer, up-to-date solution if the water pipe ground is no longer continuous.
If my older property still has metal water pipes but some sections have been replaced with plastic, does that mean I can no longer rely on those pipes for proper electrical grounding? What should I do in that situation?
If your metal water pipes have been partly replaced with plastic, you can no longer rely on them for effective electrical grounding. Plastic does not conduct electricity, so the grounding path may be interrupted. In this case, you should have a licensed electrician install a dedicated grounding electrode, such as ground rods, to ensure your electrical system is safe and compliant with current codes.
You explain that older homes often have missing or outdated grounding—how can I tell if my 1950s house is properly grounded, and are there any simple tests a DIYer can do before calling an electrician?
To check for grounding in your 1950s house, look for three-prong outlets—older two-prong ones often lack grounding. You can buy an inexpensive outlet tester at a hardware store; plug it into outlets to see if they’re properly grounded. For a more thorough check, use a multimeter to test between the hot and ground slots. If you’re unsure or find inconsistencies, it’s safest to consult an electrician.
I have an older house built in the early 60s, and I’m realizing it probably just has the original metal water pipe grounding. If I find that some sections of pipe have been replaced with plastic over time, does that mean the whole grounding system is compromised? What’s the best way to check?
If parts of your original metal water pipe have been replaced with plastic, the electrical grounding can indeed be compromised because plastic does not conduct electricity. The best way to check is to have a licensed electrician inspect your grounding system. They can test for continuity and ensure your home has a safe, code-compliant ground, possibly recommending an upgrade to a ground rod or an alternative approved method if needed.
I want a ballpark figure for what it might cost to upgrade grounding in an older small storefront—do you cover what drives cost differences, like the type of grounding method or the condition of the existing wiring, in your guide?
Yes, the article discusses the main factors that influence the cost of grounding upgrades, such as the type of grounding method used and the condition of the existing wiring. For a small older storefront, costs can vary widely, often ranging from several hundred to a few thousand dollars depending on these factors. The guide helps you understand what might affect your specific situation, so you can better estimate and plan your upgrade.
If my house was built in the 1950s and still has some ungrounded outlets, what’s the best way to prioritize grounding upgrades for safety and insurance reasons? Should I start at the main panel, or focus on outlets and circuits used for sensitive electronics first?
For a 1950s home, it’s smart to prioritize grounding upgrades for outlets that power sensitive electronics, kitchen and bathroom circuits, and any areas with heavy appliance use, as these are higher risk and more important for safety and insurance. However, before upgrading outlets, have a licensed electrician inspect your main panel and overall grounding system to ensure it’s up to modern code, which is essential for any further improvements to be effective.
If my older home still has a metal water pipe grounding system but part of the plumbing was updated with plastic pipes, does that compromise the effectiveness of the ground? Would I need to add a ground rod or upgrade the entire system?
Yes, replacing sections of metal water pipe with plastic does compromise your electrical grounding since plastic doesn’t conduct electricity. This breaks the continuity and weakens the ground path. You should install a ground rod or an approved grounding electrode system to ensure your home’s electrical safety and compliance with current codes. It’s best to have a licensed electrician assess your setup to recommend the safest upgrade.
In your experience, what’s the ballpark cost for upgrading an older home from a metal water pipe grounding method to something more up-to-date like a ground rod? I’m trying to budget for a property built in the 1950s and want to be sure I’m considering all expenses.
For a 1950s home, upgrading from metal water pipe grounding to a modern ground rod system typically costs between $300 and $800 in most areas. This covers materials, installation, and basic inspection, but can go higher if the electrical panel needs additional work or if local codes require multiple ground rods or extra bonding. It’s always wise to get a few quotes from licensed electricians to ensure accurate budgeting for your specific situation.
You mentioned that costs for upgrading grounding can vary—do you have any ballpark estimate for what a professional service would charge to upgrade a typical 1950s home’s grounding system? I’m trying to budget for a renovation and want to be prepared.
For a typical 1950s home, upgrading the electrical grounding system professionally can range from $800 to $2,500, depending on factors like home size, local code requirements, and the complexity of the job. If the service panel needs upgrading as well, costs can be higher. It’s best to get a few quotes from licensed electricians in your area to get a more accurate estimate for your specific situation.
If my older home still has some original metal water pipes but parts have been replaced with plastic over the years, is it still possible to use the remaining metal pipe for grounding, or would I need to switch entirely to a ground rod?
If your home’s metal water piping has been interrupted by plastic sections, it no longer provides a continuous, reliable path for grounding. In this case, you shouldn’t use it as your primary ground. The safest and code-compliant solution is to install one or more ground rods outside your home and connect your electrical system to them with the proper gauge wire.
You mention that grounding upgrades ensure insurance compliance. Are there specific documents or certifications I should obtain from an electrician after the upgrade to satisfy insurance requirements or potential home inspections?
After a grounding upgrade, ask your electrician for a Certificate of Compliance or an Electrical Safety Certificate, which states that the work meets current codes. Also request a detailed invoice describing the work completed. These documents are useful for insurance and home inspections, as they show the grounding was professionally updated and code compliant.
If my older home still has original metal water pipes but portions have been replaced with plastic, does that mean I can’t use the water pipe grounding method anymore? How do I check if my current setup is actually providing proper grounding?
If parts of your water pipe have been replaced with plastic, you can no longer rely on the water pipe as a grounding method because plastic sections interrupt the electrical path. To check if your current setup is properly grounded, consider using a qualified electrician to test continuity and measure ground resistance. Visual inspection alone isn’t enough for safety, so professional testing is essential.
I’m renovating a 1950s house and just found out the electrical system has no grounding at all. What are the first steps I should take before hiring an electrician, and is it safe to use appliances in the meantime?
If your home’s electrical system has no grounding, it’s important to minimize appliance use, especially for high-powered or metal-cased devices, since there’s an increased risk of electric shock. Before hiring an electrician, make a list of all outlets and circuits, note any signs of electrical issues, and gather documents like previous inspection reports. Avoid DIY fixes—waiting for a qualified electrician to assess and plan a safe grounding upgrade is best.
For a small business operating out of an older residential property, is there a difference in grounding requirements compared to a regular home, and does upgrading affect insurance premiums?
Yes, small businesses may face stricter grounding requirements than regular homes, depending on local codes and the type of equipment used. Upgrading your electrical grounding can improve safety and may positively influence your insurance premiums, as insurers often view such upgrades as risk reduction. Check with your local inspector and insurance provider for specific requirements and potential premium impacts.
If my older home still has many of the original metal water pipes, but some have been replaced with plastic over the years, does that affect the effectiveness of grounding? How can I tell if my system is still compliant and safe?
When metal water pipes are replaced with plastic, it can interrupt the electrical grounding path, reducing the system’s effectiveness and safety. Plastic doesn’t conduct electricity, so your grounding may no longer be compliant. To check compliance and safety, have a licensed electrician inspect your grounding system. They can test continuity and ensure your home meets current electrical codes.
When upgrading the grounding in an older home, how do I know if my existing metal water pipe can still be used, especially if I’m not sure about plastic sections being added during previous plumbing work?
If you’re unsure whether plastic sections have been added to your metal water pipe, it’s important to confirm that the pipe provides a continuous metal path to the ground outside. Even a small section of plastic interrupts the grounding path and makes the pipe unusable for grounding. You can visually inspect any accessible pipe areas and ask a licensed electrician or plumber to trace the line and check for non-metallic parts. If there’s any doubt, it’s safest to install a dedicated grounding electrode, like a ground rod.
If my older home still has the original metal water pipe grounding setup but I’ve since had some of the piping replaced with plastic, do I need to install a new ground rod or can this system still be considered safe and compliant?
If sections of your original metal water pipe grounding system have been replaced with plastic, your grounding may no longer be continuous or code-compliant. Plastic sections interrupt the electrical path to earth, making the system unsafe. In most cases, you should install a proper ground rod (or rods) to meet code and ensure safety. It’s a good idea to have a licensed electrician inspect your setup to confirm what’s needed.
I live in a house from the 1950s and I’m wondering, how can I tell if my existing metal water pipe actually still offers effective grounding, especially if some parts may have been replaced with plastic? Are there specific signs or tests I can do before hiring an electrician?
If your metal water pipe has been partly replaced with plastic, grounding may no longer be continuous or effective. A visible sign is any section of non-metallic (plastic) pipe that breaks the metal path from the ground rod to your electrical panel. For a quick check, look for plastic connectors or segments. You can also use a continuity tester or multimeter to check for a continuous metal connection between your panel and where the pipe enters the ground. If continuity is broken, grounding could be compromised, and it’s wise to have an electrician verify and upgrade if needed.
You mention that grounding upgrades are essential for insurance compliance in older houses. Do most insurance companies require a full grounding overhaul, or are there specific minimum standards I should be aware of before getting work done?
Most insurance companies require that your home’s electrical system meets current safety codes, but the exact standards can vary. Some may only require that certain circuits, like those in kitchens or bathrooms, are properly grounded, while others might expect a complete system overhaul. It’s best to check your policy or speak with your insurer directly to understand their specific requirements before starting any upgrade.
For a small shop I run out of a converted garage in an older home, what steps do I need to take to make sure all my equipment is properly protected with modern grounding, and is there a checklist I should follow before scheduling an inspection?
To ensure your shop’s equipment is properly grounded, start by checking that all outlets have a ground wire and upgrade any two-prong outlets to three-prong. Inspect your service panel for a proper ground connection, usually to a ground rod or metal water pipe. Use a tester to confirm grounding at each outlet. Label circuits, check for GFCI protection where needed, and address any old or damaged wiring. Before scheduling an inspection, create a checklist: upgrade outlets, verify grounding, inspect panel connections, test outlets, and ensure GFCI coverage. This will help you address issues before the inspector arrives.
When budgeting for an electrical grounding upgrade in an older property, what are the primary cost drivers that homeowners should watch out for? Are labor or materials typically the more significant expense in most retrofit projects?
When upgrading electrical grounding in older homes, the main cost drivers are often the amount of rewiring needed, accessibility of existing wiring (like finished walls or tight crawl spaces), and the need to update your electrical panel. Labor generally makes up a larger portion of the expense than materials because retrofitting usually requires skilled electricians and can be time-intensive, especially in older structures.
If I’m considering upgrading the grounding myself, are there any parts of the process that absolutely require a licensed electrician for compliance or insurance reasons? I want to make sure I don’t miss any legally required steps.
Upgrading electrical grounding often involves work inside your main panel or meter base, which usually requires a licensed electrician by law. Many local codes mandate permits and inspections for grounding upgrades, especially if you’re connecting grounding electrodes (rods) or bonding to water pipes. Insurance policies may also require that all electrical work is performed or certified by a licensed pro. Always check your local regulations before starting, as skipping these steps can void coverage or create safety hazards.
Can you give a rough estimate on what it typically costs to upgrade grounding in an older house, including what factors might make the costs go up or down?
Upgrading grounding in an older home often costs between $800 and $2,500, but this can vary. Costs might go up if your electrical panel is outdated, if rewiring is needed throughout the home, or if your property is large. If access to wiring is easy and the project is straightforward, the cost could be on the lower end. Always get a detailed estimate from a licensed electrician to understand your specific situation.
For someone budgeting a grounding upgrade in a pre-1970s home, does the cost estimate typically include potential issues like removing sections of plastic water pipe to restore metal continuity, or should those be considered additional expenses?
The typical cost estimate for grounding upgrades in older homes usually covers standard grounding work but does not automatically include fixing issues like replacing plastic water pipe sections to restore metal continuity. Such additional tasks are often considered extra expenses because they can vary greatly between homes. It’s a good idea to discuss potential complications with your electrician beforehand to get a more accurate, all-inclusive quote.
If I’m renovating an older house myself, at what point in the project should I prioritize upgrading the electrical grounding? Is it something that needs to happen before rewiring or can it be done after other electrical improvements are made?
Upgrading electrical grounding should be one of the first steps in your renovation, ideally done before or alongside any rewiring. This ensures all new work is safely grounded, meeting current safety codes. If you upgrade wiring without proper grounding in place, you may risk safety issues or have to redo work later. Always make sure grounding is addressed early in your electrical updates.
You mentioned upgrading to a ground rod system. Is this something a DIYer can realistically handle, or does it require an electrician for proper compliance and inspection? What safety precautions should someone take before attempting this upgrade themselves?
Installing a ground rod system does require careful attention to safety and local electrical codes. While some experienced DIYers might handle the physical part (like driving the rod and attaching the wire), it’s important to note that improper installation can be hazardous. You should always turn off the main power, use approved materials, and follow NEC code. In many areas, an electrician must do the work and arrange inspection for it to be legal. It’s safest to at least consult a licensed electrician before you start.
When you mention that grounding is often missing or outdated in homes built before the 1970s, how can I tell if my older house actually has any functional grounding currently in place? Are there visible signs I can check myself before calling in an electrician?
You can start by checking your outlets—if they have only two prongs, they likely aren’t grounded, while three-prong outlets may indicate grounding but aren’t a guarantee. Look inside your electrical panel; a bare copper or green wire connected to a grounding bar is a positive sign. However, the only way to be certain is to have an electrician test the system, as visual cues alone can be misleading.
If my older house still has some parts using metal water pipes for grounding but there are also plastic sections in the plumbing, does that completely eliminate its effectiveness as a grounding method? Should I plan to switch over to a ground rod instead?
If your home has plastic sections in the water pipe, the continuity of the grounding path is broken, making metal water pipe grounding unreliable and potentially unsafe. In this case, you should plan to install an approved ground rod or grounding electrode system to ensure your home’s electrical system is properly grounded and up to code.
Can you explain more about the differences between using a ground rod versus a Ufer ground in older homes? Is one method considered safer or more cost-effective when upgrading the grounding system during renovations?
A ground rod is a metal rod driven into the earth, while a Ufer ground uses the building’s concrete foundation with embedded rebar as the grounding electrode. In older homes, ground rods are simpler and cheaper to install, but Ufer grounds offer lower resistance and are often considered safer, especially in dry soil. If your home has a concrete foundation, upgrading to a Ufer ground can provide better overall performance, though installation is more complex and may cost more during renovations.
You mention that grounding is essential for insurance compliance in older homes. Are there specific requirements insurance providers look for after an electrical grounding update, and do they require inspection documentation?
Insurance providers often require proof that your home’s electrical system is properly grounded, especially after an upgrade. They typically look for documentation such as an electrical inspection report or a certificate from a licensed electrician confirming the work meets current codes. Some insurers may even request a copy of the inspection or ask about the type of grounding system installed before renewing or issuing a policy.
The article mentions that proper grounding is important for insurance compliance. How do I find out what specific grounding requirements my insurance company or local code might expect for homes built before the 1970s?
To determine specific grounding requirements for your older home, first contact your home insurance provider—they can clarify what standards or documentation they need for compliance. Next, check with your local building department or a licensed electrician about local electrical codes for homes built before the 1970s, as codes and required upgrades can vary by area. This two-step approach ensures you meet both insurance and legal requirements.
How long does a typical electrical grounding upgrade take in an older home, and would all the work usually require permitting or inspections for insurance compliance?
An electrical grounding upgrade in an older home usually takes one to three days, depending on the home’s size and accessibility. Most local regulations require permits for this kind of electrical work, and inspections are generally necessary to ensure the upgrade is safe and code-compliant. Insurance companies often ask for proof of inspection, so it’s important to check with your local authority and insurer before starting.
If my older home still has a metal water pipe as its original ground, but I recently had some sections replaced with plastic, does that mean my grounding system is now ineffective? What’s the best way to check or upgrade in this situation?
When metal water pipes are replaced with plastic, any new plastic section interrupts the electrical continuity, which can make your grounding system ineffective. To check the integrity of your ground, a licensed electrician can test the resistance between your panel and the grounding point. If your ground is compromised, it’s best to upgrade by installing a ground rod (or rods) driven into the earth and bonding it to your panel with appropriate gauge wire, following current code requirements.
The article mentions that grounding upgrades are essential for both safety and insurance compliance. Could you clarify whether most insurance companies require a specific type of grounding method, like ground rods versus Ufer grounds, for older homes to meet their standards?
Most insurance companies don’t specify a particular grounding method, like ground rods or Ufer grounds, as long as the system meets local electrical codes and provides adequate safety. The key is compliance with current code requirements in your area. It’s always a good idea to check with your insurance provider and local authorities to ensure the chosen grounding method is acceptable for your home’s age and location.
If my older home still has metal water pipes, how can I tell if they are actually being used as a grounding method or if the system needs upgrading to include a ground rod?
To check if your metal water pipes are being used for grounding, look for a thick bare or green wire clamped to the pipe near where it enters your home, often close to your main electrical panel. If you see this, it’s likely part of your grounding system. However, if your plumbing has been partly replaced with plastic or if you’re unsure of the connection’s integrity, you may need an electrician to test continuity and confirm proper grounding. In many cases, adding a ground rod is recommended or required for added safety and code compliance.
For someone renovating an older home, what’s the most critical first step to ensure electrical grounding is truly up to code? Is it a panel inspection, testing the existing grounding electrode, or something else before any rewiring starts?
Before starting any rewiring, the most critical first step is to have a licensed electrician perform a comprehensive inspection of your electrical panel and the existing grounding system. This should include checking the main service panel and testing the grounding electrode to confirm they meet current code requirements. Identifying deficiencies at this stage will guide safe and compliant upgrades throughout your renovation.
You mentioned upgrading grounding for insurance compliance in older homes. Do most insurance companies actually require proof of an upgraded grounding system, or is it just recommended for safety? If so, what kind of documentation would they typically ask for?
Most insurance companies don’t universally require proof of an upgraded grounding system, but some may request it, especially if your home is older or you’re buying a new policy. Requirements vary by insurer and region. If they do ask for documentation, they typically accept a licensed electrician’s inspection report or a certificate confirming the home’s electrical grounding meets current safety codes.
Could you expand a bit more on how insurance compliance is affected by outdated or missing grounding in older homes? Are there specific scenarios where insurers might deny a claim if grounding hasn’t been properly upgraded?
Insurance companies often require homes to meet current electrical safety standards, which include proper grounding. If your home lacks proper grounding and this is discovered after an incident like electrical fire or shock, insurers might deny claims, arguing that non-compliance contributed to the loss. This is especially likely if grounding issues were noted in inspections or if outdated wiring is involved. It’s a good idea to check your policy and ensure any upgrades are documented.
You mentioned different grounding methods like ground rods and Ufer grounds. For homes that already have a metal water pipe used for grounding, how can I tell if it meets current code or if an upgrade is needed?
If your home uses a metal water pipe for grounding, check that the pipe is at least 10 feet in direct contact with the earth and electrically continuous. Modern code also requires a supplemental ground, like a ground rod. Have a licensed electrician inspect your system to confirm both the pipe and any connectors are corrosion-free and properly bonded, and to determine if an upgrade is necessary for compliance.
Can you give a rough estimate of what the upgrade might cost if I hire a professional versus doing some of the grounding work myself? I’m trying to figure out how much of the process is realistic for a DIYer in an older home.
Upgrading electrical grounding in an older home typically costs between $1,500 and $3,000 when hiring a professional, depending on your home’s size and existing wiring. If you’re comfortable with basic tasks like installing ground rods or running some wire, you could lower costs by a few hundred dollars, but key aspects—such as panel work or code compliance—should be left to a licensed electrician for safety and inspection reasons.
When it comes to meeting insurance compliance, are there specific grounding requirements older properties need to satisfy, or does it vary by state? I want to be sure our commercial policy will cover us after making the upgrades you mentioned.
Insurance compliance for electrical grounding can indeed vary by state, but most insurers expect properties—especially commercial ones—to meet the current local electrical codes. Typically, this includes grounding all outlets and major appliances to a proper ground rod or other approved grounding method. Before upgrading, check your state’s requirements and inform your insurer about the planned work to confirm it meets their coverage conditions.
Could you explain a bit more about the cost differences between using a ground rod versus a Ufer ground? I’m trying to figure out which method would be more budget-friendly for a small DIY project.
A ground rod is often more budget-friendly for small DIY projects because it mainly involves buying a copper or galvanized steel rod and driving it into the ground—typically a straightforward process with lower material and labor costs. A Ufer ground (concrete-encased electrode) is usually used in new construction, as it requires embedding a conductor in a concrete foundation. Retrofitting a Ufer ground for an existing home is much more expensive and labor-intensive. For your project, a ground rod is likely the more cost-effective option.
Could you clarify at what point a grounding upgrade typically requires a permit or inspection? I want to tackle some of the work myself but definitely want to make sure everything is up to code before selling or renovating further.
A grounding upgrade usually requires a permit if you’re making significant changes to your home’s electrical system, such as running new grounding wires or upgrading the panel. Inspections are typically needed before walls are closed and after completion to ensure code compliance. It’s best to check with your local building department, since requirements can vary, but most areas mandate permits and inspections for electrical upgrades to ensure safety and legality.
I have an older home and I’m trying to figure out if I have a ground rod or if the metal water pipe is being used for grounding. What’s the best way to check which method my house uses, and how can I tell if it’s up to current code?
To check your grounding method, locate your main electrical panel and look for a thick bare copper or green-insulated wire. If this wire runs directly outside and connects to a metal rod in the ground, you have a ground rod. If it attaches to your metal water pipe, then the pipe is being used for grounding. For code compliance, current standards often require a ground rod even if a water pipe is used. It’s a good idea to have a licensed electrician inspect your setup to ensure it meets the latest codes.
Could you clarify if upgrading an older home’s grounding system to current code typically requires replacing all the existing wiring, or is it possible to add new grounding electrodes and connections without opening up walls throughout the house?
Upgrading an older home’s grounding system to meet current code does not usually require replacing all the existing wiring or opening up walls. In most cases, you can add new grounding electrodes (such as ground rods) and run new grounding conductors to your main panel from the outside. However, if the home’s wiring lacks a ground wire altogether, or if there are safety concerns, a more extensive upgrade might be needed. It’s always best to have a licensed electrician assess your specific situation.
Could you clarify roughly how much a full grounding system upgrade might cost for a typical pre-1970s house? Are there ways homeowners can break up the project into stages to help manage the expenses while still improving safety?
A full electrical grounding system upgrade for a pre-1970s house typically costs between $2,000 and $6,000, depending on the home’s size and local labor rates. If cost is a concern, you can upgrade in stages—start by grounding the main service panel, then address high-priority circuits like those for the kitchen and bathroom. Gradually updating the rest of the outlets and wiring can help spread out expenses while still making substantial safety improvements.
I’m renovating a house from the 1950s and I’m not sure if the existing metal water pipes are still a safe option for grounding, especially since parts of the plumbing might have been replaced with plastic. How can I check if my current setup meets code?
To check if your current grounding setup meets code, you’ll need to verify that the entire water pipe system is metal and continuous from the point it enters the ground to where it connects with your electrical panel. If any part has been replaced with plastic, the grounding path is interrupted and it won’t meet code. An electrician can perform a continuity test and inspect the system to ensure compliance and safety.
You mention that upgrading grounding systems in older homes is crucial for insurance compliance. Do insurance companies actually check for upgraded grounding during inspections, and could my policy be denied or rates increased if my system isn’t up to code?
Insurance companies often require homes to meet current electrical codes, including proper grounding, especially for older properties. During inspections—usually when starting or renewing a policy—they may check your electrical system. If your grounding isn’t up to code, some insurers might deny coverage, not renew your policy, or increase your premiums due to higher risk. It’s a good idea to confirm your home’s grounding meets local codes to avoid insurance issues.
You mention that grounding helps with insurance compliance. Do insurance companies usually require the system to be updated to the latest code, or is having any form of grounding enough in an older house? I’m trying to estimate if I need a full upgrade.
Insurance requirements can vary, but many companies expect your home’s electrical system to meet at least the basic safety standards, which usually means some form of grounding. However, for full coverage or better rates, they may want your system updated to current code—especially if you make major changes or file a claim. It’s best to check directly with your insurer to see if they require a full upgrade or if existing grounding is sufficient.
If I’m planning to do some of the grounding upgrade work myself, what are the most common code compliance pitfalls to watch out for, particularly when tying the new system into an old electrical panel?
When upgrading grounding in older homes, a common pitfall is failing to bond the grounding system properly to water pipes or other required electrodes. Also, make sure you use the right gauge wire for grounding and connect it securely to the panel’s grounding bar, not the neutral bar. Always ensure all connections are tight and corrosion-free. Double-check local code requirements, as older panels sometimes need updated grounding electrode systems to pass inspection.
If my older home currently relies on metal water pipes for grounding but some sections have been replaced with plastic, does that mean my house is no longer properly grounded? What’s the best way to address this situation without doing a full panel upgrade right away?
If parts of your metal water pipe have been replaced with plastic, your grounding may be compromised, since plastic does not conduct electricity. This could make your system unsafe. The best solution is to install a dedicated ground rod (or rods) outside your home and run a copper grounding wire from the rod directly to your main service panel. This upgrade is usually affordable and doesn’t require a full panel replacement.
If my house was built before the 1970s and I want to ensure insurance compliance, are there specific grounding upgrades that insurers require, or is it just a matter of meeting the current electrical code?
Insurers usually expect your electrical system to meet the current local electrical code, which requires proper grounding for safety. While some insurance companies might have extra requirements, upgrading to include grounded outlets, a grounded panel, and bonding of metal plumbing is typically what they look for. It’s a good idea to check with your insurer directly about any specific guidelines they have, but code compliance is usually the main standard.
If you decide to upgrade the grounding yourself as a DIYer, what are the main code compliance checkpoints or common mistakes to watch out for during the process? I want to be sure I’m not overlooking any steps that could lead to insurance or safety issues down the line.
When upgrading grounding yourself, be sure to use the correct gauge wire, securely bond the ground to the main panel, and properly connect to an approved grounding electrode like a ground rod. One common mistake is failing to bond water and gas pipes if required by local code. Also, avoid running ground wires too loosely or forgetting to tighten all connections. Always check your local electrical code or consult an inspector to avoid insurance or safety problems.
The article mentions that older homes may have grounding systems that are outdated or entirely missing. Is it possible to visually inspect my home’s electrical panel or outlets to get a sense of whether proper grounding is present, or is specialized equipment always required?
You can do a basic visual check by looking for a bare copper or green wire connected to the ground bar inside your electrical panel and by checking if outlets have three prongs (the third prong is for grounding). However, visual inspection alone can’t confirm if grounding is functioning correctly. Specialized equipment, like a circuit tester, is needed to verify effective grounding and overall safety.
Could you clarify how to determine whether an older home’s current grounding uses a metal water pipe or a ground rod, especially if parts of the system are behind finished walls? Are there visible signs or testing methods a homeowner can use before hiring a pro?
You can often spot where the main grounding wire connects: look for a thick bare or green wire near your electrical panel. If it runs to a metal pipe entering the ground (usually near your water meter), it’s likely using a water pipe for grounding. If it leads outside to a rod driven into the earth, that’s a ground rod. Where wiring is hidden, a multimeter can check continuity between outlets and the pipes or rod, but if you’re unsure or can’t access connections, it’s safest to consult a professional.
For budget planning, could you give a ballpark estimate on the total cost difference between hiring an electrician to upgrade grounding versus doing it as a well-informed DIYer, assuming a typical 1950s house with no visible ground rod or Ufer ground in place?
For a typical 1950s house, hiring an electrician to upgrade grounding (installing a ground rod, wiring, and bonding) usually costs between $800 and $1,500, including parts and labor. If you do the work yourself and only purchase materials, your cost might be $100 to $300. However, DIY grounding carries risks if not done to code, and electrical permits may still be needed, so factor that into your decision.
If an older house only has a metal water pipe as its ground but parts of the plumbing were replaced with plastic, what steps should a homeowner take to assess whether the grounding is still effective and what upgrades might be necessary?
When parts of a home’s metal water pipe grounding system are replaced with plastic, the grounding may no longer be reliable because plastic does not conduct electricity. To assess effectiveness, a licensed electrician should test the continuity of the ground path. If it’s not sufficient, the electrician will likely recommend installing a proper ground rod or another code-approved grounding method to ensure both safety and compliance with current electrical standards.
I live in a 1950s house that uses the metal water pipe as the main grounding electrode, but I recently found out there’s a section replaced with plastic. How big of a safety concern is this, and what’s the recommended fix in that situation?
When a metal water pipe is interrupted by a plastic section, it can no longer serve as a reliable grounding electrode. This is a serious safety concern because proper grounding is crucial for reducing shock and fire risks. The recommended fix is to install a dedicated grounding electrode, such as a ground rod driven into the earth, and connect it to your main service panel. A licensed electrician should handle this to ensure it meets current code requirements.
If my older building only has two-prong outlets and no obvious ground wires, what steps should I take first to check compliance before budgeting for an upgrade? Are there common signs I can spot myself before calling an electrician?
Start by inspecting your outlets and breaker panel. If your outlets only have two prongs, it likely means they aren’t grounded. Look for metal boxes—sometimes grounding is connected to the box itself, but not always. Check for any visible ground wires inside the outlet boxes. Also, signs like frequent breaker trips or mild shocks could mean grounding issues. However, to confirm compliance with current codes, you’ll need an electrician, but these checks can give you a general idea before you budget.
You mention that older homes might have grounding systems that are incomplete or even missing entirely. If my house only has metal water pipe grounding but part of the water line was replaced with plastic, how can I tell if my system is actually grounded properly?
When a section of your metal water pipe is replaced with plastic, it can break the electrical path to ground, making the grounding unreliable. To check if your system is properly grounded, you should have a licensed electrician test the continuity between your electrical panel and a verified ground (such as a ground rod or intact metal water pipe). They can also check if your system meets current code and recommend safe upgrades if needed.
If my older house still has some metal water pipes, but I know parts have been replaced with plastic, does that mean the water pipe can’t be relied on for proper grounding anymore? Should I prioritize installing a ground rod instead?
When sections of your water pipe have been replaced with plastic, the continuity needed for reliable electrical grounding is broken. This means you can’t count on your water pipe for proper grounding anymore. Installing a ground rod or another approved grounding electrode is the safer choice, and it’s usually required for compliance with modern electrical codes. Prioritizing a proper ground rod upgrade is a good idea.
After upgrading the electrical grounding system, are there specific tests or inspections homeowners should request to confirm that the new grounding meets modern code and will satisfy insurance requirements?
Yes, after upgrading your electrical grounding system, you should request a final inspection from a licensed electrician or your local building authority. They will test ground resistance, continuity, and bonding connections to ensure compliance with modern electrical code. Be sure to ask for documentation or a certificate of compliance, as insurance companies often require proof that the system meets current safety standards.
In an older house where the original metal water pipe grounding has been partially replaced with plastic, is it still necessary to install a separate ground rod, or can the remaining metal sections be used effectively? If so, are there specific code requirements to be aware of during this upgrade?
When part of the metal water pipe has been replaced with plastic, the pipe can no longer serve as a reliable grounding electrode because the plastic interrupts the electrical continuity. In this case, you must install a separate ground rod or another code-approved grounding electrode. The NEC requires that if metal water piping is used for grounding, it must have at least 10 feet of continuous contact with the earth. Always ensure that all connections are secure and accessible for inspection, and consult your local electrical code for any additional requirements.
When budgeting for a grounding upgrade in an older house, what are the main cost factors to consider aside from materials, such as permits or potential complications tying into old infrastructure?
When budgeting for a grounding upgrade, be sure to include permit fees, which can vary by area. Labor is a significant factor, especially if access to wiring is difficult or walls need to be opened. Old infrastructure can reveal surprises like deteriorated wiring or outdated panels, which may require additional repairs. Also, some local codes might require extra inspections or upgrades. Factoring in these possibilities helps set a realistic budget.
If my older home only has grounding through the metal water pipe but some sections have been replaced with plastic, does that mean the grounding is no longer effective? What should I do to fix this situation to ensure safety?
When metal water pipes in your home are partially replaced with plastic, the grounding can become interrupted and may no longer provide proper protection. To ensure safety, you should have a licensed electrician install a dedicated grounding electrode, such as a ground rod, that connects directly to your electrical panel. This upgrade will bring your grounding system up to code and keep your home safe.
Could you elaborate on how insurance compliance is affected by outdated or missing grounding in older homes? I’m curious if home insurance providers might deny coverage or claims based on the type or age of a home’s grounding system.
Insurance companies often require that homes meet current electrical safety standards, including proper grounding. If your home’s grounding is outdated or missing, insurers may consider it a higher risk and could deny coverage or claims, especially after incidents like electrical fires. Some providers might also require proof of electrical upgrades before issuing or renewing a policy. It’s a good idea to check with your insurer to understand their specific requirements regarding grounding in older homes.
When upgrading grounding in an older home with a mix of copper and galvanized piping, how do I know if the existing metal water pipe can still serve as a reliable ground, or should I plan to install ground rods instead?
In homes with mixed copper and galvanized piping, you need to confirm if the metal water pipe is continuous and electrically connected to the earth for at least 10 feet outside the foundation. If any part of the piping is plastic, or there are concerns about corrosion or discontinuity, the pipe may not provide a reliable ground. In those cases, installing ground rods is recommended to ensure proper safety and code compliance.
You mentioned insurance compliance as one reason to upgrade grounding. Are there certain types of insurance policies or providers that now require proof of updated grounding in older homes, and what sort of documentation would typically satisfy those requirements?
Some home insurance providers, especially those covering older properties, are starting to require proof of modern electrical grounding as a condition for coverage or renewal. This is more common with comprehensive or high-value policies, but requirements can vary. Typically, insurers will accept a recent electrical inspection report or a certificate of compliance from a licensed electrician as documentation. It’s best to check directly with your insurer to understand their specific requirements.
Could you clarify how I can tell if my older home’s metal water pipes are still providing a safe and continuous ground, especially if some sections have been replaced with plastic? Are there specific warning signs or simple tests a homeowner can do before calling an electrician?
If sections of your metal water pipes have been replaced with plastic, the ground path may be interrupted, as plastic does not conduct electricity. A simple check is to visually inspect for any plastic pipe segments between where the grounding wire attaches and where the pipe enters the ground. If you see plastic in this path, grounding may be compromised. Look out for flickering lights, slight shocks from appliances, or non-functioning outlets as warning signs. For safety, you can use a basic outlet tester to check for grounding issues, but a licensed electrician should confirm your home’s grounding system.
If an older home still has mostly metal water pipes but some sections have been replaced with plastic, does that entire method of grounding become unsafe or just less effective? Is it worth updating the ground rod in this situation or should both be used?
When sections of metal water piping are replaced with plastic, the effectiveness of using the piping as a grounding method is reduced or lost, because plastic doesn’t conduct electricity. This can make the grounding system unsafe. It’s best to install a proper ground rod and connect your electrical system to it. In many cases, both a ground rod and any continuous metal water piping (if still present and electrically continuous) are used together for added safety, but the ground rod is essential if any part of the piping is plastic.
When upgrading grounding in an older home with a mix of copper and galvanized steel pipes, how do you determine if the existing water pipe can actually serve as a reliable grounding electrode, or if you’ll need to install a new ground rod?
To determine if your existing water pipe is suitable as a grounding electrode, first ensure it’s a continuous metal pipe (without plastic sections) and it extends at least 10 feet underground outside the house. Since you have both copper and galvanized pipes, check for any non-metallic segments or corrosion that could interrupt conductivity. If the pipe doesn’t meet these conditions, or if there’s uncertainty about its integrity, it’s best to install a new ground rod to ensure reliable grounding and code compliance.
Can you give a rough estimate of the cost difference between installing a new ground rod versus upgrading to a Ufer ground in an existing older home? I’d like to plan my budget before I hire an electrician.
Installing a new ground rod typically costs between $100 and $300, depending on labor and local prices. Upgrading to a Ufer ground (concrete-encased electrode) is usually more expensive—often $500 to $1,500 or more—since it involves breaking into concrete and additional materials. The exact cost can vary based on your home’s layout and existing foundation.
If my older house still has mostly metal water pipes but some sections have been replaced with plastic, does that make the existing grounding ineffective? Would I need to redo everything or can it be partially upgraded to meet current code?
When metal water pipes in an older home are replaced with plastic, the effectiveness of the existing grounding system can be compromised, since plastic sections break the electrical continuity. In most cases, you’ll need to upgrade your grounding system to meet current code, which usually means installing new grounding electrodes, such as ground rods, and bonding water pipes where they enter your home. A licensed electrician can assess your setup and determine what updates are required for safety and compliance.
If an inspection finds that my home’s grounding is incomplete, what are the first safety steps I should take before a full system upgrade can be completed by a professional?
If your home’s grounding is incomplete, minimize the use of electrical appliances, especially those with metal cases, until repairs are made. Avoid touching metal plumbing or exposed wiring, and consider turning off circuits to affected areas. Don’t attempt DIY fixes—wait for a licensed electrician to assess and address the grounding issues to ensure everyone’s safety.
If my older home still has some metal water pipe grounding but parts of the plumbing have been replaced with plastic, does that mean my grounding is incomplete? Is this something an inspector would flag during a sale or insurance check?
Yes, if sections of your metal water pipe have been replaced with plastic, your grounding may be compromised because plastic does not conduct electricity. This break in the grounding path could definitely be flagged by a home inspector or insurance evaluator, as it poses a safety risk and doesn’t meet current code requirements. It’s a good idea to have a licensed electrician assess and upgrade your grounding system to ensure full compliance.
If my house was built in the 1960s and still has some original wiring, how can I tell if it’s actually grounded, or if I need an upgrade? Are there clear signs to watch for before calling an electrician?
If your home still has original 1960s wiring, check your outlets first—two-prong outlets often mean no ground wire, while three-prong outlets might not always be properly grounded. Flickering lights, frequent blown fuses, or mild shocks from appliances can also suggest grounding issues. For full certainty, it’s best to have an electrician test the wiring, since grounding may not be visible just by looking at outlets.
If I’m planning to renovate an older house myself, what specific signs should I look for in the current electrical system to identify whether the grounding is outdated, and at what point should I definitely call in a professional?
Look for signs like two-prong outlets (instead of three-prong), lack of grounding wires in outlet boxes, and visible use of old wiring such as knob-and-tube or cloth-covered wires. Frequent breaker trips, flickering lights, or buzzing outlets can also indicate issues. You should definitely call a professional if you see exposed or damaged wiring, smell burning, or if your home’s main panel looks outdated or crowded.
If my older home only has metal water pipe grounding but parts of the pipe have been replaced with plastic, does that mean the grounding is no longer effective? How can I tell if the current setup is actually protecting my appliances and family?
If sections of your metal water pipe have been replaced with plastic, the grounding may not be effective anymore, since plastic does not conduct electricity. You can check your main electrical panel for a proper ground rod or ask a licensed electrician to test your grounding system. They can verify if your setup still provides protection and recommend necessary upgrades to ensure your home and appliances are safe.
If my older home only has a metal water pipe as its grounding method and some of the piping has been replaced with plastic over time, does that make the grounding system unreliable? Would replacing the plastic with metal be necessary, or should I consider installing a separate ground rod instead?
If your metal water pipe grounding has been interrupted by plastic sections, it can no longer be relied on as a safe or effective ground. Rather than replacing plastic with metal, it’s usually safer and easier to install a dedicated ground rod according to current electrical codes. This ensures your home’s grounding is both reliable and compliant.
If my older house still has some circuits that use metal water pipes as grounding, how can I tell if that method is still safe or up to code, especially since some pipes might have been replaced with plastic?
When metal water pipes are used for grounding, the safety and code compliance depend on the continuity of the metal piping all the way to the earth. If any part of the piping has been replaced with plastic, the ground path could be broken. To check, have a qualified electrician test the continuity of the ground and verify whether the setup meets current NEC standards. If the ground is interrupted, an upgrade to a dedicated grounding electrode (like ground rods) is usually needed.
After reading about Ufer grounds, I’m curious if it’s possible or even worthwhile to retrofit one in an older home that doesn’t have concrete-encased rebar. Or is it usually better to stick with a ground rod for upgrades?
Retrofitting a Ufer ground (concrete-encased electrode) in an older home without existing concrete-encased rebar is usually not practical, since it would require breaking up concrete and pouring new footings. In most upgrade situations, installing one or more ground rods is a reliable, code-approved, and more cost-effective solution. Ground rods are easier to install and still provide excellent grounding for older homes.
The article mentions Ufer grounds, but are those only an option for homes undergoing major renovations that expose the foundation, or can they be added in some way to an existing finished basement? I’m interested in the most practical route for retrofitting grounding in a 1950s house.
Ufer grounds, which use concrete-encased electrodes, are typically easiest to install during new construction or major renovations where the foundation is exposed. Retrofitting them in a finished basement is usually not practical due to the need to access the concrete footing. For a 1950s home, the most common retrofit grounding method is installing ground rods or using the metal water service line (if present and continuous) as a grounding electrode, as these require far less invasive work.
I’d like a step-by-step breakdown of how to safely check if my current grounding system is incomplete or missing before hiring a professional—are there visible signs in the main panel or elsewhere that a homeowner like me should look for first?
To check if your grounding system may be incomplete, start by inspecting your main electrical panel. Look for a thick bare copper wire or green-insulated wire connected from the panel to a ground rod (usually outside your home), water pipe, or foundation rebar. Inside the panel, confirm that ground and neutral wires are properly separated. Also, check for ground wires connected to outlets—older two-prong outlets often mean no grounding. If you notice missing ground wires, corrosion, or unclear connections, it’s wise to consult a professional for a full assessment.
Can you give a ballpark figure for the total cost of upgrading grounding in a house built before the 1970s if the only current grounding is a metal water pipe? I’m hoping to budget accurately for materials and any potential permit fees.
For a typical home built before the 1970s, upgrading grounding beyond a metal water pipe usually costs between $800 and $2,500. This range covers professional labor, new grounding electrodes (rods), wiring, connectors, and permit fees, which can vary by location but often run $50 to $200. If your electrical panel also needs updating, costs may rise further. Getting quotes from local electricians will help you budget more precisely.
If I’m renovating and need to upgrade grounding, what kind of time and cost range should I expect for hiring a licensed electrician to do a standard ground rod installation? Are there hidden steps like permits or special inspections I need to budget for?
For a standard ground rod installation by a licensed electrician, you can usually expect costs between $250 and $600, depending on your location and specific site conditions. The job itself typically takes 1–3 hours. Be sure to budget for permit fees, which vary by municipality, and there may be an inspection required by your local building department. Electricians often handle permits and inspections, but confirm this in advance to avoid surprises.
For someone living in a pre-1970s house planning to do major renovations, is upgrading the grounding system something that should be tackled before other electrical projects, or can it be worked in alongside panel upgrades and rewiring? I want to prioritize safety but also keep the process efficient.
Upgrading the grounding system should ideally be one of the first electrical tasks when renovating an older home, especially if you’re planning panel upgrades or rewiring. Addressing grounding early ensures that all new electrical work is properly protected, which boosts both safety and code compliance. However, it’s common to coordinate grounding upgrades alongside other major electrical projects to streamline the work and minimize disruption.
If my house still uses metal water pipes as a grounding method but part of the pipe has been replaced with plastic, does that mean my grounding isn’t effective anymore? What should I do in this scenario?
When metal water pipes are replaced with plastic, the grounding path can be interrupted, making your electrical grounding potentially ineffective or unsafe. In this case, it’s important to have a licensed electrician inspect your system. You may need to install a dedicated grounding electrode, like a ground rod, to ensure proper and safe grounding for your home’s electrical system.
I have a house from the 1950s and I’m realizing there probably isn’t a proper ground rod outside. How can I tell for sure if it’s grounded correctly or if I need to install a new ground rod to meet current code?
To check if your home is properly grounded, look for a thick copper wire running from your main electrical panel to a metal rod driven into the ground outside—this is the ground rod. If you can’t find one, or if the wire looks corroded or disconnected, your system might not meet current code. For peace of mind and safety, it’s best to have a licensed electrician inspect your grounding and recommend any needed upgrades.
If I decide to hire a professional instead of doing a DIY upgrade, are there specific certifications or qualifications I should look for in an electrician to ensure proper compliance and safety?
When hiring an electrician for grounding upgrades, look for someone who is licensed and insured in your state. It’s also a plus if they’re certified by a recognized organization like the National Electrical Contractors Association or have a journeyman or master electrician certification. These credentials help ensure the electrician is trained in current codes, safety standards, and compliance requirements.
Could you give a ballpark cost range for upgrading the grounding in a pre-1970s house, assuming I need to add new ground rods and wiring? I’m trying to plan my budget before talking to an electrician.
Upgrading grounding in a pre-1970s house can vary depending on your location and house size, but a ballpark figure is typically between $800 and $2,500. This range covers installing new ground rods, running proper wiring, and updating connections. Costs could be higher if your electrical panel also needs work or if access is difficult. Getting a few quotes from licensed electricians will help you nail down a more accurate estimate for your specific situation.
I run a small business from an older property, and the insurance company is asking about electrical compliance. Can you provide a ballpark estimate on what it might cost to upgrade to proper grounding, assuming the building currently has little or no grounding system in place?
Upgrading the electrical grounding in an older property can vary in cost, but you can expect a ballpark range of $1,500 to $3,000 for most small businesses. Factors like building size, existing wiring, and local code requirements will affect the final price. It’s best to get a licensed electrician to assess your property and provide a detailed quote for compliance.
In the section about common grounding methods, you mention metal water pipes as a possible grounding electrode, but what happens if parts of the water line have been replaced with plastic over the years? Are there specific signs to look out for to know if this method is still effective?
If sections of your water line have been replaced with plastic, the metal water pipe may not provide a continuous or effective path to ground. You should check for any visible plastic sections or fittings, especially between your electrical panel and where the pipe enters the ground. If you find plastic breaks or suspect they exist underground, it’s best to use another approved grounding method like ground rods to ensure safety and compliance.
If an older home still has mostly ungrounded outlets but upgrading the entire system at once isn’t possible, what are the most critical first steps to prioritize for safety and meeting local code requirements?
Start by identifying and upgrading outlets in areas with the highest risk, such as kitchens, bathrooms, laundry rooms, and outdoor locations, to have proper grounding or GFCI protection. Replace any damaged or two-prong outlets in these spaces first. Also, ensure your main electrical panel is up to code. Consulting a licensed electrician can help you prioritize upgrades based on your local regulations and your home’s specific needs.
I have an older house and noticed that the water main coming in is now partly plastic. Does this mean the old metal water pipe grounding method won’t work anymore, or can I still rely on it for proper grounding?
If your incoming water main is now partly plastic, you can no longer rely on the old metal water pipe as a reliable grounding method. Plastic sections interrupt the electrical path to earth, which means grounding won’t be effective or safe. You should have a licensed electrician assess your system and, if needed, install a proper ground rod or an alternate approved grounding method to ensure your home’s safety and compliance.
The article mentions different grounding methods like rods, water pipes, and the Ufer system. If my older home already has metal water pipes, is it still necessary or recommended to add a ground rod when upgrading for compliance or insurance purposes?
Even if your home has metal water pipes, many updated electrical codes now require a ground rod in addition to bonding the pipes. This provides a more reliable and redundant grounding system, especially if sections of the water pipe might be replaced with plastic in the future. Adding a ground rod is usually recommended for compliance and can help with insurance approval.
You mention both ground rods and the Ufer ground method for grounding—are there cases where one is more suitable (or required) for old homes? Is it ever necessary or recommended to use more than one method for better safety or compliance?
Yes, the choice between ground rods and the Ufer ground often depends on the home’s foundation and local codes. Ufer grounds (concrete-encased electrodes) are usually best when there’s access to the foundation during construction or renovation. Ground rods are common for existing homes without access to the foundation. Some codes require or recommend using both methods together, especially if soil conditions are poor or for extra safety and redundancy.
We’re on a tight budget while renovating our house built in the 1950s. What’s the ballpark cost difference between installing a ground rod versus a Ufer ground, and are there pros or cons to picking one method over the other?
For most older homes, installing a ground rod typically costs $100–$300, while a Ufer ground (concrete-encased electrode) can run $300–$800 since it usually involves more labor and materials. Ground rods are quicker and easier to add to existing homes, but Ufer grounds can offer better long-term conductivity and durability if you’re pouring new concrete anyway. If budget is the main concern and you’re not redoing your foundation, a ground rod is likely the more affordable choice.
After upgrading the grounding system to meet modern code, do I need to notify my homeowner’s insurance or get a new inspection to maintain compliance and coverage? The article mentions insurance but doesn’t specify next steps after an upgrade.
Once you’ve upgraded your grounding system, it’s a good idea to inform your homeowner’s insurance provider about the electrical improvements. Some insurers require documentation or may offer discounts for safety upgrades. While not always mandatory, getting a new electrical inspection report can be beneficial—it provides proof that your system meets code, which may be helpful if you ever file a claim or renew your policy.
We have an older house with a mix of copper and plastic water pipes, so I’m confused—does that mean the metal water pipe method won’t work for grounding in our situation? How do I know for sure if my system is properly grounded?
If your home’s water piping is a mix of copper and plastic, the metal water pipe method likely won’t provide reliable grounding—plastic sections interrupt the continuous conductive path. To know for sure if your system is properly grounded, have a licensed electrician inspect it. They can test for a continuous ground and recommend upgrades, which may include installing ground rods if the water pipe can’t be used.
If my older home only has metal water pipes for grounding but some of the water lines have been replaced with plastic, does that mean my grounding is no longer effective? Should I be looking to add a ground rod instead, and is that something a DIYer can do safely?
When metal water pipes are partially replaced with plastic, the electrical ground can lose continuity and may not be effective anymore. In this case, it’s recommended to install a ground rod to ensure proper grounding. While some homeowners install ground rods themselves, it involves driving an 8-foot rod into the earth and making secure electrical connections, which must comply with local codes. For safety and code compliance, it’s best to consult a licensed electrician.
When upgrading grounding in an older home, how do you determine if you can reuse the existing metal water pipe as a primary grounding electrode, especially if you aren’t sure whether sections of it have been replaced with plastic over the years?
To determine if the metal water pipe can be used as a primary grounding electrode, it needs to be electrically continuous and in direct contact with the earth for at least 10 feet. If you suspect parts have been replaced with plastic, visually inspect accessible sections and, if possible, use a continuity tester to check for breaks along the run. Any plastic breaks or uncertainty means the pipe shouldn’t be relied on for grounding and another approved electrode should be installed.
When budgeting for an electrical grounding upgrade, what kind of costs should I expect if I plan to hire an electrician instead of doing it myself? Are there any hidden expenses homeowners often overlook during this process?
Hiring an electrician to upgrade electrical grounding in an older home typically costs between $800 and $2,500, depending on the home’s size, current wiring, and local labor rates. Homeowners sometimes overlook expenses like required permits, electrical panel upgrades, and repairs to walls or landscaping after the work is done. Be sure to ask your electrician for a detailed estimate that includes these potential costs.
For older homes or business spaces that were wired before grounded outlets became standard, is it possible to upgrade just certain circuits to meet insurance compliance, or does the entire grounding system need to be brought up to code at once?
You can often upgrade specific circuits—such as those serving kitchens, bathrooms, or critical equipment—to grounded outlets for insurance or safety compliance, rather than rewiring the entire property. However, the exact requirements may depend on local electrical codes and your insurer’s policies. It’s wise to consult both a licensed electrician and your insurance provider to ensure you’re meeting the necessary standards.
The article mentions insurance compliance when upgrading electrical grounding in older homes. Are there specific insurance requirements or documentation I should be aware of before starting the upgrade, especially if my house still has the old metal water pipe setup?
Insurance companies often require proof that your electrical system meets current codes, especially after an upgrade. Before starting, contact your insurer to ask about any specific guidelines or paperwork they need. They might request an electrician’s certification or inspection report after work is completed. If your home uses old metal water pipes for grounding, you’ll likely need to document any changes you make to ensure ongoing coverage and compliance.
The article mentions different grounding methods like ground rods and Ufer grounds. How do I know which method is best suited for my older home, and are there code requirements in the US that might limit my options?
The best grounding method for your older home depends on factors like soil conditions, your foundation type, and local code requirements. In the US, the National Electrical Code (NEC) sets minimum standards. For example, newer homes often use Ufer grounds if there’s a concrete foundation, while ground rods are common in other cases. However, local codes may be stricter, so it’s a good idea to check with your local building department or consult a licensed electrician to ensure you’re meeting all requirements for safety and compliance.
For older homes where the original plumbing has been partially replaced with plastic pipes, how reliable is the metal water pipe method for grounding? Would I need to supplement it with a ground rod, or is there a way to test if my existing setup is still effective?
If your home’s metal plumbing has been partially replaced with plastic, the metal water pipe method may no longer provide a reliable ground. Plastic sections interrupt electrical continuity, reducing effectiveness. In most cases, you should add a ground rod to ensure proper grounding. To check your current setup, a licensed electrician can test continuity and measure resistance from your panel to verify if your ground is still effective and up to code.
The article mentions breaking down costs related to grounding upgrades. Could you provide a ballpark range for what homeowners might expect to pay for a typical upgrade, and are there specific code compliance expenses we should anticipate beyond materials and labor?
For a typical electrical grounding upgrade in an older home, homeowners might expect to pay between $1,200 and $3,000, depending on the home’s size and complexity. In addition to materials and labor, you may need to budget for permit fees, which can range from $100 to $300. Some jurisdictions also require inspections, which could add to the cost. Always check with your local building authority for exact compliance expenses in your area.
You mention grounding is important for insurance compliance. If I upgrade the grounding myself as a skilled DIYer, are there specific permits or inspections I need to be aware of to meet local code and satisfy my insurer?
Upgrading electrical grounding often requires a permit, even for skilled DIYers. Most local codes mandate that such work be inspected by a licensed inspector to ensure safety and compliance. Insurance companies may ask for proof of the upgrade, like inspection sign-off or a permit number. Before starting, check with your local building department for permit requirements and talk to your insurer to confirm what documentation they’ll need.
You mention that many older homes rely on metal water pipes for grounding, but what happens if parts of the water line have been replaced with plastic? How can I tell if this affects the effectiveness of my current grounding system?
If your home’s metal water pipes have been partially replaced with plastic, the grounding system may no longer be effective because electricity can’t travel through plastic. To check if this affects your grounding, look for plastic sections in your water line, especially between the grounding wire connection and where the pipe enters the ground. If you find any, it’s important to have a qualified electrician test your grounding and, if needed, install a dedicated ground rod for safety.
I’m considering upgrading my home’s grounding myself. About how much should I budget for materials and tools if I want to add a ground rod and connect it to my main panel as described here?
For a DIY grounding upgrade, you’ll likely need to budget around $60–$120 for materials. This usually covers a copper ground rod, grounding wire (typically #6 copper), a ground rod clamp, wire staples, and possibly a drill bit for your foundation. If you don’t already own basic tools like a hammer, shovel, and wire cutters, you might need to allow an extra $30–$50. Always remember to check local code requirements before starting.
If I’m hiring a pro to upgrade my electrical grounding, what kinds of compliance paperwork or documents should I expect for insurance purposes once the job is finished?
After a professional grounding upgrade, you should receive a Certificate of Compliance or completion signed by a licensed electrician. Additionally, you may get a copy of any permits pulled for the work and possibly an inspection report from your local building authority. These documents are important for insurance, as they prove the work meets code and was properly inspected.
I’m planning to renovate a home built in the 1960s and want to make sure I meet current electrical codes. Could you clarify what specific compliance issues I should watch out for when upgrading the grounding system?
When upgrading grounding in a 1960s home, check for the presence of a grounding electrode system—modern codes require ground rods or a concrete-encased electrode. Older systems might only use metal water pipes, which is no longer sufficient. Also, verify that all outlets, especially in kitchens and bathrooms, are grounded and protected by GFCIs where required. Make sure the main service panel is properly bonded to both the neutral and the grounding system. Local code updates may apply, so consulting a licensed electrician is highly recommended.
If my older home still has some metal water pipes but part of the system was updated to PEX, does that rule out using the water pipe as a grounding electrode, or can it still play a role in my grounding upgrade?
When a home’s water piping has been partially replaced with PEX, the continuity needed for the metal pipe to serve as a reliable grounding electrode is usually lost. Modern electrical codes require at least 10 feet of buried, continuous metal pipe for it to be used for grounding. In your case, the metal sections alone can’t be relied on and you’ll likely need to install a dedicated ground rod or approved grounding electrode system.
When budgeting to upgrade grounding in a 1950s house, what unexpected costs should I watch out for, such as panel upgrades or permits, and how much should I realistically set aside for a typical job?
When upgrading grounding in a 1950s house, unexpected costs can include electrical panel upgrades if the current panel is outdated or can’t support modern grounding requirements. You might also need to pay for local permits, GFCI outlets, and correcting old or unsafe wiring discovered during the upgrade. For a typical job, homeowners often set aside $1,500 to $3,500, but more extensive work or unforeseen issues can push costs higher.
If my older home only has a metal water pipe for grounding, but some sections have been replaced with plastic, does that mean my grounding is no longer effective? How should I address this to make sure the system is still safe?
When a metal water pipe is used as a ground but parts have been switched to plastic, your grounding is likely compromised. Plastic sections break the electrical path to earth. To ensure safety, you should install a proper grounding electrode system, such as a ground rod driven into the earth, and connect it to your main panel. It’s best to have a licensed electrician assess and upgrade your grounding to meet current codes.
For older homes that still have metal water pipes as part of their grounding system, how can I tell if plastic sections have replaced parts over time and if that would make the grounding unreliable?
To check if metal water pipes have been replaced with plastic, look for visible pipe sections where they enter your home or near your water meter. Plastic pipes are usually white, blue, or cream and have a smooth, non-metallic surface. If you find any plastic sections interrupting the line, your grounding could be compromised. In that case, it’s important to have a qualified electrician test the system and possibly install new grounding electrodes.
If my older home has metal water pipes but I’m not sure if any sections have been replaced with plastic, how can I check if the grounding system is still effective or if I need to upgrade to a ground rod?
You can visually inspect your water pipes, especially where they enter the house and near the main water shutoff, to see if any sections have been replaced with plastic. If you find plastic, the electrical grounding may no longer be continuous or effective. To be certain, it’s best to have a licensed electrician test your system’s grounding and, if needed, install a proper ground rod to meet current safety codes.
I’m interested in the step-by-step upgrade process for grounding described in the article. Are there any specific local code issues I should watch out for when upgrading an older home, or is it pretty standard across most states?
Local electrical codes can vary quite a bit, especially regarding grounding methods for older homes. While the article outlines the general upgrade process, you should always check with your city or county building department for requirements in your area. Some regions have stricter rules on grounding rods, wire types, or inspection steps. It’s a good idea to verify what’s needed before starting, and consider having your plans reviewed by a licensed electrician familiar with your local codes.
If my older home was built in the 1960s and only uses metal water pipes for grounding, but part of the pipe was replaced with plastic during a remodel, does that mean the ground is no longer effective? What should I do in that case?
If your home’s grounding relies on metal water pipes, but some sections have been replaced with plastic, your electrical ground may no longer be effective. Plastic does not conduct electricity, so the grounding path could be interrupted. It’s important to have a licensed electrician inspect your system. They may recommend installing a ground rod or another compliant grounding method to restore proper safety.
After reading your step-by-step guide, I’m still unsure how to tell if my older property’s grounding is truly up to current code. Is there a simple way for a business owner to check this themselves, or should I always call an electrician first before making any upgrades?
While you can look for basic indicators like the presence of grounding wires in your outlets or check your electrical panel for a grounding bar, verifying full code compliance is more complex. Electrical codes change often, and proper grounding isn’t always visible. For safety and accuracy, it’s best to have a licensed electrician assess your property before making any upgrades.
You mentioned both copper rods and Ufer grounds as grounding options. For a small business owner upgrading a shop in an old building, are there significant cost or performance differences between these two methods that I should consider before hiring an electrician?
Copper ground rods are usually less expensive to install because they require minimal site preparation and just need to be driven into the ground. Ufer grounding (using a concrete-encased electrode) can be more costly, especially in existing buildings, since it may involve breaking concrete. Both methods are effective when installed correctly, but copper rods are generally easier and more economical for retrofits unless there’s an issue with soil conditions. An electrician can assess your specific site to recommend the most suitable and compliant option.
Do you have any insight on how much the typical insurance savings might be after upgrading an older home’s electrical grounding to meet current safety standards, or is the benefit more about compliance and peace of mind than actual cost reduction?
Upgrading your home’s electrical grounding can sometimes lead to modest insurance savings, but the reduction isn’t usually dramatic—often around 5% or less. Insurers vary in how they assess upgrades, so some may not offer a discount at all. The main benefits tend to be meeting legal requirements, increasing home safety, and reducing the risk of electrical fires, which can also offer peace of mind.
If my older house only has metal water pipes acting as the ground but some sections were replaced with plastic, does that mean the grounding no longer works? Would I need to add a ground rod or is there another solution?
If any part of your metal water pipe has been replaced with plastic, your grounding is likely interrupted and no longer reliable. In this case, you should not rely on the water pipe as the sole grounding method. Adding a ground rod (or even two, depending on local codes) is typically the best solution to ensure proper grounding for safety and code compliance. It’s a good idea to have an electrician assess your setup to confirm what’s needed.
If my older house only has two-prong outlets and I don’t see any visible ground wires, what’s the safest first step to check if any grounding is present before I start the upgrade process you describe?
To safely check for grounding in your older home, start by turning off power at the breaker for the outlet you want to inspect. Remove the outlet cover and gently pull out the outlet. Look inside the electrical box for any bare copper or green-insulated wire connected to the box or outlet. If you don’t see one, it’s likely there’s no ground, but using a non-contact voltage tester or consulting a licensed electrician can confirm this before proceeding.
Can you give a ballpark figure for how much it might cost to upgrade grounding in an average older home if I hire an electrician versus attempting to do some of it myself? I’m trying to budget for a renovation and want to make sure I don’t underestimate this part.
For a typical older home, hiring a licensed electrician to upgrade grounding usually costs between $1,500 and $3,000, depending on the home’s size and local rates. If you’re able to do some prep tasks yourself, like clearing access or running certain wires under supervision, you might trim costs by several hundred dollars. Always ensure major electrical work is inspected for safety and code compliance.
If my older home only has metal water pipes running underground but some sections have been replaced with plastic, how does that affect the effectiveness of grounding, and what would I need to upgrade to meet current code requirements?
When metal water pipes are partially replaced with plastic, the continuity of your grounding system is broken, making it ineffective and unsafe. Plastic sections do not conduct electricity, so your grounding system can’t rely on the water pipe anymore. To meet current code, you’ll likely need to install proper ground rods or an alternative approved electrode, and run new grounding conductors from your electrical panel to these electrodes. It’s best to have a licensed electrician assess your setup and perform any necessary upgrades.
Can you give a rough estimate for the total cost of fully upgrading grounding in a 1950s house, including both materials and hiring a licensed electrician? I’m trying to budget for both compliance and insurance reasons.
For a 1950s house, a full electrical grounding upgrade typically ranges from $2,000 to $5,000, depending on the home’s size and accessibility. This estimate includes both materials and labor by a licensed electrician. Costs may be higher if your electrical panel needs upgrading or if extensive wiring adjustments are required. It’s always best to request a detailed quote after an on-site inspection to get an accurate figure for your specific situation.
You mention that upgrading grounding is essential for both safety and insurance compliance. Does insurance usually require proof of updated grounding for older homes, and if so, what kind of documentation should I expect to provide?
Insurance companies often require proof of updated electrical grounding, especially for older homes. They may ask for an inspection report, a certificate from a licensed electrician, or photos of the upgraded grounding system. It’s best to check with your insurer for their specific requirements but keeping detailed records and receipts from the work is always advisable.
Could you give a rough idea of what the minimum and maximum costs might be for a professional to upgrade grounding in a 1950s home? I’m trying to budget realistically before reaching out to electricians.
For a 1950s home, the cost to professionally upgrade electrical grounding can vary based on your home’s size and current setup. On the low end, minor upgrades like bonding and adding a ground rod may start around $800 to $1,500. For a full rewiring and comprehensive grounding, costs can climb to $3,000–$7,000 or more. Getting multiple quotes from licensed electricians will give you a clearer picture for your specific situation.
After completing a grounding upgrade as outlined, what are the recommended steps to verify that the system is actually functioning safely? Should homeowners hire a professional inspector, or are there practical checks a DIYer can perform themselves?
After finishing a grounding upgrade, it’s wise to confirm everything is working safely. While a professional electrical inspector can provide a thorough assessment and documentation of compliance, homeowners can also do some basic checks themselves—such as using a receptacle tester to confirm proper grounding at outlets or visually inspecting connections for tightness and corrosion. Still, for full peace of mind and to meet code requirements, hiring a licensed electrician or inspector is strongly recommended.
When considering an upgrade for grounding in an older house that currently uses a metal water pipe as its electrode, what should homeowners look out for if there’s a mix of metal and plastic piping? Are there extra steps or costs involved in ensuring a proper ground connection in this scenario?
If your home has a combination of metal and plastic water pipes, it’s important to know that plastic pipe sections break the electrical path, making the water pipe unreliable as a grounding electrode. In this case, you’ll likely need to install new grounding electrodes, such as ground rods, outside your home. This will add to the cost, as both materials and professional installation may be required. Always have a licensed electrician assess your system to ensure full compliance and safety.
I own a small commercial building that was constructed in the 1960s, and I’m not sure if the metal water pipe grounding method is still reliable since some plumbing has been updated with plastic sections. How do I determine if my system is properly grounded and compliant with current codes?
Since your building has updated plumbing with plastic sections, the original metal water pipe grounding may no longer provide a continuous, reliable ground. To check compliance and safety, have a licensed electrician inspect the grounding system. They can test continuity, verify connections, and ensure your setup meets current electrical codes, possibly recommending installation of ground rods or other approved grounding electrodes if necessary.
Could you give a rough estimate of what the grounding upgrade might cost for a typical older home, especially if the system currently has no ground rod or Ufer ground in place?
For a typical older home without an existing ground rod or Ufer ground, a grounding upgrade usually costs between $500 and $1,500. The actual price depends on factors like your home’s size, access to the service entrance, and local labor rates. An electrician will install a new ground rod, connect it with proper wiring, and update the panel bonding as needed.
If an older home still relies mainly on metal water pipes for grounding, how can I tell if those connections are still effective, especially if sections of pipe may have been replaced with plastic over the years?
When metal water pipes are used for grounding, any section replaced with plastic will interrupt the electrical path, reducing grounding effectiveness. To check, you can visually inspect the pipes for plastic sections, especially near the main water entry and where pipes branch off. For a more accurate assessment, an electrician can use a continuity tester to verify the ground connection between your electrical panel and the water main. This ensures the grounding system is still reliable and up to code.
The article mentions that grounding helps with insurance compliance. Does upgrading an old home’s grounding usually involve a specific inspection or certification for insurance purposes, or is it enough to show an invoice from a licensed electrician?
Insurers often require proof that grounding work was done by a licensed electrician, and an invoice or detailed receipt is usually sufficient. However, some insurance companies may also ask for a formal inspection report or certification, especially if the upgrade was extensive. It’s best to check with your insurer about their specific documentation requirements to ensure your coverage is compliant.
If I plan to handle some of the grounding upgrade steps myself and hire a professional for the final inspection, what specific tasks should I leave strictly to a licensed electrician to ensure both safety and insurance compliance?
You should leave any work involving your main electrical panel, bonding of water or gas pipes, and the final connection of new grounding electrodes to a licensed electrician. These tasks carry risks of shock, fire, and code violations. Doing them yourself could also void your insurance coverage or fail inspections. You can handle prep work like clearing access, mapping outlets, or running conduit, but let a professional do the actual wiring and final connections.
I live in a house from the 1950s and I’m worried the grounding might not be up to code. How can I tell if I have a ground rod, a Ufer ground, or just a metal water pipe being used, and is one method safer than the others?
To check your grounding type, look where the main electrical panel is grounded: a ground rod will have a thick bare copper wire leading outside to a metal rod in the earth; a Ufer ground connects to rebar in the concrete foundation; and a water pipe ground connects to a metal water pipe near the panel. Modern codes prefer ground rods or Ufer grounds for safety, as old water pipe grounds can corrode or be replaced with plastic. If you’re unsure, a licensed electrician can inspect your system and recommend updates if needed.
I saw in the guide that grounding upgrades are crucial for insurance compliance in older homes. Is there a typical inspection process or paperwork I should expect when updating my grounding system to satisfy insurance requirements?
When upgrading your grounding system, most insurance providers will want proof of compliance. This usually involves an inspection by a licensed electrician, who will provide a written report or certificate confirming the grounding upgrade meets current electrical codes. You may need to submit this documentation to your insurer. Some local authorities might also require a permit and their own inspection, so check with both your insurance company and local building department in advance.
For someone planning to tackle this as a DIY project, what are the key safety codes or permits I need to be aware of before starting any upgrades to my home’s grounding system?
Before starting a DIY grounding upgrade, check your local building codes, as requirements can vary by area. Most places require a permit for electrical upgrades, including grounding. You’ll need to follow the National Electrical Code (NEC), especially sections covering grounding electrode systems and conductor sizing. It’s also important to have your work inspected for safety and compliance. If you’re unsure about any steps, consider consulting a licensed electrician before beginning.
I’m curious about the step-by-step upgrade process—does the guide cover whether upgrading grounding in an older home typically requires replacing the main electrical panel, or can grounding be improved without a full panel replacement? I’d appreciate more specifics on this decision.
The article explains that upgrading grounding in older homes doesn’t always require a full main panel replacement. In many cases, grounding can be improved by adding ground rods, bonding water pipes, or upgrading the grounding electrode conductor. However, if your current panel is outdated, unsafe, or lacks space for necessary upgrades, then panel replacement may be recommended. The decision often depends on your panel’s age, condition, and grounding system compatibility.
If an older home currently has only metal water pipe grounding and part of the pipe was replaced with plastic, does it become necessary to add a new ground rod, or are there other compliant solutions that avoid major rewiring?
When metal water pipes are interrupted by plastic, they can no longer serve as reliable grounding electrodes. In most cases, you will need to install a ground rod or other approved grounding electrode to ensure code compliance and safety. You typically don’t need to rewire the house, just add the new ground rod and connect it to the panel with appropriate wire. Always check local code requirements or consult a licensed electrician for specifics.
You mentioned that older homes sometimes use metal water pipes as grounding electrodes, but those might be interrupted by plastic sections now. How can I tell if my water pipe is still a valid grounding method, or if I need to upgrade to a ground rod?
To check if your water pipe is still a valid grounding electrode, inspect the entire length from where the ground wire connects to the main water line all the way to where the pipe enters the ground. Look for any plastic sections or repairs—if you find any, the pipe no longer qualifies as a continuous ground path. In that case, upgrading to a properly installed ground rod is necessary for safety and electrical code compliance.
For someone considering a DIY approach, are there certain steps in the grounding upgrade process that are usually safe for homeowners to handle themselves, or should all aspects be left to a professional to ensure code compliance and insurance coverage?
Homeowners can often handle simple tasks like clearing access to the grounding rod location or identifying existing wiring, but installing or upgrading grounding systems usually involves work inside the electrical service panel and must meet strict code requirements. For safety, compliance, and insurance reasons, most of the actual wiring and grounding work should be done by a licensed electrician.
If I suspect my older home still relies on a metal water pipe for grounding, what are the first steps I should take to determine whether that method is still compliant and safe under current electrical codes? Are there common warning signs that homeowners should watch out for?
To check if your metal water pipe grounding is still compliant, start by having a licensed electrician inspect your home’s grounding system. Codes have changed, and this method may no longer be sufficient on its own. Warning signs to watch for include corroded pipes, loose or disconnected ground wires, and signs of electrical shock or flickering lights. Regular inspections are important for safety and code compliance.
I’m planning a DIY electrical upgrade and am wondering what typical budget range homeowners should expect for a full grounding upgrade, including parts and labor if hiring a licensed electrician. Are there common hidden costs or pitfalls I should plan for?
For a full grounding upgrade in an older home, you can usually expect a budget between $1,500 and $3,000 if hiring a licensed electrician, depending on home size and local rates. Common hidden costs include repairing walls after running new wires, upgrading your main panel if it’s outdated, and possible permitting fees. Be prepared for unexpected issues like old wiring or code violations that could increase costs.
My property is being renovated and the insurance company is asking for proof of grounding compliance. Once I’ve completed the upgrade, are there specific documents or inspections required to prove that my home now meets modern grounding codes?
After upgrading your home’s grounding system, you should arrange for an inspection by your local building authority or a licensed electrical inspector. They will verify that your installation meets current codes and provide a compliance certificate or inspection report. This official documentation typically satisfies insurance requirements, as it demonstrates the work was completed to code and inspected professionally.
You mentioned the risk of insurance issues if grounding isn’t up to code. Can you clarify what the typical costs are for a professional grounding upgrade in an older home, and how much of that is usually labor versus materials?
For older homes, the cost of a professional grounding upgrade usually ranges from $1,000 to $3,000, depending on your home’s size and electrical complexity. Labor tends to make up the majority—about 60–75% of the total cost—since electricians need to inspect, access, and upgrade wiring throughout the home. Materials like grounding rods, wire, and clamps are generally less expensive but still necessary for a complete, code-compliant installation.
You mention different grounding methods like ground rods and Ufer grounds. Is one of these more reliable or affordable for a DIY upgrade in a 1960s house? I’m trying to figure out which would be best for my renovation budget.
For a 1960s house, ground rods are usually more straightforward and affordable for a DIY project. They’re easy to install since you typically just drive them into the earth outside and connect them to your main panel. Ufer grounds (concrete-encased electrodes) are highly reliable but are usually installed during new construction or major renovations with exposed foundations, making them less practical and more expensive for upgrades in existing homes. For most renovations on older houses, ground rods are the best balance of cost, reliability, and ease for DIYers.
I run my business out of an older home that still has some original wiring. How can I tell if the existing metal water pipes in my building still provide adequate grounding, especially if some sections might have been replaced with plastic over the years?
To check if your metal water pipes still provide proper grounding, first look for any visible sections where metal has been replaced with plastic, as this interrupts the grounding path. A licensed electrician can test continuity between your main electrical panel and various points on the water pipe to confirm if the grounding is intact. If any part is plastic, additional grounding methods may be needed to ensure safety and code compliance.
For those of us needing to stay compliant with insurance requirements, is hiring a licensed electrician always required for grounding upgrades, or are some steps considered safe for a business owner with basic DIY skills to handle?
For insurance compliance and safety, most policies require that major grounding upgrades be performed by a licensed electrician—especially any work inside electrical panels or involving main service grounding. Basic DIY tasks like checking for loose outlet covers or using outlet testers are usually fine, but running new ground wires or updating the grounding system should be left to a professional to ensure your insurance remains valid.