
Introduction: Lighting Up Your Outdoors the Smart Way
Outdoor lighting transforms your home’s exterior, enhancing safety, boosting curb appeal, and allowing you to enjoy your yard long after sunset. Whether you’re adding path lights, accent fixtures, or security floodlights, installing outdoor lighting is more than just an aesthetic upgrade—it involves careful planning, understanding electrical principles, respecting safety codes, and making smart choices about fixtures and wiring. Many homeowners underestimate the complexity involved or make costly mistakes that lead to safety hazards, code violations, or premature failures. This guide is your comprehensive resource for planning, wiring, and installing outdoor lighting that is safe, energy-efficient, and built to last. We’ll walk you through budgeting, layout design, fixture selection, wiring options, safety checks, and ongoing maintenance, all tailored for DIYers and those working with professionals. By the end, you’ll understand how to create a beautiful, functional outdoor lighting system that enhances your property while ensuring the utmost safety and compliance.
Planning Your Outdoor Lighting Project
Setting Goals: Function, Safety, and Aesthetics
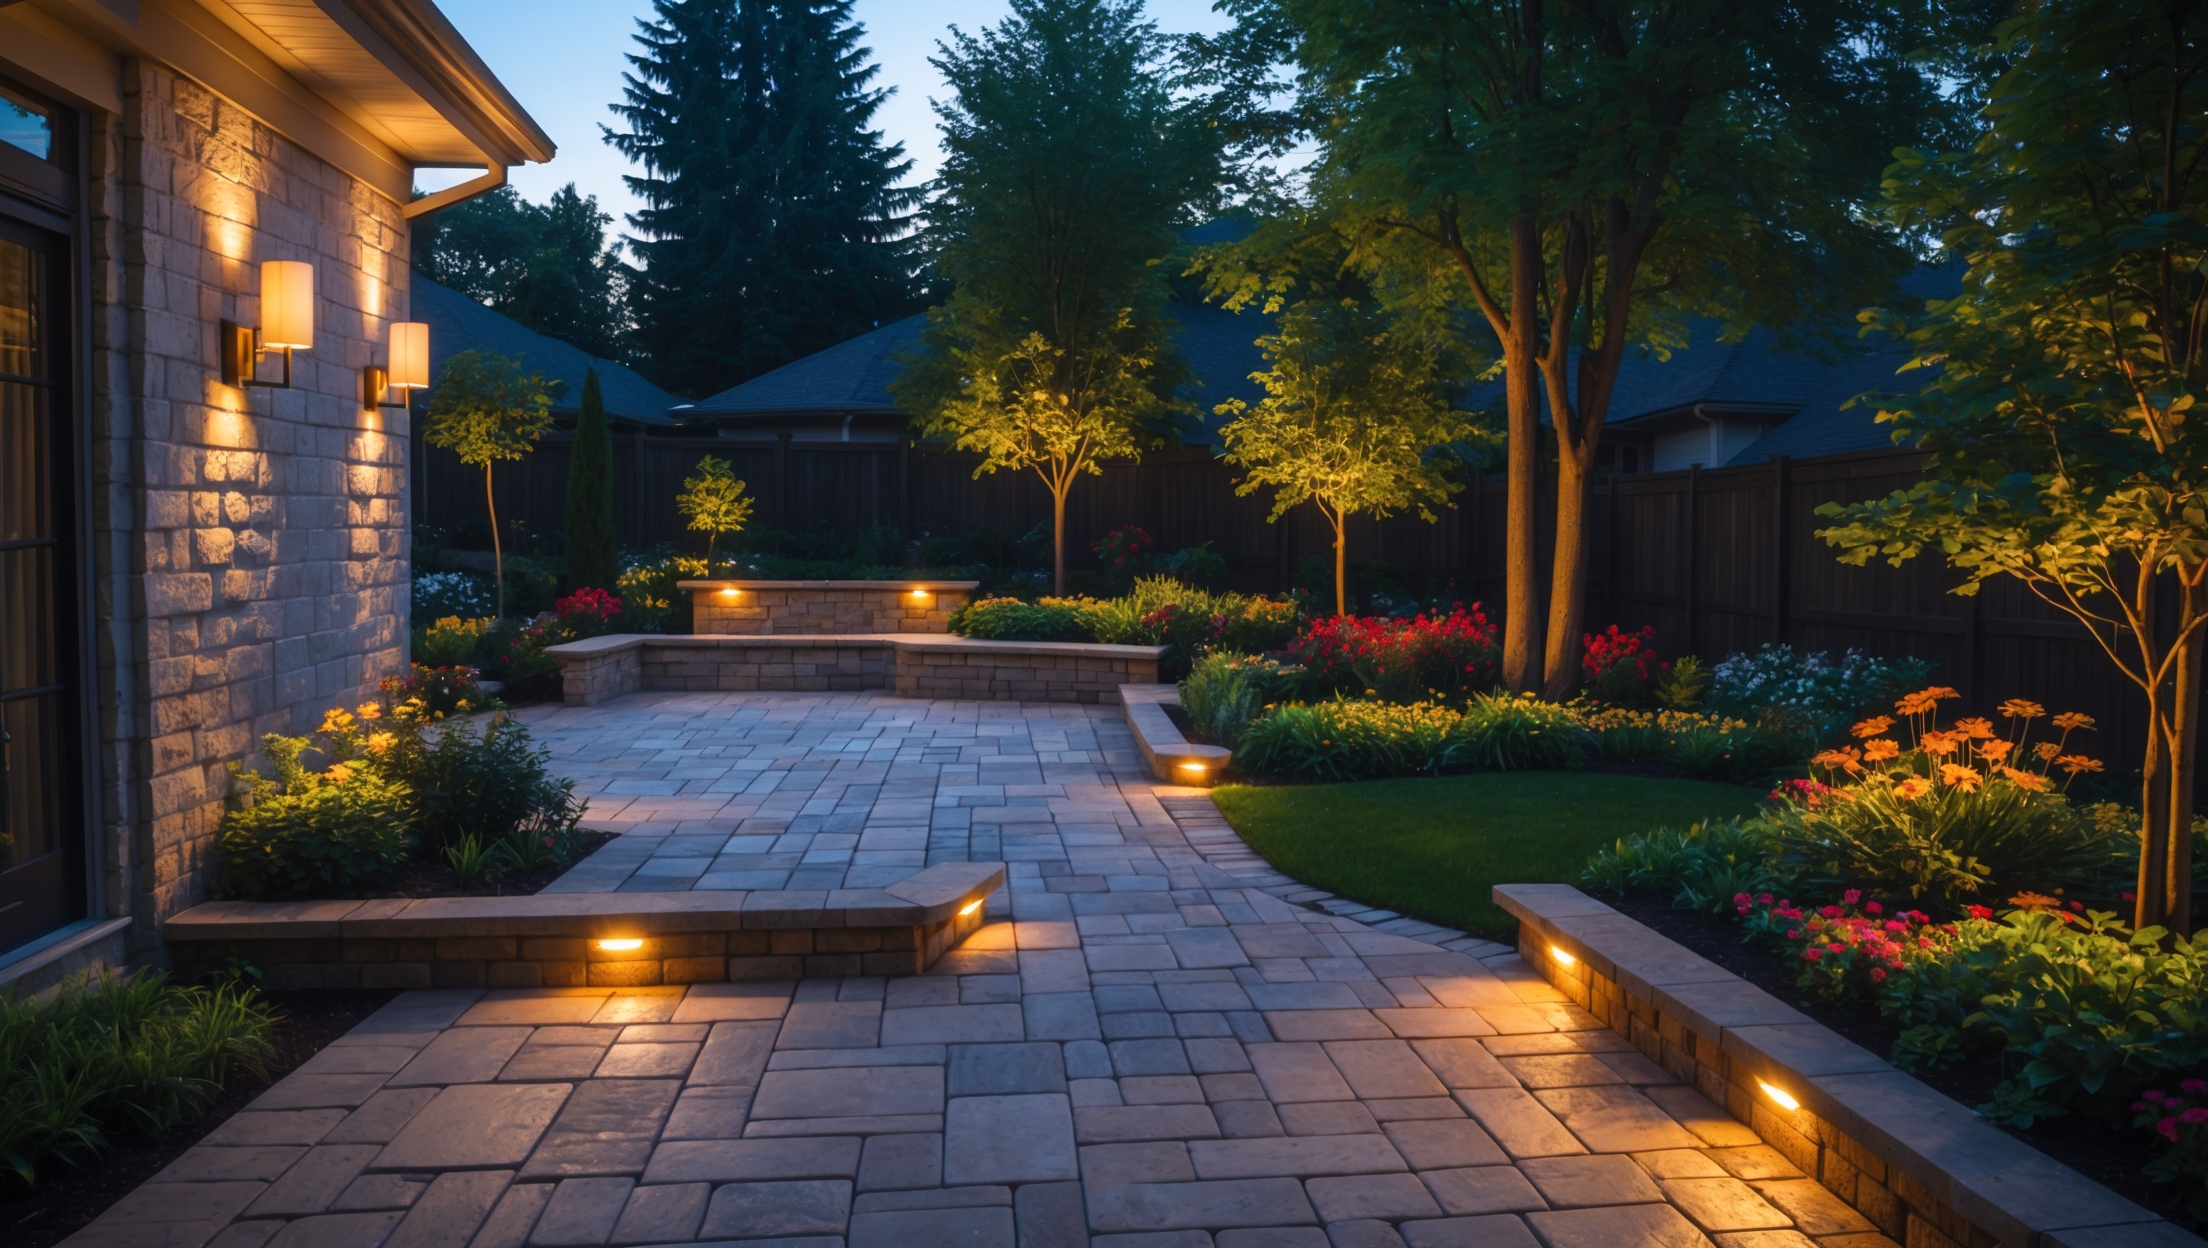
Begin by clarifying why you want outdoor lighting. Are you aiming to deter intruders, safely guide guests to your door, showcase landscaping, or create ambiance for outdoor gatherings? Defining your priorities helps determine fixture types, placement, and control systems.
- Security: Focus on motion-activated floodlights around entrances, driveways, and dark corners.
- Safety: Use path, step, and deck lighting to prevent trips and falls.
- Aesthetics: Accent lighting for trees, architectural features, or water elements.
- Functionality: Task lighting for grilling, seating, or work areas.
Mapping Your Lighting Layout
Draw a scaled diagram of your outdoor spaces. Mark fixed features like doors, walkways, patios, trees, and existing electrical outlets. Sketch in desired fixture locations and consider sight lines from inside and outside your home. Think about:
- Fixture spacing and overlap to avoid dark patches or glare.
- Wiring routes that minimize trenching and disruption.
- Access to power sources—outdoor-rated outlets or existing circuits.
Budgeting: What to Expect
Outdoor lighting costs can vary widely. Consider:
- Fixtures: Quality outdoor-rated fixtures cost $30–$200 each, depending on style and technology (LED, solar, low-voltage, smart).
- Wiring and Supplies: Expect $1–$3 per linear foot for low-voltage cable and $2–$4 for conduit and weatherproof boxes for line voltage.
- Transformers and Controls: Low-voltage systems require transformers ($50–$200), while smart controls or timers add $30–$150.
- Professional Labor: Electricians typically charge $50–$120 per hour; expect $300–$1,500+ for complex projects.
Choosing the Right Fixtures and Technologies
Fixture Types and Their Uses
- Path Lights: Short posts with diffused light for walkways and borders.
- Spotlights: Directional light to highlight trees, walls, or art.
- Floodlights: Wide-beam, high-output fixtures for security and large areas.
- Wall Lights/Sconces: Mounted on exterior walls for entryways and patios.
- Deck and Step Lights: Recessed or surface-mounted for walkways, stairs, and decks.
- Well and In-ground Lights: Subtle, flush-mounted fixtures for driveways and garden beds.
Choosing Between Low Voltage, Line Voltage, and Solar
- Low Voltage (12V): Safer and easier for DIYers, ideal for accent and pathway lighting. Requires a transformer plugged into a GFCI outlet.
- Line Voltage (120V): Used for high-output fixtures and large areas. Requires expertise in wiring and local code compliance. All connections must be weatherproof and GFCI protected.
- Solar: Easy to install, no wiring, but performance depends on sunlight and battery quality. Best for accent or pathway lighting, not for security or high-brightness needs.
Smart and Energy-Efficient Options
- LED Fixtures: Lower energy use, long lifespan, and available in a range of brightness and colors.
- Smart Controls: WiFi or Bluetooth timers, motion sensors, or voice control via smart home systems.
- Dusk-to-Dawn Sensors: Automate lighting to turn on at sunset and off at sunrise.
Understanding Outdoor Electrical Safety and Compliance
National Electric Code (NEC) and Local Regulations
Outdoor electrical work must meet the NEC and any stricter local codes. Key requirements include:
- Use of weatherproof (UL-listed) fixtures, boxes, and conduit.
- GFCI protection for all outdoor outlets and circuits.
- Proper burial depth for wiring: 6″ for low-voltage cable, 12–18″ for line voltage in conduit (check local codes).
- Permits may be required for new wiring or additional circuits. Always check with your local inspector before starting.
Safety Gear and Precautions
- Always turn off power at the breaker before working on electrical systems.
- Wear insulated gloves and use insulated tools.
- Never work on outdoor wiring in wet or damp conditions.
Step-by-Step Installation: From Planning to Power
1. Gather Tools and Materials
- Outdoor-rated fixtures
- Low-voltage transformer (for 12V systems)
- Outdoor-rated cable (UF cable for line voltage, low-voltage cable for 12V)
- Weatherproof electrical boxes and connectors
- Conduit (PVC or metal for line voltage)
- Wire strippers, voltage tester, shovel or trenching tool
- GFCI outlet or breaker
- Mounting hardware
2. Lay Out and Prepare the Site
- Use flags or stakes to mark fixture locations and cable routes.
- Call 811 to have underground utilities located before digging.
- Clear the area of debris and obstacles.
3. Run Wiring and Install Boxes
- For low-voltage: Unroll cable above ground, connect fixtures, and test layout before burying (6″ deep).
- For line voltage: Install conduit per code, run UF cable, and mount weatherproof boxes at each fixture location. Wire connections must remain inside boxes with appropriate waterproof wire nuts.
- Secure all cables and conduit to prevent shifting.
4. Mount and Connect Fixtures
- Attach fixtures securely according to manufacturer instructions.
- Seal around boxes and entry points with exterior-grade caulk to prevent moisture intrusion.
- Connect wires: For low-voltage, use quick-connect or waterproof connectors; for line voltage, match color codes and ensure tight, protected connections.
5. Install and Set Up Controls
- Plug low-voltage transformer into a GFCI outlet and set timer or photocell as desired.
- Install switches, timers, or smart controls in weatherproof boxes for line-voltage systems.
6. Test and Finalize
- Turn on power and test all fixtures for proper operation and coverage.
- Adjust fixture angles and brightness as needed.
- Backfill trenches carefully, leaving a slight mound to account for settling.
- Double-check that all boxes are sealed and cable entry points weatherproofed.
Cost-Saving and Energy-Efficiency Tips
- Choose LED fixtures for significant long-term energy savings.
- Use motion sensors or timers to reduce unnecessary run time.
- Limit high-output floodlights to necessary areas; use accent lighting elsewhere.
- Consider DIY installation for low-voltage systems to save on labor (but know your limits).
- Group fixtures on circuits/zones to control separately and avoid overloading.
Maintenance Best Practices for Outdoor Lighting
Routine Maintenance Checklist
- Inspect fixtures quarterly for water intrusion, corrosion, or physical damage.
- Clean lenses and housings to maintain brightness and appearance.
- Check and reset timers, photocells, and smart controls seasonally.
- Trim vegetation away from fixtures and wiring routes.
- Test GFCI outlets at least monthly.
Troubleshooting Common Issues
- Flickering or dim lights: Check connections, transformer output, and bulb condition.
- Tripped breakers or GFCI: Inspect for moisture in boxes, damaged wires, or overloaded circuits.
- Non-working fixtures: Test with a voltage meter, replace bulbs, or check for broken wires.
- Corrosion: Use dielectric grease on connections and replace rusted parts promptly.
Advanced Upgrades and Considerations
Integrating Smart Home Features
- Connect outdoor lights to your home automation hub for remote control and scheduling.
- Integrate with security cameras for automated lighting on motion detection.
Expanding or Modifying Your System
- Leave slack loops in wiring and record cable routes for future expansion.
- When adding more fixtures, ensure transformer and circuit capacity are not exceeded.
- Consider color-changing LEDs or programmable scenes for seasonal or event lighting.
Conclusion: Bringing Your Outdoors to Life—Safely and Efficiently
Thoughtful outdoor lighting is more than a finishing touch—it’s a blend of safety, security, visual appeal, and smart energy use. By planning your layout carefully, selecting the right fixtures and technologies, and adhering to electrical codes, you’ll create a system that not only enhances your home’s beauty but also its value and safety. Remember that proper installation and regular maintenance are critical to avoid hazards like electrical shorts, fire risks, or premature equipment failure. If you’re ever in doubt about wiring or code compliance, consult a licensed electrician; safety should never be compromised. With the right approach, you can enjoy stunning, reliable outdoor lighting that welcomes you home, protects your property, and turns your yard into a nighttime oasis—all while keeping energy costs in check. Light up your outdoors with confidence, knowing your system is as safe and efficient as it is beautiful.
You talked about choosing fixtures based on whether you want security, safety, or ambiance. If I want a mix of all three, is it better to use the same type of fixture throughout, or should I use different ones for each function for better results?
For the best results, it’s usually better to use different types of fixtures for each function. Security lighting often needs to be bright and cover wide areas, while safety lighting focuses on pathways and steps. Ambiance lighting is softer and highlights features or creates mood. Mixing fixtures lets you tailor light levels and styles to each purpose, making your outdoor space both practical and inviting.
I noticed you mentioned both energy efficiency and safety compliance when installing outdoor lighting. Are there particular types of fixtures or wiring materials that work best to meet both goals, especially in areas with harsh weather?
For both energy efficiency and safety in harsh weather, LED fixtures with weatherproof (IP65 or higher) ratings are a top choice. They consume less power and withstand moisture and dust. For wiring, use outdoor-rated, UV-resistant cables like UF-B (underground feeder) or THWN-2 wires inside conduit for extra protection. Always ensure that fixtures and wiring meet local codes and use proper ground fault protection for safety.
When it comes to budgeting, how can I estimate the overall cost for installing outdoor lighting myself versus hiring a professional? The article mentions budgeting but doesn’t give any ballpark figures or what kinds of unexpected expenses might come up.
To estimate your DIY cost, add up the price of fixtures, wiring, junction boxes, tools you might need, and any permits. For a basic setup, this could range from $200 to $800. Hiring a professional often starts around $1,000–$3,000, depending on the project size and fixture quality. Unexpected expenses might include renting specialized tools, fixing damaged wiring, or addressing code requirements. Always add 10–20% to your budget to cover surprises.
Can you explain how to choose between low-voltage and line-voltage wiring for outdoor lights? I want to make sure I pick an option that’s both safe and energy-efficient, but I’m a little confused about the pros and cons.
Choosing between low-voltage and line-voltage wiring depends on your lighting needs. Low-voltage (12V) is safer, easier to install, and more energy-efficient, making it ideal for garden paths or accent lighting. Line-voltage (120V) is better for large areas or commercial spaces but requires professional installation and proper safety measures. For most home projects, low-voltage is recommended for safety and efficiency unless you need very bright illumination.
You mentioned budgeting as part of the planning process. Could you provide a ballpark estimate for a small DIY outdoor lighting project, including recommended fixture types and wiring options for someone on a tight budget?
For a small DIY outdoor lighting project on a tight budget, you can expect to spend around $100–$250. Solar-powered stake lights are the most affordable and easy to install option, averaging $5–$15 per fixture. For wired low-voltage path lights or spotlights, basic kits with transformer and wiring start at about $60. Stick to LED fixtures to keep energy costs low, and use pre-assembled low-voltage wiring kits for safety and simplicity.
I noticed the article mentions budgeting as an important step, but I’m unsure how much I should expect to spend if I want to install basic path lighting along a 40-foot walkway. Could you suggest a ballpark cost for a simple DIY setup including wiring and fixtures?
For a basic DIY path lighting setup along a 40-foot walkway, you can expect to spend between $100 and $300. This estimate covers low-voltage LED path lights (about 6 to 8 fixtures), wiring, connectors, and a transformer. Prices vary depending on fixture quality and brand, but this range should give you a good starting point for budgeting.
For budgeting purposes, can you provide ballpark costs or tips on how to estimate the overall price when selecting different fixture types and wiring methods, especially for homeowners who want to balance aesthetics and energy efficiency without overspending?
To estimate costs, start by listing the number and type of fixtures you want—LED lights are more energy-efficient and often save money long-term, though they may cost more upfront. For fixtures, expect to pay $30–$150 each, depending on style. Wiring and installation can range from $200 to $1,000 depending on complexity. Get quotes from electricians and compare DIY versus professional installation. Setting a clear budget and prioritizing key areas will help balance looks, efficiency, and spending.
I noticed your article covers choosing between different types of fixtures for security, safety, and aesthetics. How do you recommend prioritizing those if my budget is limited and I can’t do everything at once?
If your budget is limited, start by prioritizing security lighting around entry points, driveways, and dark corners. This helps protect your home and gives you peace of mind. Next, focus on safety lighting for pathways and steps to prevent accidents. Once those essentials are covered, you can add aesthetic lighting like accent or landscape features as your budget allows.
When mapping out the lighting layout as suggested, how do you recommend homeowners balance the need for both safety and aesthetics without over-lighting certain areas or causing glare? Are there specific fixture types or placement strategies you find work best for this?
Balancing safety and aesthetics starts with identifying key zones: pathways and entrances need brighter, even lighting for safety, while accent lights can highlight landscaping or architectural features for visual interest. Use shielded or downward-facing fixtures to reduce glare, and avoid placing lights too close together to prevent over-lighting. Low-intensity, warm-colored lights work well for ambiance, and spacing fixtures at regular intervals ensures even coverage without harsh spots.
I noticed you mentioned budgeting as part of the planning process, but I’m not sure what a realistic cost range is for a basic DIY setup. Could you give a rough estimate for someone looking to add path and accent lights around a small yard?
For a basic DIY setup with path and accent lights around a small yard, you can expect to spend anywhere from $100 to $400. This estimate covers LED path lights and a few accent lights, plus wiring and a low-voltage transformer. If you choose solar-powered lights, costs can be on the lower end since you won’t need wiring or a transformer. Actual costs depend on the number and quality of fixtures you pick.
The guide mentions ongoing maintenance for outdoor lighting. What sort of maintenance should I expect to do regularly, and are there specific fixture types that tend to require less upkeep over time?
You can expect to clean lenses and fixtures regularly to remove dirt and debris, check for and replace burnt-out bulbs, and inspect wiring connections for signs of wear or damage. LED fixtures generally require less upkeep because they last longer and are more energy-efficient. Additionally, fixtures made from stainless steel or brass resist corrosion better than cheaper materials, so they often need less maintenance over time.
Could you clarify what kind of ongoing maintenance is usually required for outdoor lighting systems, especially when it comes to energy-efficient fixtures? I want to make sure I’m prepared for any regular tasks or potential issues that might come up after the installation is finished.
For outdoor lighting systems, especially energy-efficient ones like LEDs, routine maintenance is simple but important. Check fixtures periodically for dirt, debris, or insect buildup and clean them gently to keep the light output bright. Inspect cables and connections for damage, especially after storms. Replace any faulty bulbs or components promptly. Also, check that timers or motion sensors are working correctly, as settings can drift over time. Regular upkeep will help your system remain efficient and reliable.
When planning the layout for outdoor lighting, the article suggests drawing a scaled diagram. Are there any recommended tools or apps that can help with creating an accurate outdoor lighting plan, especially if I’m not great at drawing by hand?
You don’t need to rely on hand drawing if that’s not your strength. Digital tools like SketchUp, SmartDraw, or even simple options like Microsoft Visio can help you create a clear, scaled diagram for your outdoor lighting plan. Some landscape design apps also offer specific lighting features, making it easier to visualize placements and wiring paths.
Could you provide more details about how to create a scaled diagram for the lighting layout? I’m a bit stuck on what measurements or tools are best for marking features like existing electrical outlets and trees before I start buying fixtures.
To create a scaled diagram, start by measuring your outdoor area and noting key features like walls, walkways, trees, and existing outlets. Use graph paper, assigning each square a set distance, such as one square equals one foot. A tape measure works well for distances, and a ruler or architect’s scale helps keep proportions accurate. Mark the locations of trees and outlets clearly on your drawing. This will help you visualize fixture placement and ensure nothing important is missed before purchasing any lighting.
When you’re mapping out your lighting layout like the article suggests, how do you determine if your existing electrical outlets can handle the extra load, or if you’ll need to upgrade your electrical panel for safety?
To figure out if your outlets can handle the extra lighting, add up the total wattage of all new and existing outdoor lights, then divide by your voltage (usually 120V) to get the total amperage. Compare this to the circuit’s capacity, which is usually 15 or 20 amps. If you’re close to or above capacity, or planning a large installation, it’s best to consult a licensed electrician to see if a panel upgrade or new circuit is needed for safety.
The guide talks about safety checks, but what are some common mistakes people make when choosing fixture types for wet or exposed areas? How do I know if a fixture is truly rated for the kind of weather we get in the Midwest?
One common mistake is using indoor-rated fixtures or ones with a low IP (Ingress Protection) rating in wet or exposed areas. For Midwest weather, look for fixtures labeled as ‘wet location’ rated and with a minimum IP rating of IP65 to ensure they can withstand rain, snow, and humidity. Always check the manufacturer’s specifications and avoid fixtures only rated for ‘damp locations,’ as they aren’t suitable for direct exposure.
I want to do some of this installation myself, but I’m on a college budget. Can you recommend which types of fixtures or wiring options offer a good balance between price and energy efficiency without skimping on safety?
For a college budget, LED fixtures are a smart choice since they’re energy efficient and have long lifespans, saving money on both electricity and replacements. For wiring, low-voltage (12V) systems are not only safer for DIY installation but also tend to be more affordable. Stick with weatherproof, outdoor-rated materials to maintain safety without overspending.
The section about setting goals mentions balancing functionality with aesthetics. If my priority is security, but I also want the yard to look welcoming, are there fixture styles or layouts that fit both needs without blowing my budget?
You can achieve both security and a welcoming look by choosing fixtures like wall-mounted lanterns or LED floodlights with warm color temperatures. Place security lights at entry points and paths, and use softer accent lights on landscaping or seating areas. Solar-powered or low-voltage options can help keep costs down while blending functionality with style.
I’m trying to figure out the best way to create a lighting layout for our backyard, especially with a bunch of trees and winding pathways. Do you have any tips for mapping out a scaled diagram if I’m not very confident with drawing or measurements?
You don’t need to be an artist to create an effective lighting layout. Start by using graph paper; each square can represent a set distance, like one foot or half a meter. Walk your yard and use a measuring tape or even pacing to estimate lengths. Mark out major features like trees and pathways, then sketch where you want lights for safety and effect. If you prefer digital tools, simple apps or free online garden planners can make mapping easier. Focus on clarity rather than perfect drawing skills.
When mapping out the lighting layout, should I account for potential future changes to landscaping or hardscaping, or is it best to install wiring only for my current plans to avoid complications with code compliance?
It’s wise to consider potential future changes when planning your lighting layout. Running extra conduit or leaving access points can make it much easier to add or move fixtures later, saving time and money. Just ensure any installed wiring follows current electrical codes, even if you aren’t using all the wires right away. Planning ahead helps keep your lighting adaptable without creating compliance issues.
You mention safety checks and ongoing maintenance at the end. Are there specific maintenance tasks I should schedule regularly to avoid premature failure of my outdoor lighting system, or signs that indicate I need to call a professional?
Yes, regular maintenance is important for outdoor lighting. You should clean fixtures, check for loose connections, and replace burnt-out bulbs every few months. Watch for flickering lights, exposed wiring, or persistent outages—these can signal electrical issues that need a professional. Also, inspect for water damage or corrosion, especially after heavy weather.
I’m curious about the budgeting process described for outdoor lighting installations. What are some typical hidden costs DIYers run into beyond fixtures and wiring, like permitting or professional inspections, and how much should I expect those to add to the overall project?
When budgeting for outdoor lighting, it’s wise to plan for hidden costs beyond just the fixtures and wiring. Common extras include permit fees (which can range from $50 to $200 depending on your area), potential professional inspections (usually $100 to $250), and possible tool rentals if you don’t own everything needed. Also, unexpected issues like trenching through tough soil or repairing landscaping after installation can add $100–$500 or more to your total. Factoring in these costs upfront will give you a more realistic budget.
If I’m primarily interested in improving pathway safety but also want to add some accent lighting later, is it better to plan and install all wiring up front, or can the system be easily expanded in stages without redoing electrical work?
It’s usually best to plan and install all the wiring up front, even if you only add basic pathway lighting initially. This approach avoids having to dig or run new cables later, which can be much more work. With conduit or extra wiring in place, you can easily add accent lights later without redoing electrical work.
Can you provide some guidance on budgeting? I’m trying to figure out what a realistic price range would be for a DIY outdoor lighting project that includes both path lights for safety and a couple of accent fixtures.
For a DIY outdoor lighting project with path lights and a few accent fixtures, you can typically expect to spend between $150 and $500. Path lights usually range from $20 to $50 each, while accent fixtures can be $30 to $80 each. Don’t forget to include costs for low-voltage wiring, a transformer (about $50 to $150), and possibly basic tools. Your total will depend on the number and quality of fixtures you choose.
I’m concerned about picking the right fixtures for both aesthetics and safety. Is it better to prioritize one over the other, especially if I have a limited budget, or can certain types of lights serve both purposes effectively?
You definitely don’t have to choose one over the other. Many outdoor fixtures offer both safety and style—look for options like path lights or wall-mounted sconces that create a welcoming look while illuminating walkways and entry points. If your budget is limited, consider prioritizing key areas for safety first, then select designs that complement your home’s appearance. This way, you balance both needs efficiently.
I’m trying to set a realistic budget for my outdoor lighting project. Could you provide more detail about the typical cost differences between DIY installation versus hiring a professional, especially when it comes to electrical work and code compliance?
DIY installation of outdoor lighting typically costs less up front, often ranging from $100 to $500 for basic materials and fixtures, depending on your choices. Hiring a professional can cost anywhere from $1,500 to $4,000 or more, which includes labor, higher-grade materials, and proper electrical work. Professionals ensure everything meets local electrical codes, reducing safety and compliance risks. If your project involves new wiring, a licensed electrician is strongly recommended, as they can handle permits and inspections needed for code compliance.
Can you explain more about how to budget for a DIY outdoor lighting project? I’m particularly concerned about unexpected costs related to wiring or code compliance.
When budgeting for DIY outdoor lighting, start by listing all the necessary materials, like fixtures, cables, connectors, and weatherproof boxes. Add a buffer—typically 10–20%—for unexpected costs, especially if you encounter issues like outdated wiring or need extra conduit. For code compliance, check your local regulations early to see if you’ll need permits or inspections, as fees can add up. Consider consulting an electrician for a quick review to avoid costly mistakes later.
When mapping out the layout, do you recommend using any specific software or apps for creating scaled diagrams, or is it fine to just use graph paper? I’ve got a pretty complex yard with multiple levels and existing wiring, so I want to make sure my sketch is accurate.
For a complex yard with multiple levels and existing wiring, using software can help you create more accurate and detailed scaled diagrams. Apps like SketchUp, SmartDraw, or even basic CAD programs let you adjust for scale and layers easily. However, if you’re comfortable with graph paper and are precise with your measurements, that can work too. Just be sure to clearly mark levels and wiring paths, whichever method you choose.
Regarding budgeting for outdoor lighting, does the guide have recommendations on where to prioritize spending, like on high-quality fixtures or wiring, or is it more important to invest in timers and control systems for energy efficiency?
The guide suggests prioritizing your budget on high-quality fixtures and durable wiring, as these are essential for safety and longevity, especially outdoors. While timers and control systems are valuable for energy efficiency, it’s recommended to invest in these after you’ve ensured that your core lighting components are robust and reliable.
When budgeting for an outdoor lighting project, do you have tips on estimating overall costs, including wiring and fixture selection? I’m trying to figure out how to balance upfront investment with ongoing energy efficiency as mentioned in your guide.
To estimate overall costs, start by listing how many fixtures you need and their types—LED fixtures usually cost more upfront but save on energy bills long-term. Factor in wiring length, conduit, labor, and any needed permits. Calculate energy usage for each fixture to estimate ongoing costs. Prioritizing efficient bulbs and smart controls can help balance your initial spend with future savings.
You mention that many homeowners underestimate the complexity and could run into safety hazards or code violations. What are some common electrical code requirements I need to be especially aware of during a DIY installation?
Some key electrical code requirements for outdoor lighting include using weatherproof (wet-rated) fixtures and boxes, installing ground fault circuit interrupter (GFCI) protection, and using proper outdoor-rated wiring (like UF cable). Also, all connections should be made in approved junction boxes, and cables must be buried at the correct depth—typically 18 inches for direct-burial wire. Local codes may have extra requirements, so it’s always a good idea to check with your local building authority before starting.
When mapping out the lighting layout, how should I balance between security lights and accent lighting so it doesn’t end up being too bright or uneven? Is there a recommended way to space or layer different types of fixtures?
When mapping your layout, first use security lights at key entry points and dark corners, but keep their brightness focused and avoid flooding the entire area. For accent lighting, highlight pathways, plants, or features using softer, lower-lumen fixtures. Space security lights about 15–20 feet apart, while accent lights can be placed closer, depending on what you want to showcase. Layering is most effective when you combine security and accent lights so their beams don’t overlap too much, avoiding glare and uneven patches.
You mentioned choosing between different wiring options for outdoor lighting. Could you elaborate on how to decide whether to go with low-voltage versus line-voltage systems, especially in terms of safety and energy efficiency for a typical home?
Low-voltage systems (usually 12V) are safer for most homeowners, especially in wet outdoor environments, since there’s less risk of electrical shock. They’re also typically more energy-efficient and easier to install, making them ideal for gardens or pathways. Line-voltage systems (120V) offer brighter lighting and may be better for large areas or security lighting, but they require professional installation and must follow strict electrical codes. For most home applications, low-voltage is recommended for both safety and energy savings.
In your guide you mention budgeting for outdoor lighting, but what are some typical costs homeowners should expect for materials and hiring a professional versus doing it themselves? Any tips for saving money without sacrificing safety or durability?
Homeowners can expect to spend $100–$500 for basic materials like fixtures, wiring, and transformers if doing it themselves, while hiring a professional might range from $1,200 to $3,000 or more depending on project size and complexity. To save money, consider using LED lights for efficiency and longevity, choose solar options where possible, and handle simpler tasks like fixture placement yourself. Always use weatherproof components and never cut corners on safety with wiring or connections.
You mention budgeting for the project—are there any common hidden costs I should be aware of when it comes to wiring or fixture selection, especially for a DIY installation?
Some common hidden costs for DIY outdoor lighting projects include purchasing extra wiring and connectors if your layout changes, investing in proper weatherproof junction boxes, and buying tools you might not already own (like a voltage tester or trenching equipment). Also, certain fixtures may require special bulbs or mounting hardware not included in the box. Factoring in these extras can help prevent surprises as your project progresses.
You mention budgeting as part of the planning process for outdoor lighting. Could you give some ballpark figures or examples for what a typical DIY installation might cost versus hiring a professional, especially if I want to focus on both security and aesthetics?
For a DIY outdoor lighting project focusing on both security and aesthetics, expect to spend around $200 to $800, depending on the number and type of fixtures, wiring, and any tools you might need. Hiring a professional can range from $1,500 to over $3,000, since labor and expertise add to the cost. These estimates can vary by region and the complexity of your design, such as adding smart controls or accent lighting.
When mapping the lighting layout, how precise do I need to be with my diagram? Should I include things like existing sprinkler systems or just stick to marking patios, walkways, and outlets as the article suggests?
Including patios, walkways, and outlets is essential, but adding existing sprinkler systems to your diagram can be very helpful. This extra detail helps you avoid accidental damage during installation and ensures your lighting plan works smoothly with other systems in your yard. So, while it’s not strictly required, being a bit more precise with your diagram is a good idea.
The article mentions budgeting and ongoing maintenance for outdoor lighting systems. Can you provide some ballpark figures on what homeowners typically spend on installation and what kind of maintenance is usually needed over time?
Homeowners generally spend anywhere from $2,000 to $5,000 for a professionally installed outdoor lighting system, depending on the size of the area and the type of fixtures chosen. For ongoing maintenance, plan for occasional bulb replacements, cleaning fixtures, checking wiring for damage, and resetting timers or smart controls. Annual maintenance might cost around $100 to $300, especially if you hire a professional for routine checks and upkeep.
When mapping out a lighting layout, is there a recommended way to determine how many circuits or how much electrical load I can safely add if my outdoor outlets are already powering other things, like a pond pump or holiday lights?
To determine how much additional lighting you can safely add, first check the amperage rating of your existing circuit (typically 15 or 20 amps) and the total wattage of devices already using it. Add up the wattage of your pond pump, holiday lights, plus new lighting, then divide by your circuit voltage (usually 120V in most homes) to get the total amps. Try to keep total load below 80% of the circuit’s capacity for safety and to avoid tripping breakers.
When it comes to mapping out the lighting layout, how do I know if I need to upgrade my existing electrical outlets or add new ones to safely handle the extra load from outdoor lights? Is this something a DIYer can usually assess, or do I need to call an electrician right away?
To determine if your current outlets can handle the extra load from new outdoor lights, start by checking the total wattage of all planned fixtures and compare it with the amperage rating of your existing circuit (usually listed on your breaker). If the total load approaches 80% of the circuit’s capacity, it’s best to add a new outlet or circuit. While basic calculations can be done by a DIYer, if you’re unsure about your home’s wiring or have an older system, consulting an electrician is the safest choice.
You talk about budgeting for an outdoor lighting project. What are some common unexpected costs people run into during installation, especially for DIYers, and how can I plan for them?
Some common unexpected costs for DIY outdoor lighting include extra wiring or connectors if your initial measurements are off, renting trenchers or digging tools for underground cables, replacing faulty fixtures, and buying additional weatherproofing materials. You may also need to update your circuit breaker if your system draws more power than expected. To plan ahead, set aside a 10-20% buffer in your budget to cover these surprises and double-check local code requirements before starting.
If I want to combine motion-activated floodlights for security with pathway lights for safety, is it better to keep these systems separate, or can they share wiring and control systems? I’m worried about making things too complicated when it comes to controls and maintenance.
You can technically combine motion-activated floodlights and pathway lights on the same circuit, but it’s usually better to keep them separate. This way, each system can be controlled and maintained independently, which simplifies troubleshooting if something goes wrong. Having separate wiring also lets you use dedicated switches, timers, or sensors for each area, keeping both security and safety features straightforward and reliable.
I noticed you mentioned both DIY installations and working with professionals. How can I tell which parts of the outdoor lighting project are safe for a homeowner with basic skills to tackle, and which steps should always be left to an electrician?
If you have basic DIY skills, you can usually handle tasks like planning the lighting layout, installing low-voltage lighting systems, and mounting fixtures. However, anything involving direct wiring to your home’s electrical system—such as running new circuits or connecting to the main panel—should always be done by a licensed electrician. If you ever feel unsure or need to comply with local codes, it’s best to consult a professional.
You mention ongoing maintenance for outdoor lighting systems. What kind of maintenance should I expect after installation, and how often do things like bulbs, fixtures, or wiring typically need attention if I install everything correctly the first time?
After a proper installation, outdoor lighting systems usually need only minimal upkeep. Bulbs may need replacing every 1-3 years, depending on type and usage—LEDs last longer than halogens. Clean fixtures and lenses once or twice a year to prevent dirt buildup. Check for loose wires, corrosion, or water intrusion annually. Wiring and fixtures can last many years if installed correctly, but a quick annual inspection helps catch any early signs of wear.
Could you elaborate a bit more on how to map out the electrical wiring when creating a scaled diagram of your outdoor space? Specifically, I’m not sure how to factor in the distance between fixtures and the location of existing outlets to avoid overloading circuits.
When mapping out your wiring on a scaled diagram, first mark the location of your existing outlets. Then, draw the placement of each light fixture, measuring the distance between them and to the outlets. Use the scale to ensure accuracy. Add up the wattage of each fixture and check that the total load for each circuit doesn’t exceed 80% of the outlet’s rated capacity. This helps prevent overloading. If distances are long, consider voltage drop and use thicker wire if needed.
If I want to install motion-activated floodlights for security but also want softer accent lighting for aesthetics, is it possible to wire them on separate circuits, or does that get complicated for a DIY installer?
You can definitely wire motion-activated floodlights and accent lighting on separate circuits, and many homeowners choose this setup for flexibility. It does add a bit more complexity, since you’ll need to run separate wiring and possibly add an extra breaker in your panel. If you’re comfortable with basic electrical work and follow safety codes, it’s a manageable DIY project. However, if you’re unsure, consulting a licensed electrician is a good idea.
The guide suggests drawing a scaled diagram that includes existing electrical outlets. If a homeowner wants to add new outlets to accommodate their lighting plan, what are the main factors to consider regarding placement and running new wiring safely outdoors?
When adding new outdoor outlets, it’s important to choose locations that are convenient for your lighting yet protected from direct rain. Use weatherproof, GFCI-protected outlets for safety. Plan the wiring route to avoid areas where digging could damage pipes or cables, and bury outdoor-rated wiring at the correct depth in conduit. Always follow local electrical codes, and if unsure, consult a licensed electrician.
In the budgeting section, do you have any advice for estimating the total cost, especially if I want both security floodlights and accent lighting? I’m concerned about hidden expenses like permits or upgrading electrical capacity.
When estimating costs, break down your budget into fixtures (security floodlights and accent lights), wiring, controls, and labor. Don’t forget potential permit fees—which can vary by location—and factor in a contingency for unforeseen expenses. If your home’s electrical panel is older, upgrading capacity can add significantly to the total. Contacting a licensed electrician for an assessment can help avoid surprise costs and ensure your plan meets code.
The article mentions both DIY installs and working with professionals. For someone trying to balance budget and safety, at what point would you say it makes sense to bring in an electrician instead of handling everything as a homeowner?
If your outdoor lighting project involves simple tasks like plugging in solar or low-voltage lights, most homeowners can handle these safely. However, if you’re installing new wiring, adding circuits, or working near the main electrical panel, it’s wiser to hire a licensed electrician. This ensures your setup meets safety codes and prevents potential hazards. Generally, when the project involves anything beyond basic plug-in or battery-operated lights, bringing in a professional is the safest choice.
When planning the layout for outdoor lighting, how do you recommend handling situations where there are limited existing electrical outlets? Is it better to add new outdoor-rated outlets or rely on low-voltage systems in those cases?
If you have limited existing electrical outlets, adding new outdoor-rated outlets is a safe and flexible option, especially for standard voltage lighting or areas where you may want to plug in other devices in the future. However, low-voltage systems can be a great alternative—they’re easier to install, use less power, and often don’t require as many outlets since they are powered by a transformer connected to a single outlet. Your choice depends on your lighting needs, budget, and long-term plans for the space.
When mapping out the lighting layout for my backyard, how accurate does the scaled diagram need to be? Should I measure everything with a tape measure or can I just estimate distances for things like patios and walkways?
For your backyard lighting layout, it’s best to use accurate measurements, especially for permanent features like patios and walkways. Using a tape measure ensures your lights are positioned exactly where you want them and helps avoid issues with wiring lengths or coverage gaps. Estimating can lead to uneven lighting or missed spots, so while you don’t need architectural precision, taking a little extra time to measure will make the installation smoother and the results more reliable.
When mapping out the lighting layout as suggested, how do you recommend accounting for future landscaping changes or additions? Are there flexible wiring options or installation techniques that make it easier to adapt the system later without rewiring everything?
Planning for future landscaping changes is smart. Consider using conduit pipes to run your wiring underground; this lets you pull new wires or adjust existing ones more easily if your lighting needs change. Leave extra slack in your wiring at key points and install junction boxes in accessible locations. Modular low-voltage systems are also a flexible option, allowing you to add or move lights without major rewiring.
When mapping out the lighting layout, do you recommend using any specific software or just sticking to hand-drawn diagrams? I’m trying to figure out the easiest way to plan everything accurately before I start buying fixtures or running wires.
Hand-drawn diagrams work well for simple layouts, especially if you’re comfortable sketching the space to scale. For more complex projects or if you want extra precision, user-friendly software like SketchUp or even basic online garden planners can help you visualize fixture placement and wiring paths. Choose the method that feels easiest for you, but make sure to measure carefully so your final plan matches your actual space.
When choosing between different types of outdoor fixtures for both security and aesthetics, how do I balance energy efficiency with brightness needs, especially since some areas require motion-activated floodlights while others just need accent lighting?
To balance energy efficiency with brightness for different outdoor areas, consider using LED fixtures, which provide strong illumination with low energy use. For motion-activated floodlights, choose LEDs with high lumens for security, but set timers or sensors so they only activate when needed. For accent lighting, opt for lower-lumen, energy-efficient LEDs or solar lights. This way, each area gets the right brightness without wasting electricity.
You mentioned budgeting as part of the process, but I’m unsure how to estimate costs before actually choosing fixtures and wiring. Are there any average price ranges or tips for setting a realistic budget for a standard-sized backyard project?
Estimating a budget for outdoor lighting can start with average price ranges. For a standard backyard, basic fixtures usually cost $20–$100 each, while wiring and supplies might add $200–$500. Labor, if you hire an electrician, typically ranges from $50–$100 per hour. A typical modest project often totals $500–$2,500. Consider your lighting goals and start with a rough fixture count, adding a buffer for unexpected costs to set a realistic budget.
I noticed the guide emphasizes the importance of following safety codes when installing outdoor lighting. As a small business owner, are there specific electrical codes or permits I should be aware of if I’m upgrading the exterior lighting on a commercial building?
Yes, as a small business owner upgrading exterior lighting on a commercial building, you’ll likely need to follow both national and local electrical codes—such as the National Electrical Code (NEC)—and secure the appropriate permits. Some areas require inspections, especially for commercial properties. It’s a good idea to check with your local building department about specific requirements before starting work, and consider hiring a licensed electrician to ensure compliance.
Could you clarify whether low-voltage lighting is safer and more practical for DIYers compared to standard 120V fixtures, especially for areas exposed to rain? I’m worried about both electrical safety and compliance with code in wet locations.
Low-voltage outdoor lighting is generally safer and more practical for DIYers, especially in wet or exposed areas. It operates at 12 to 24 volts, reducing shock risk compared to standard 120V fixtures. Low-voltage systems also tend to be easier to install and are widely accepted by electrical codes for wet locations, provided you use weatherproof connectors and transformers listed for outdoor use. Always follow manufacturer instructions and check local code requirements.
When mapping out the lighting layout, how do I decide the best placement for accent versus security lights so I don’t end up with too much glare or dark spots? Any tips for balancing aesthetics and safety?
To balance aesthetics and safety, place accent lights to highlight features like gardens or architectural details, aiming them downward or at an angle to avoid glare. For security, install lights near entry points, pathways, and dark corners, using motion sensors if possible. Use fixtures with shields or hoods to direct light where needed, and avoid placing too many lights close together. Test your layout at night and adjust positions until you achieve even coverage without harsh glare or deep shadows.
Your guide mentions budgeting as part of the planning process, but what are some realistic cost estimates for a typical backyard setup with path lights, a few accent spots, and one security floodlight? Should I expect higher installation costs if I need to update my existing outlets?
For a typical backyard setup with path lights, several accent spots, and a security floodlight, expect to spend about $500 to $1,500 for good-quality fixtures and materials. Professional installation usually adds $300 to $1,000, depending on complexity. If your outlets need updating or adding weatherproof GFCI outlets, electrical work can raise costs by $200 to $500 or more. Updates involving rewiring or adding circuits tend to increase installation expenses the most.
Could you go into more detail about how to safely connect new lighting fixtures to existing outdoor electrical outlets? I’m especially interested in best practices for waterproofing connections and ensuring compliance with outdoor electrical codes.
To safely connect new lighting fixtures to existing outdoor outlets, always turn off power at the breaker first. Use weatherproof outdoor-rated boxes and covers, and connect wires with waterproof wire nuts or silicone-filled connectors. All connections should be enclosed in an approved outdoor junction box with a gasketed cover. Check that your fixtures and cables are rated for outdoor use and are properly grounded. Finally, ensure you follow local electrical codes, including using GFCI outlets for any outdoor power source.
I noticed you mentioned budgeting for outdoor lighting projects. Can you provide a ballpark figure for what a typical installation might cost for a medium-sized patio and walkway area, especially when balancing quality with energy efficiency?
For a medium-sized patio and walkway, you can generally expect to spend between $1,500 and $3,500 for a complete outdoor lighting installation that balances quality and energy efficiency. This estimate includes fixtures, wiring, a transformer, and professional labor. Opting for LED fixtures can help save on long-term energy costs without sacrificing brightness or durability.
When mapping out the lighting layout, how do you decide the best spots to add new electrical outlets if your outdoor area doesn’t have many existing ones? Is it okay to use heavy-duty extension cords temporarily during the planning stage or is that a bad idea?
When deciding where to add new outdoor electrical outlets, focus on where you’ll need power most—like near seating, pathways, or garden features. Consider future needs for holiday lights or tools, too. Using heavy-duty extension cords temporarily is fine for testing placement, but it’s not safe as a permanent solution. Plan for weatherproof, professionally installed outlets for long-term use.
When mapping out the lighting layout, do you recommend any particular software or tools to help create a scaled diagram, or is drawing it by hand usually sufficient for most DIY projects?
For most DIY outdoor lighting projects, drawing your layout by hand on graph paper is usually sufficient, especially for smaller or straightforward spaces. If you want more precision or have a larger area, free tools like SketchUp or simple landscaping apps can help you create a scaled diagram. The main goal is to ensure your measurements are accurate and that you clearly mark fixture locations and wiring paths.
The article mentions safety codes and compliance, which makes me wonder—what are the most common mistakes DIYers make in outdoor wiring that could lead to code violations or safety risks? Any tips on how to avoid them?
Some common mistakes DIYers make include using indoor-rated wiring or fixtures outdoors, failing to bury cables at the proper depth, skipping weatherproof boxes and covers, and not installing ground fault circuit interrupters (GFCIs) where required. To avoid these risks, always use materials rated for outdoor use, follow local code requirements for cable depth and protection, and double-check that all connections are weather-sealed. If in doubt, consulting a licensed electrician is a smart move.
If my main goal is to improve safety with path and step lighting, can I use existing outdoor outlets or will I usually need to run new wiring from my electrical panel? Just trying to figure out how complicated this gets for a small area.
For a small area, you can often use your existing outdoor outlets, especially if you’re installing low-voltage or plug-in path and step lights. This makes the project simpler and avoids the need for new wiring from your electrical panel. Just be sure your outlet is weatherproof and GFCI-protected for safety. If you want hardwired lighting or your outlets aren’t ideally located, new wiring might be needed.
The article mentions ongoing maintenance for outdoor lighting. Could you share some tips on what kind of routine checks or upkeep small business owners should plan for to keep everything safe and functioning year-round?
To keep your outdoor lighting safe and reliable, inspect fixtures regularly for damage, loose connections, or corrosion. Clean lenses to maintain brightness and remove debris around lights to prevent overheating. Check that timers and sensors work correctly and replace any burnt-out bulbs promptly. Also, inspect wiring for wear, especially after storms or in high-traffic areas, and schedule a professional electrical check at least once a year.
If I want to do most of the outdoor lighting installation myself but I’ve never worked with electrical wiring before, are there certain parts of the job that really require a licensed electrician for safety or code reasons?
Yes, there are some parts of outdoor lighting installation that should be handled by a licensed electrician, especially anything involving new wiring runs from your main electrical panel, connections inside your breaker box, or installing new circuits. Running low-voltage lighting or replacing existing fixtures is generally safer for DIY, but any work with the main power supply or underground wiring often requires permits and a professional to ensure safety and code compliance.
Could you explain a bit more about how to create an effective scaled diagram for mapping out outdoor lights? I’m not sure what key measurements or distances are most important to include when planning my layout.
To create an effective scaled diagram, start by measuring your outdoor area—capture lengths and widths of spaces like patios, walkways, and garden beds. Draw these to scale on graph paper or using design software. Mark permanent features such as trees, doors, and driveways. For lighting, show proposed fixture locations, distances between lights, and how far each light is from key elements. Pay attention to spacing lights evenly and ensuring coverage without overlap or dark spots. Including these details will help plan wiring routes and ensure a balanced lighting layout.
In terms of budgeting, is there an average price range I should expect for a complete system that covers both security and accent lighting, including the cost of energy-efficient fixtures?
For a complete outdoor lighting system that includes both security and accent lighting with energy-efficient fixtures, the average price range is typically between $1,500 and $5,000. This estimate covers the cost of fixtures, wiring, transformers, and professional installation. The final price will depend on the size of your property, the number of lights needed, and specific fixture choices.
The article mentions budgeting as part of the planning process. Could you offer any examples or rough cost ranges for a medium-sized DIY project that includes both path lights and some accent lighting for landscaping? I’m just trying to set realistic expectations before getting started.
For a medium-sized DIY outdoor lighting project with path lights and accent landscaping lights, costs can vary but here’s a rough estimate. Path lights typically range from $20 to $60 per fixture, while accent lights for landscaping are about $30 to $80 each. Including cables, connectors, and a transformer, the total budget might fall between $400 and $1,000, depending on the number of lights and quality of materials you choose.
I see you recommend drawing a scaled diagram before installing fixtures. Are there any easy-to-use apps or tools you suggest for creating this kind of diagram, or is it better to just sketch it out by hand for a small yard?
For a small yard, sketching your lighting plan by hand on graph paper works really well and lets you quickly adjust your ideas. If you’d like to use an app, options like RoomSketcher or SketchUp are user-friendly and let you create to-scale diagrams easily. Choose whichever approach feels most comfortable—both work well for planning outdoor lighting.
I noticed the guide mentions different wiring options, but are there particular pros and cons of low-voltage versus line-voltage systems when it comes to ongoing maintenance and energy efficiency? I want to make sure I choose the best option for a pretty large backyard.
Low-voltage systems are generally easier and safer to maintain, especially for DIYers, and they tend to be more energy efficient due to the use of LED fixtures. They also have lower operating costs and simpler repairs. Line-voltage systems, while suitable for large areas and brighter lighting, often require professional installation and can be more expensive to maintain. For a large backyard, low-voltage is usually preferred for its efficiency and lower long-term hassle, unless you need very high-intensity lighting.
When planning the layout for outdoor lighting, how do I determine the safest way to run wiring if my walkway is surrounded by flower beds and I want to avoid digging up too much of my landscaping?
To minimize disruption to your flower beds, consider running wiring along the edge of existing hardscape like walkways or edging. Surface-mount low-voltage wiring inside protective conduit, tucking it under mulch or along borders where possible. For crossing flower beds, use a narrow trench and route wiring under stepping stones or pavers to avoid disturbing plant roots. Always keep wiring at least 6 inches deep and use waterproof outdoor-rated cables for safety.
You mention mapping out a scaled diagram during the planning stage. Are there any particular software tools or templates you suggest for homeowners who aren’t comfortable with hand-drawing layouts but want an accurate plan for their outdoor lighting?
For homeowners who prefer not to hand-draw, user-friendly tools like SketchUp (for 3D planning), SmartDraw, or even simple programs like Microsoft Visio can work well for mapping out your outdoor lighting layout. Some home improvement stores also offer free online garden planning tools with drag-and-drop features, which can help you create accurate, to-scale diagrams easily.
I’m a bit new to electrical work, so I’m wondering how to know if my existing outdoor electrical outlets are safe and up to code for new lighting. Is there a way to check this before I start planning my layout?
To check if your outdoor outlets are safe and up to code, look for GFCI (Ground Fault Circuit Interrupter) protection, weatherproof covers, and proper grounding. Test the outlet using a GFCI tester—these are affordable and simple to use. If you’re unsure or the outlets look old, have a licensed electrician inspect them before you plan your lighting layout. This ensures everything is safe and legal for your new installation.
When planning the budget for an outdoor lighting project as a DIYer, what are some common expenses people tend to overlook beyond the obvious cost of fixtures? Does the guide provide a ballpark estimate for a typical yard setup?
Aside from the light fixtures themselves, people often forget to budget for things like quality weatherproof wiring, electrical conduit, junction boxes, timers or smart controls, and any necessary tools (like trenchers or wire strippers). GFCI outlets and permits might also add to the total. The guide doesn’t give a specific dollar estimate, but it does list these hidden costs so you can make a more complete plan for your yard.
If my main goal is safety for walkways and steps, but I’m also on a tight budget, what are some cost-effective wiring options or fixture types that you’d recommend from your guide?
For safety on walkways and steps while keeping costs low, solar-powered stake lights or low-voltage LED path lights are excellent choices. Both are energy-efficient and relatively easy to install yourself, minimizing wiring expenses. If you need wired fixtures, use a low-voltage landscape lighting kit, which is safer and requires less complicated wiring than standard voltage systems. Focus on placing lights at key points like steps and curves for maximum safety impact with fewer fixtures.
I noticed the article mentions using motion-activated floodlights for security around entrances and driveways. In your experience, do you recommend hardwired or solar-powered motion lights for these areas, especially in terms of long-term reliability and maintenance?
For entrances and driveways, hardwired motion lights tend to be more reliable long-term, especially if you want consistent brightness and minimal maintenance. They aren’t affected by weather or reduced sunlight, so you don’t have to worry about batteries running low. Solar-powered options are great for quick installation and energy savings but may need more frequent maintenance and can be less dependable in shaded or cloudy locations.
When mapping out the lighting layout for my backyard, is it necessary to run new wiring to every light, or can I use existing outlets for multiple fixtures? I’m trying to avoid major rewiring if possible.
You can often use existing outdoor outlets to power multiple light fixtures, especially if the total load does not exceed the circuit capacity. Consider using weatherproof outdoor extension cords or daisy-chaining low-voltage lights. However, for permanent or high-powered fixtures, dedicated wiring might be safer and more reliable. Always check that your setup meets local electrical codes and consider consulting an electrician for safety.
When mapping out the lighting layout, how do you decide the best spots for placing path lights versus accent lights, especially if you have a lot of trees and landscaped areas? Should the focus be more on highlighting features or making walkways safer?
When planning your layout, path lights should primarily be placed along walkways and steps to ensure safe navigation after dark. Accent lights are best used to highlight features like trees, sculptures, or garden beds. With lots of trees and landscaping, try to balance both: prioritize safety with path lights on main walkways, then use accent lights to showcase standout features without overwhelming the space.
You mention budgeting as part of the planning process. What are some typical cost ranges for a DIY outdoor lighting project, including wiring and fixtures? I want to be realistic about expenses before I get started.
For a DIY outdoor lighting project, costs can vary based on the size of your space and the type of fixtures you choose. Generally, basic pathway or spotlights start around $20–$50 each, while higher-end fixtures can be $100 or more. Low-voltage wiring and transformers may add $100–$300, depending on your layout. Overall, a small to mid-sized project might range from $300 to $1,500. It’s a good idea to get quotes for materials before starting.
The article mentions budgeting as one of the first steps—could you provide some guidance on estimating total project costs, especially when deciding between DIY installation versus hiring a professional electrician?
To estimate total project costs, start by listing materials like fixtures, cables, transformers, and switches, then check local prices. For DIY, add costs for tools if you don’t already own them. Labor is your time. Hiring a professional often doubles or triples costs, as electricians charge for both materials and labor. Get a few quotes from licensed electricians for comparison, and remember to consider permit fees if needed.
Could you clarify whether there are specific electrical codes I need to be aware of when installing outdoor lighting near water features like ponds or pools? I want to make sure everything is up to code before I start planning my layout.
Absolutely, there are specific electrical codes to follow when installing lighting near water features like ponds or pools. The National Electrical Code (NEC) requires using fixtures and wiring rated for wet locations and installing ground-fault circuit interrupters (GFCIs) for safety. There are also minimum distance requirements for outlets and fixtures near water. It’s a good idea to check with your local building authority for any additional rules specific to your area.
When it comes to budgeting for an outdoor lighting project, what are some common hidden costs that DIYers should be aware of besides just the fixtures and wiring?
Some hidden costs DIYers often overlook include conduit and weatherproof boxes, renting digging equipment if trenching is required, GFCI outlets for safety, extra connectors or wire for changes mid-project, and permits or inspection fees in some areas. You might also want to budget for replacement bulbs and ongoing maintenance, as outdoor conditions can cause wear over time.
I noticed you mention sketching a scaled diagram to map out the lighting layout. Do you have any tips for parents like me who aren’t very artistic or tech-savvy to make sure the plan is accurate enough before starting purchases or installations?
You don’t need artistic skills or special software to create a helpful lighting plan. Use graph paper so each square represents a set distance, like one foot. Mark out your house and yard features simply with rectangles and circles, then use colored dots or numbers for each light. Label measurements and distances clearly. This basic approach will give you a clear, accurate guide for planning and buying your lighting.
Could you elaborate on how to estimate a realistic budget for a DIY outdoor lighting project, especially when accounting for different fixture types and the need for weather-resistant wiring or protective enclosures?
To estimate a realistic budget, start by listing all the fixtures you plan to use and checking prices for each type, since path lights, spotlights, and wall lights can vary widely. Factor in costs for weather-resistant wiring and any protective enclosures needed for your climate. Include extras like connectors, mounting hardware, and possibly renting tools. Add about 10-15% for unexpected expenses. This breakdown will give you a clearer overall cost before you start.
I’m budgeting for my outdoor lighting project and wondering if there are any recurring maintenance costs that tend to catch homeowners off guard after installation, like bulb replacements or issues with wiring exposed to the elements?
Yes, besides the initial installation, homeowners often overlook recurring costs like replacing bulbs, especially if you use halogen or incandescent lights, which burn out faster than LEDs. Outdoor wiring can also be affected by weather, leading to occasional repairs or corrosion treatment. Cleaning fixtures and checking connections for safety are other regular tasks. Budgeting a small yearly amount for these maintenance needs can help prevent surprises.
Budgeting was brought up early on, but how much should I realistically expect to spend per fixture for a basic, energy-efficient setup? Are there hidden costs I should watch out for during installation or maintenance?
For a basic, energy-efficient outdoor fixture, expect to spend between $30 and $100 per fixture, depending on features and quality. Additional costs may include wiring, weatherproof boxes, and hiring an electrician if you’re not doing it yourself. Hidden costs can include trenching for underground cables, permits, or replacing bulbs and timers over time. Factoring in these extras will give you a clearer overall budget.
I see the guide covers budgeting, but can you give a ballpark estimate of how much a basic outdoor lighting system might cost for a medium-sized yard, including fixtures and installation materials?
For a medium-sized yard, a basic outdoor lighting system—including fixtures, wiring, transformer, and installation materials—typically ranges from $500 to $2,000. The cost varies depending on the number and quality of fixtures, as well as whether you do it yourself or hire a professional. For simple DIY setups, you might spend closer to the lower end, while higher-end fixtures or professional installation can push costs higher.
I’m trying to figure out a realistic budget for a DIY outdoor lighting project. Does the guide mention any average cost ranges for materials or installation, and are there ways to keep expenses lower without sacrificing safety or durability?
The guide does provide some rough cost estimates for materials like fixtures, wiring, and transformers, though exact figures can vary by project size and quality choices. To keep expenses lower, it suggests using LED fixtures for energy savings, planning wiring routes efficiently, and handling the installation yourself if you have some electrical knowledge. However, it emphasizes not cutting corners on outdoor-rated materials and weatherproof connections to ensure safety and long-term durability.
The article mentions ongoing maintenance. What should I expect in terms of maintenance tasks or frequency for typical outdoor lighting systems, especially in areas with harsh winters or lots of rain?
For outdoor lighting in harsh winters or rainy areas, expect to clean fixtures and lenses every few months to remove dirt and debris. Check for water damage, rust, or loose wiring after storms or freeze-thaw cycles. Replace burnt-out bulbs as needed, and inspect timers or sensors twice a year to ensure proper function. Annual checks of connections and weatherproof seals are also recommended to prevent moisture problems.
If I’m mostly focused on security but still want things to look nice for occasional gatherings, should I prioritize motion-activated floodlights and add accent lights later, or is it better to plan for everything at once as described in your guide?
If security is your main concern right now, installing motion-activated floodlights first is perfectly fine—you can always add accent lighting later for gatherings. However, planning for everything at once, as suggested in the guide, helps ensure your wiring and layout will accommodate both needs without extra work in the future. If possible, consider pre-wiring for accent lights even if you install them later.
When mapping out the outdoor lighting layout, do you recommend using software tools for the scaled diagram, or is hand drawing usually sufficient for most DIY projects? I’m wondering if there are advantages to one approach over the other for accuracy and planning.
For most DIY projects, a hand-drawn scaled diagram is usually sufficient and quick to create, especially for straightforward layouts. However, software tools can help with more complex designs, offering precise measurements and easy edits. If your project involves a large area, unique shapes, or lots of fixtures, using software might give you better accuracy and help you visualize the final result more easily.
The article talks about respecting safety codes during installation. For someone planning a DIY project, how can I be sure I’m meeting local electrical codes, and are there common mistakes small business owners should watch out for to avoid violations?
To ensure you’re meeting local electrical codes for your outdoor lighting project, start by checking with your city or county’s building department—they can provide the specific codes and permit requirements for your area. It’s also wise to use only outdoor-rated fixtures and wiring, install ground fault circuit interrupters (GFCIs), and avoid overloading circuits. Common mistakes include improper grounding, using indoor-rated materials, and skipping permits, all of which can lead to violations and safety hazards.
You mention budgeting as one of the planning steps, but I’m unsure how to estimate the total cost for a small to medium project. Could you break down which parts tend to be the most expensive and where I might be able to save if I’m doing most of the work myself?
For a small to medium outdoor lighting project, the main costs are typically fixtures, wiring, and a transformer (if using low voltage). Fixtures can be the priciest—designer or high-output lights cost more, but basic models are more budget-friendly. Wiring and connectors are relatively inexpensive. If you’re doing the installation yourself, you’ll save a lot on labor, which is often the biggest expense. Opting for solar lights or simpler layouts can also reduce material and complexity costs.
When you talk about mapping out a scaled diagram for the lighting layout, how precise does it actually need to be? I don’t have much experience drawing plans, so is a rough sketch enough for a DIY project like this?
A rough sketch is just fine for a DIY outdoor lighting project. The diagram mainly helps you visualize where each light and cable will go, so it doesn’t need to be perfectly to scale. Focus on marking key features like walkways, trees, and electrical outlets, and try to keep spacing as accurate as possible. This will help you estimate measurements and plan cable runs, even without professional drawing skills.
I noticed you mention budgeting in the planning stage. What’s a realistic ballpark budget for a medium-sized backyard if I want a combination of path lighting, accent lights on trees, and a couple of deck lights, assuming I do most of the installation myself?
For a medium-sized backyard with path lighting, a few accent lights for trees, and deck lights, a typical DIY budget ranges from $400 to $1,000. This estimate covers quality fixtures, wiring, a transformer, and basic tools. Doing most of the installation yourself helps keep costs down, but make sure to factor in a little extra for unexpected needs or upgrades.
If you’re budgeting for a DIY outdoor lighting project, what are some realistic cost ranges for quality fixtures and wiring, and are there any spots where it actually makes sense to save money versus investing in higher-end components?
For a typical DIY outdoor lighting project, quality fixtures can range from $30 to $100 each, while wiring and connectors might add $0.50 to $2 per foot. It’s smart to invest more in weather-resistant fixtures and safe, durable wiring since these face the elements. You can save by choosing simpler fixture designs or using fewer accent lights in less critical areas, but never compromise on electrical safety or waterproofing.
Does planning for ongoing maintenance mean choosing certain fixture materials or wiring methods up front, or is that something I can deal with later if issues pop up?
It’s best to consider ongoing maintenance when selecting fixture materials and wiring methods from the start. For example, choosing corrosion-resistant fixtures and weatherproof wiring will help reduce future problems and maintenance needs. Planning ahead makes your outdoor lighting system more durable and reliable, saving you time and repairs later.
You mentioned that many homeowners make costly mistakes leading to code violations or hazards. What are some common pitfalls I should watch out for when choosing and installing wiring for outdoor lights, especially as a DIYer?
When installing outdoor lighting, a few key pitfalls to avoid are using indoor-rated wiring (instead of weatherproof UF or THWN wire), failing to bury cables at the required depth, and skipping GFCI protection for outdoor circuits. Also, be careful not to overload circuits and always use proper junction boxes rated for wet locations. Double-check that all connections are sealed and follow local electrical codes to prevent hazards or violations.
The guide mentions ensuring code compliance when planning and installing outdoor lighting. Could you clarify which specific electrical codes or standards typically apply to outdoor residential lighting in the US, and are there any common pitfalls homeowners should be aware of during installation?
For outdoor residential lighting in the US, the main electrical standard is the National Electrical Code (NEC), especially Article 210 (branch circuits) and Article 410 (lighting). Key points include using weatherproof fixtures and boxes, GFCI protection for outdoor outlets, and burial depth requirements for cabling (usually 18 inches for direct burial). Common pitfalls include skipping permits, improper grounding, or using indoor-rated equipment outside. Double-check local codes, as some municipalities add requirements.
I see you mention that many homeowners make mistakes that lead to code violations. As a small business owner, what are the most common electrical code issues I should watch for when installing outdoor lighting myself?
Some of the most common electrical code issues with outdoor lighting include not using weatherproof or outdoor-rated fixtures and boxes, failing to bury wiring at the proper depth, and skipping the use of GFCI protection for outdoor outlets. Also, be sure to use conduit where required and never overload circuits. Always double-check your local code requirements, as they can vary.
If I only have a basic understanding of wiring, how much of this outdoor lighting installation could reasonably be done myself versus needing a professional? The guide talks about safety codes and electrical principles, and I’m worried about making costly mistakes.
With a basic understanding of wiring, you can likely handle planning your lighting layout, choosing fixtures, and installing low-voltage or solar outdoor lights yourself, since these are generally safer and simpler. However, running new electrical wiring, installing outlets, or connecting to your home’s main power supply should be left to a licensed professional. This ensures safety and compliance with local codes, minimizing risks and costly errors.
The article mentions the importance of respecting electrical codes when installing outdoor lighting. For someone with some DIY experience but not a lot of electrical know-how, what are some of the most common code violations to watch out for when working with low-voltage versus line-voltage systems?
When working with low-voltage systems, a common code mistake is not using weatherproof connectors or failing to bury cables at the recommended depth. For line-voltage systems, using indoor-rated boxes or wire instead of outdoor-rated ones, and neglecting to use GFCI protection are frequent violations. Also, all outdoor line-voltage connections should be in approved, weatherproof enclosures. Double-check your local code requirements before starting.
When mapping out the outdoor lighting layout, do you recommend any specific software or templates for drawing a scaled diagram, or is hand-drawing usually sufficient for most homeowners?
For most homeowners, a hand-drawn diagram on graph paper is usually sufficient, as long as measurements are accurate and all fixtures and wiring paths are clearly labeled. However, if you prefer digital tools, free programs like SketchUp or basic diagram apps such as Microsoft Visio or even PowerPoint can help create a scaled layout. The method really depends on your comfort level—both approaches are effective as long as your plan is clear and to scale.
When budgeting for an outdoor lighting project as mentioned in your guide, what are the biggest costs I should anticipate upfront, and are there any surprising ongoing expenses that small business owners often overlook?
The biggest upfront costs for outdoor lighting are usually fixtures, wiring, and professional installation—especially if trenching or new circuits are involved. For small business owners, ongoing expenses that are often overlooked include increased electricity bills, routine maintenance (like replacing bulbs or cleaning fixtures), and occasional repairs due to weather or vandalism. Some also forget about costs for timers, sensors, or smart controls, which can help manage energy use but may add to your initial investment.
Do you have any advice on how to estimate the overall budget for an outdoor lighting project, especially for someone new to electrical work? I’m worried about unexpected costs, like wiring and code compliance, popping up during installation.
To estimate your budget, start by listing all the fixtures you’ll need and their prices. Don’t forget to include costs for wiring, transformers, switches, and weatherproof boxes. Be sure to check local electrical codes early, as you might need permits or inspections, which can add fees. Adding a 10–20% buffer helps cover unexpected expenses like extra wire or fittings.
The article talks about budgeting as part of the planning process, but I’m not sure how to estimate overall costs. Could you give a ballpark range on how much a typical DIY outdoor lighting project might run, including wiring, fixtures, and basic tools, for a medium-sized yard?
For a medium-sized yard, a DIY outdoor lighting project typically costs between $300 and $1,000. This estimate includes basic fixtures, wiring, and essential tools. Low-end solar or LED lights can keep costs down, while higher-quality fixtures and more complex wiring will increase the total. If you already have some tools, your expenses may be lower. Planning your layout carefully helps avoid unnecessary purchases.
If I want to prioritize energy efficiency while ensuring my outdoor areas stay well lit for evening events, what types of fixtures or control systems would you recommend based on the principles discussed in the article?
To balance energy efficiency with effective evening lighting, consider using LED fixtures, as they consume much less power than traditional bulbs and have a long lifespan. The article also suggests installing motion sensors or timers to control when lights are on, which helps save energy. Dimmable fixtures can let you adjust brightness depending on the event, keeping your space both inviting and efficient.
Budgeting is a big concern for my small business property, especially since I want to balance security, safety, and aesthetics. Could you expand on how to prioritize spending or share tips for estimating the total cost before starting the installation?
To prioritize spending, start by listing your goals—security and safety lighting should come first, such as entryways and pathways. Aesthetic fixtures can be added as budget allows. For cost estimation, measure the areas needing light, count fixtures, and research prices for fixtures, wiring, and installation. Don’t forget to include labor if hiring a professional, and set aside about 10% extra for unexpected expenses. This approach helps you allocate funds wisely and avoid surprises.
You talk about budgeting for an outdoor lighting project—can you give an idea of the most expensive pitfalls homeowners run into, or mistakes to avoid that could blow up the cost later on?
One of the biggest cost pitfalls is underestimating the amount of wiring or failing to plan for future expansion, which can require expensive rework. Choosing low-quality fixtures to save money can also backfire as replacements and repairs add up. Not accounting for professional labor costs or permits can surprise homeowners if these become necessary. Careful upfront planning and buying quality materials usually save money in the long run.
The article mentions drawing a scaled diagram for mapping out the lighting layout. Is there a recommended method or tool for doing this, especially if I’m not very handy with design software? Or would a simple paper sketch be just as effective?
A simple paper sketch works perfectly well for planning your outdoor lighting layout, especially if you’re not comfortable with design software. Just use graph paper to keep everything to scale, and mark out key features like pathways, patios, and power sources. If you prefer digital tools, basic apps like Microsoft Paint or free online planners can also help, but they aren’t required for an effective plan.
I’m curious about the budgeting part you mentioned. Are there any tips for prioritizing which areas to light first if I have a tight budget, or should I aim to do everything at once for efficiency?
If you’re on a tight budget, it’s usually best to prioritize lighting areas that are essential for safety and functionality first, such as pathways, entrances, and stairs. You can add decorative or ambient lighting later as funds allow. Doing everything at once is more convenient, but tackling the most important spots first lets you spread out the cost and still enjoy the benefits right away.
I noticed you touched on budgeting for outdoor lighting projects. Are there any tips on prioritizing which areas to light first if someone is working with a limited budget and wants to maximize both safety and curb appeal?
If your budget is limited, start by lighting essential areas for safety, such as pathways, steps, and entryways. Once those are covered, focus on highlighting key features that boost curb appeal, like your front door, a statement tree, or architectural details. Solar or low-voltage lights can help you stretch your budget further while still achieving a welcoming effect.
When you mention drawing a scaled diagram for the layout, do you have any tips for homeowners who aren’t very confident with measurements or sketching? Is there a simple method or tool you recommend to make sure the lighting plan is accurate before installation?
If you’re not comfortable with hand-drawing or taking precise measurements, you might find it helpful to use free online garden planner tools, which often let you drag and drop lights and features onto a digital grid. Alternatively, graph paper can make sketching easier—just use each square to represent a set measurement (like one foot). Take rough measurements of your yard and mark out main features, then place your lighting elements. This approach keeps things simple and accurate without needing artistic skills.
I noticed budgeting was touched on briefly—can you share some guidance or examples of how to estimate total project costs, especially when choosing between solar versus hardwired lighting options?
To estimate your project cost, start by listing how many fixtures you need and their types. Solar lights generally cost more per unit but save on wiring and electricity costs, with prices usually ranging from $20–$50 each. Hardwired lights can be less expensive per fixture, around $10–$40, but you’ll need to factor in wiring, installation supplies, and possibly hiring an electrician, which can add several hundred dollars. Always include extra for unexpected expenses and compare your total for each option before deciding.
If I want to install path and accent lights myself but hire a professional just for connecting to the main power, what are the best steps to divide the work safely and efficiently?
You can handle the layout, placement, and installation of light fixtures and cables along the path and for accents. Leave the final connection of your low-voltage transformer or wiring to the main power source to the professional. Clearly mark cable paths and leave enough cable slack near the power connection point. Communicate your work details to the electrician so they can inspect and safely complete the electrical hookup.
When you mention mapping out a scaled diagram of the outdoor space, what is the best way for a beginner to figure out the right scale and measurements? Are there specific tools or apps that would make this easier for someone who hasn’t done this before?
To figure out the right scale, start by measuring your yard with a tape measure or a laser distance measurer. Choose a simple scale for your diagram, like 1 inch equals 5 feet. Graph paper helps keep things proportional, or you can use free apps like SketchUp or the Home Design 3D app for beginners. These tools let you input real measurements and automatically scale your layout, making the process much easier.
When mapping out a lighting layout as described, do you recommend using specialized outdoor electrical boxes and conduit for all fixture placements, or are there cases where weather-rated extension cords are acceptable for temporary setups?
For permanent outdoor lighting installations, it’s important to use specialized outdoor electrical boxes and conduit to ensure safety and compliance with electrical codes. Weather-rated extension cords can be used for temporary setups, such as seasonal decorations, but shouldn’t replace proper wiring for long-term use. Always make sure any temporary solution is rated for outdoor use and is protected from moisture and physical damage.
You talk about choosing between different types of outdoor lighting for safety, aesthetics, and functionality. For a small business with a mixed-use outdoor space, is it possible to combine all three goals effectively, or would that make the installation too complicated or expensive?
It’s definitely possible to achieve safety, aesthetics, and functionality together, even for a small business. The key is to plan your lighting layout carefully. Use brighter, motion-activated lights or pathway lights for safety, accent or spotlights for aesthetics, and task lighting for areas like seating or signage. Combining these doesn’t have to make the project overly complex or costly if you choose fixtures that serve multiple purposes and use efficient LED options.
You mentioned budgeting as one of the planning steps for outdoor lighting. Do you have any tips or guidelines on how to estimate the total cost, including both fixtures and professional installation, for a medium-sized front yard?
To estimate the total cost for outdoor lighting in a medium-sized front yard, start by listing the number and types of fixtures you need, then look up their prices to get a subtotal. For professional installation, electricians typically charge by the hour or per fixture—get a few local quotes for accuracy. Don’t forget to include extras like wiring, transformers, and any permits. Adding a 10–15% buffer for unexpected expenses can help you stay within budget.
When you’re mapping out your outdoor lighting and choosing between motion-activated floodlights for security versus accent lights for aesthetics, are there any suggestions on how to balance both without making your yard look too bright or cluttered?
To balance security and aesthetics, try placing motion-activated floodlights in strategic spots like entrances and dark corners, while using accent lights to highlight landscaping or pathways. Use lower-wattage bulbs or shielded fixtures for accent lights to avoid excess brightness. Space your lights thoughtfully to prevent clutter, and consider using timers or dimmers to adjust brightness as needed throughout the evening.
When mapping out a lighting layout, how precise does my diagram need to be? Is it necessary to use special software, or is a hand-drawn sketch enough if I just want to install basic path and accent lights?
For a basic setup like path and accent lights, a hand-drawn sketch is usually more than enough. The main goal is to clearly note light locations, wiring routes, and any nearby obstacles. Special software can help with complex layouts, but for most simple projects, your own diagram will work fine as long as it’s clear and to scale.
When budgeting for outdoor lighting, what are some common costs people tend to forget about? I want to make sure I’m not surprised by unexpected expenses, especially related to ongoing maintenance or complying with local safety codes.
People often overlook the costs of permits or inspections required by local safety codes, so be sure to check your area’s regulations. Ongoing expenses like replacing bulbs, cleaning fixtures, and possible repairs from weather damage can also add up. Additionally, running underground wiring or upgrading your electrical panel, if needed, can be significant but easy to miss in initial estimates.
When planning the wiring for path and accent lighting in a typical backyard, how do you decide between running low-voltage versus standard 120V lines? Are there any code considerations or safety differences I should be aware of if some areas of my yard are prone to moisture?
Low-voltage wiring (usually 12V) is generally safer and easier to install, especially in areas exposed to moisture, as it reduces the risk of electric shock. Standard 120V systems must be installed with weatherproof conduit and outdoor-rated fixtures, and must follow stricter electrical codes, including GFCI protection. For wet or damp locations, low-voltage is often preferred, but always check your local code requirements before starting your installation.
When it comes to budgeting for a full outdoor lighting project, what kinds of costs should I plan for beyond just buying the fixtures? Are permits, electrical upgrades, or professional installation significant expenses I should consider?
Beyond the cost of fixtures, you should factor in permits (which may be required depending on your local regulations), wiring and electrical supplies, and potential upgrades to your electrical panel if your system needs more capacity. Professional installation can also be a major expense, especially for complex or large projects. Additional costs like trenching, weatherproof junction boxes, and timers or smart controls might also come up. Planning for these will help avoid surprises.
The article mentions choosing the right wiring options for outdoor lighting. Could you explain the difference between low-voltage and line-voltage setups, and how to decide which would be better for a DIY project?
Low-voltage systems use a transformer to reduce standard household voltage (120V) down to 12V, making them safer and easier to install, especially for DIY projects. Line-voltage setups operate directly at household voltage and usually require professional installation due to code and safety considerations. For most homeowners, low-voltage is better for DIY because it’s safer to handle, requires less trenching, and is flexible for future changes.
For budgeting purposes, how should I estimate the overall costs involved—from buying fixtures and wiring to any permits or professional help that might be required for code compliance—before I start installing outdoor lighting myself?
To estimate your outdoor lighting costs, list the number and type of fixtures you want, then check prices for those, as well as wiring, connectors, and mounting hardware. Allow for extra wire length and a weatherproof transformer if needed. Check your local permit fees, and if your project is complex or involves new circuits, factor in an electrician’s rate for code compliance. Adding a 10–20% buffer for unexpected expenses is also wise.
When budgeting for a new outdoor lighting project, are there any hidden costs that tend to catch homeowners by surprise, like trenching, permits, or special safety equipment? I’m trying to make sure my initial budget is as accurate as possible.
Absolutely, there are several common costs that can surprise homeowners during outdoor lighting projects. Trenching for underground wiring, obtaining local permits, and renting or buying safety equipment like weatherproof gear and GFCI outlets can add up quickly. Also consider potential expenses for hiring a licensed electrician, repairing landscaping after installation, and disposing of excess materials. Factoring these into your initial budget will help you avoid unexpected expenses.
The article talks about drawing a scaled diagram to plan the lighting layout. How detailed does this need to be for a DIY project, and are there any apps or tools you recommend for creating these diagrams?
For a DIY outdoor lighting project, your diagram doesn’t need to be highly technical. Aim to include accurate measurements of your yard, the location of key features (like paths, trees, and patios), and where each light fixture will go. Simple symbols or sketches are fine. For tools, consider using basic drawing apps like Microsoft Visio, Google Drawings, or even free landscape design apps. Many people find grid paper and a pencil work just as well for planning.
When you mention mapping out a scaled diagram of the outdoor space, do you have any tips for beginners on how to accurately measure and sketch the yard? I’m not sure how precise I need to be for planning where to put each light.
For beginners, start by using a simple measuring tape to get the length and width of your yard and main features—like patios, walkways, and trees. Jot these measurements down, then sketch a rough outline on graph paper where each square represents, for example, one foot. You don’t need to be perfectly precise, but the more accurate your measurements, the easier it’ll be to plan light placement and avoid surprises during installation.
I noticed you mentioned budgeting and fixture selection—can you give some example price ranges for different types of outdoor lighting, like accent lights versus security floodlights? I’m trying to get an idea of what a typical project might cost before I start.
Absolutely, here are some ballpark figures to help you plan. Simple accent lights, like pathway or small spotlights, usually range from $20 to $60 each, while higher-end versions can be $80 or more. Security floodlights tend to start around $40 for basic models and can go up to $200 or more if they include features like motion sensors or smart controls. For a typical mid-sized yard, total fixture costs often land between $200 and $1,000, depending on the mix and quality you choose.
Could you clarify how to determine if your existing outdoor electrical outlets are properly grounded and up to code before connecting new lighting fixtures? I want to make sure I’m not creating any safety hazards during installation.
To check if your outdoor outlets are properly grounded and up to code, use a plug-in outlet tester, which will indicate grounding and wiring issues. Also, outdoor outlets should be GFCI-protected and have weatherproof covers. If you’re unsure about the wiring or grounding, it’s best to have a licensed electrician inspect them before connecting new lighting. This ensures safety and compliance with local electrical codes.
Once I’ve selected the types of fixtures based on my goals, what are the next steps in ensuring the overall system will be energy-efficient and compliant with local codes, especially if I’m planning to DIY most of the installation?
After choosing your fixtures, check their energy ratings and opt for LED or other energy-efficient options. Create a detailed lighting plan, using timers or motion sensors to reduce usage. Before starting installation, review your local building codes, especially regarding wiring, voltage, and weatherproofing requirements. If you’re unsure about certain electrical connections, consider having a licensed electrician inspect your setup to ensure both safety and code compliance.
You mention budgeting as part of the process—could you give a rough estimate of the costs involved for a basic setup, including both materials and potentially hiring a professional for the installation?
For a basic outdoor lighting setup, the cost of materials like fixtures, wiring, and controllers typically ranges from $100 to $500, depending on the quality and number of lights. If you hire a professional electrician, installation can add $300 to $800 or more, based on project complexity and local rates. So, a basic professional installation usually totals between $400 and $1,300.
You mentioned budgeting in the planning process—can you offer any advice on estimating total costs for a basic outdoor lighting project, including both fixtures and wiring? Are there particular areas where it’s worth spending more or where you can save?
When estimating costs for a basic outdoor lighting project, start by listing the number of fixtures you’ll need and researching average prices for those types. Add in the cost of wiring, connectors, and a transformer if needed. Labor will add more if you hire an electrician. It’s wise to spend a bit more on durable, weather-resistant fixtures and good quality wiring, as these prevent future problems. You can save by doing the installation yourself (if comfortable with electrical work) and choosing simpler fixture designs.
When drawing up a scaled diagram for the lighting layout, what tools or apps do you recommend for homeowners who aren’t very experienced with design or technical drawings?
For beginners, I recommend starting with simple and user-friendly tools like graph paper and a pencil for your initial layout. If you prefer digital options, apps such as RoomSketcher or SketchUp Free offer easy drag-and-drop features and don’t require advanced technical skills. These tools allow you to visualize your space to scale and experiment with different lighting arrangements comfortably.
I see you mention that homeowners sometimes make mistakes that lead to code violations or safety hazards. Can you clarify which local electrical codes are most commonly overlooked when installing outdoor lighting, and how a small business owner can ensure compliance?
Commonly overlooked local electrical codes for outdoor lighting include the requirement for weatherproof junction boxes, proper grounding, use of GFCI outlets, and ensuring cables are rated for outdoor use and buried at the correct depth. As a small business owner, check your municipality’s electrical code, use only UL-listed fixtures, and, if unsure, consult a licensed electrician or request an inspection after installation to ensure compliance.
When you’re drawing a scaled diagram to plan the lighting layout, how detailed should you get with measurements and features, and are there any common mistakes to watch out for during this stage that could affect the final installation?
Aim for as much detail as possible when drawing your scaled diagram—include exact measurements for walkways, patios, garden beds, and any permanent features like trees or structures. This helps you accurately position fixtures and avoid surprises during installation. Common mistakes include forgetting to account for elevation changes, not marking power sources, or underestimating cable lengths. Double-check all measurements and ensure you include existing obstacles to avoid issues later.
The article mentions balancing safety, security, and aesthetics when planning outdoor lighting. If I’m on a tighter budget, which area would you suggest prioritizing for a first-time DIY project?
If you’re working with a limited budget, it’s wise to prioritize safety first—focus on lighting pathways, steps, and entryways to prevent trips and falls at night. Once those areas are safely lit, you can gradually add lighting for security and then look at accent or aesthetic features as your budget allows.
When mapping out the lighting layout as suggested, how do you recommend homeowners assess their existing electrical capacity to determine if upgrades or new circuits are needed for additional outdoor fixtures?
To assess your current electrical capacity, start by checking your main service panel to identify what amperage it supports and how many circuits are already in use. Then, calculate the total wattage of the new outdoor fixtures you plan to add. If your panel is near capacity or if you notice frequent breaker trips, it’s wise to consult an electrician, who can help determine if dedicated circuits or panel upgrades are necessary for safe installation.
If I’m planning to run new wiring for outdoor lights, how do I make sure I’m following local safety codes and not accidentally overloading any circuits? The article mentions code compliance but doesn’t go into details on what to check for as a homeowner.
To ensure you’re following local safety codes, check with your city or county’s building department for specific electrical requirements before starting. You may need a permit, and certain wiring types and installation methods could be required outdoors. To avoid overloading circuits, calculate the total wattage of your planned lights and make sure it doesn’t exceed 80% of the circuit breaker’s rated capacity. If unsure, consult a licensed electrician for guidance or inspection.
Could you elaborate on budget planning for a project like this? Specifically, what are the most common expenses that tend to catch homeowners off guard when installing outdoor lighting for both aesthetics and security?
When planning your outdoor lighting budget, don’t forget hidden expenses like trenching for wiring, renting tools, or upgrading your electrical panel if your current setup can’t handle more lights. Weatherproof junction boxes, timers, and professional installation or permit fees also add up. Homeowners are often surprised by the cost of quality fixtures and the extra wiring needed for optimal coverage and safety. It’s a good idea to include a 10–20% buffer for unexpected costs.
I noticed you mentioned budgeting for an outdoor lighting project—can you give a ballpark estimate for how much a typical DIY installation might cost, and what parts of the process are most likely to trigger unexpected expenses?
A typical DIY outdoor lighting project can cost anywhere from $200 to $800, depending on the number and type of fixtures, wiring, and transformer you choose. The most common surprise expenses are related to renting or buying tools for trenching, unexpected electrical issues, and replacement of fixtures if you change your design partway through. Also, prices for quality weatherproof fixtures and cables can add up more quickly than many people expect.
For homeowners who want to prioritize both safety and aesthetics, are there specific fixture types or layout tips you suggest to avoid making the yard look cluttered while still ensuring all paths and features are well lit?
To balance safety and aesthetics, choose low-profile fixtures like path lights for walkways and spotlights for key features. Space fixtures evenly and avoid over-lighting any single area. Use uplights for trees or architectural highlights, and consider installing lights with shielded or downward-facing designs to minimize glare. Layering your lighting at different heights keeps the yard inviting without appearing crowded.
The article mentions budgeting for outdoor lighting, but do you have advice on estimating the total cost difference between low-voltage and standard 120V systems, including wiring, transformers, and fixtures? I want to avoid under-budgeting halfway through my project.
To estimate the total cost difference, start by listing all components for each system: fixtures, wiring, transformers (for low-voltage), and installation materials. Low-voltage systems usually cost more upfront for transformers and specialized wiring, but fixtures can be less expensive and often easier to install. Standard 120V systems may have higher wiring costs and require a licensed electrician, increasing labor expenses. Add a 10-15% buffer to your budget for unexpected costs. Comparing itemized quotes for both systems will give you a clearer picture before starting.
The article talks about creating a scaled diagram for planning outdoor lighting. Do you have any tips or templates for small business owners to map out more complex properties, like ones with multiple entrances or landscaped areas, so the design process is easier?
For more complex properties, try dividing your diagram into distinct zones—like entrances, pathways, parking, and landscaped areas. Use graph paper or free online landscape design tools to create a to-scale map. Color-coding different lighting types and marking power sources can help clarify your plan. Templates from garden design software or even large-format printable grids can make it much easier to accurately plot fixtures and wiring routes.
I’m interested in energy-efficient options, but I’m also conscious of budget constraints. Do you have advice on which fixture types or wiring choices strike the best balance between upfront costs and long-term savings for outdoor lighting?
LED fixtures are your best bet for balancing energy efficiency and cost—they use much less power and last longer than traditional bulbs, leading to long-term savings, even if they’re a bit pricier upfront. For wiring, low-voltage systems are usually both safer and more affordable to install, and they pair well with LED lights. Look for simple designs without fancy features to keep initial costs down.
Is there a typical budget range homeowners should expect for a safe and energy-efficient DIY outdoor lighting project that includes both accent and path lights, or does it largely depend on the size of the yard?
The cost of a DIY outdoor lighting project can vary, but most homeowners spend between $300 and $1,200 for a basic setup with accent and path lights, assuming you do the work yourself. The size of your yard does affect the budget, as more fixtures, wire, and possibly a larger transformer will be needed for bigger spaces. Choosing energy-efficient LED lights may have a slightly higher upfront cost but will reduce long-term energy use.
You mentioned ongoing maintenance as part of a safe outdoor lighting system. What kind of regular upkeep should I plan for, especially if I install low-voltage versus standard voltage fixtures?
For both low-voltage and standard voltage outdoor lighting, you should regularly check for burned-out bulbs, clean fixtures to remove dirt or debris, and inspect wiring for any signs of wear or damage. With low-voltage systems, also check the transformer for proper function and ensure connections are tight. For standard voltage fixtures, it’s wise to verify that junction boxes remain weatherproof and that GFCI outlets are working. Seasonal checks after storms or heavy weather can help catch issues early.
The article talks about budgeting for the project, but I’m not sure what kind of costs to expect for a basic setup covering a walkway and a few accent lights. Are there general price ranges or tips for keeping expenses down for first-timers?
For a basic walkway with a few accent lights, you can typically expect to spend between $150 and $500, depending on the quality and type of fixtures. Solar-powered lights are a budget-friendly choice and easier to install. To keep costs down, choose DIY-friendly lighting kits, use LED bulbs for efficiency, and compare prices at different retailers before purchasing.
When figuring out the lighting layout, how do you recommend balancing the different goals like security, safety, and aesthetics without overdoing it or running up the energy bill? Is there a suggested approach for prioritizing which areas to light first if you’re on a budget?
To balance security, safety, and aesthetics while keeping costs and energy use reasonable, start by identifying your most important needs. Prioritize lighting for safety—such as pathways and steps—first. Next, address security by lighting entry points and darker corners. Finally, add accent lights for aesthetic touches if your budget allows. Focus initial spending on the areas you use the most or those that pose the biggest risks.
You discuss different lighting goals like safety, security, and aesthetics. Is it possible to combine multiple types of fixtures and control systems on a single circuit, or would that increase the risk of overloading and violate electrical codes?
You can combine different types of lighting fixtures on a single circuit, as long as the total load does not exceed the circuit’s capacity (typically 15 or 20 amps). Control systems, like timers or smart switches, can also be integrated. Just be sure to calculate the total wattage and follow local electrical codes. If in doubt, consult a licensed electrician to ensure safety and compliance.
The article mentions drawing a scaled diagram to plan the lighting layout. In a yard with irregularly shaped garden beds and existing landscaping, do you have any tips for accurately mapping the space and determining the best fixture placement?
To map an irregular yard, start by measuring key distances, such as from your house to garden beds, trees, and pathways. Use graph paper or digital tools to sketch these features to scale. Mark existing plants and obstacles as you go. Consider walking the yard at night with a flashlight to visualize where light is needed for safety or atmosphere. This hands-on approach helps you choose fixture locations that highlight landscaping and avoid glare or shadows.
The guide talks about drawing a scaled diagram and planning fixture placement, but I’m not clear on how to choose the best control system for different zones in my yard. Do you have tips on selecting manual switches versus smart controls versus timers?
Choosing the right control system depends on your needs and how you use each zone. Manual switches work well for areas you use occasionally, like a garden shed. Timers are useful for security or regular schedules, such as pathway lights. Smart controls offer the most flexibility, allowing remote access and automation for entertainment spaces or if you want to adjust lighting from your phone. Consider how often each zone is used and your preference for convenience versus simplicity.
The article mentions considering safety codes and avoiding common mistakes when planning outdoor lighting. Could you explain what the most frequent code violations are and how to avoid them, especially if you’re doing a DIY installation?
Some of the most frequent code violations with DIY outdoor lighting are using the wrong type of wire, failing to use weatherproof electrical boxes and covers, and not burying cables deep enough (usually 18 inches is required for underground wiring). Also, outlets outdoors must be GFCI-protected. To avoid these mistakes, always use outdoor-rated materials, follow local code requirements for wiring depth and protection, and check if you need permits before starting your project.
I noticed the article mentions making a scaled diagram of your yard to plan fixture placement. Can you clarify what the best way is for a DIYer to measure and draw this if I don’t have landscaping software? Would graph paper work, or is there a better method?
Graph paper is actually a great choice for creating a scaled diagram by hand. Start by measuring the key features of your yard with a long tape measure—note distances like the edges of patios, paths, and planting beds. Then, assign a scale (such as 1 square = 1 foot) and sketch these features onto the graph paper. This makes it easy to plan fixture placement accurately without any special software.
When it comes to installing motion-activated floodlights for security, is there a recommended height or angle to mount them so they actually cover dark corners effectively? I’ve got an odd-shaped driveway and want to make sure I don’t miss any spots.
For motion-activated floodlights, mounting them between 6 and 10 feet high is generally effective for most driveways, as this helps spread the light widely while allowing the sensor to detect movement. Angle the lights downward at about 30 degrees so they illuminate the ground without causing glare. In odd-shaped areas, you might need to test different positions or install more than one light to cover all dark corners.
Regarding budget planning, could you provide some examples of typical cost ranges for the different lighting types mentioned, like path lights versus motion-activated floodlights? I’d like to understand what to expect before starting my project.
Path lights usually range from $20 to $60 each, depending on style and quality, while basic motion-activated floodlights cost around $35 to $100 per fixture. If you opt for smart or solar options, prices may increase. Don’t forget to factor in installation and wiring, which can add $100 to $250 per hour if hiring a professional electrician.
You recommend sketching a scaled diagram of the outdoor space before starting the install. Do you have tips or recommended tools for accurately mapping existing electrical outlets and fixed features, especially for someone who isn’t very experienced with electrical planning?
To map out your outdoor space, start with a tape measure to get accurate distances between features like walls, trees, and patios. Use graph paper or free online design tools, plotting each square as a set measurement (for example, 1 square = 1 foot). Mark all existing outlets and fixed features as you go. If you’re unsure about electrical points, a simple circuit tester can help you identify active outlets. Take clear notes and photos to reference while planning your lighting layout.
After figuring out the layout and choosing fixture locations as you suggest, what’s the next step? Should I purchase all the materials first or should I get any permits before starting the wiring work?
Once you’ve finalized your lighting layout and fixture locations, the next step is to check if your local building codes require permits for outdoor electrical work. It’s important to sort out any permits before purchasing materials or starting installation, as the permit process may have specific requirements that affect your plans or the materials you need. After securing any required permits, you can confidently purchase materials and proceed with the wiring work.
If my main goal is to improve both safety and aesthetics, how do you suggest balancing the number and placement of path lights versus accent lights without overdoing it or blowing my budget?
To balance safety and aesthetics without overspending, start by focusing on path lights for all key walkways and entrances to ensure safe navigation. Then use accent lights selectively to highlight a few standout features like trees or architectural elements. Space your lights evenly to avoid harsh spots or dark gaps and opt for energy-efficient LED fixtures to keep operating costs lower. Planning out your layout on paper before buying can help you stick to your budget.
Could you clarify whether it’s necessary to use weatherproof electrical boxes and conduit for all outdoor lighting installations, or are there certain low-voltage setups where this isn’t required under code?
For most outdoor lighting, especially when using standard line voltage (120V), weatherproof electrical boxes and conduit are required by code to protect against moisture and damage. However, for many low-voltage (usually 12V) landscape lighting systems, you often aren’t required to use weatherproof boxes or conduit if all components are rated for outdoor use, and connections are made with approved weatherproof connectors. Always check your local electrical code, as requirements can vary.
You mentioned budgeting as part of the process—do you have any advice on estimating typical costs for a DIY outdoor lighting project versus hiring a professional? I’m not sure what kind of expenses I should expect for both materials and installation.
For a DIY outdoor lighting project, expect to spend anywhere from $100 to $500 mainly on materials like fixtures, wiring, and connectors, depending on the size and quality. If you hire a professional, total costs usually range from $1,000 to $3,000, which includes both materials and labor. Professional installation adds expense but ensures code compliance and expertise. Always factor in extras like timers or smart controls, and get itemized quotes for accurate comparisons.
For budgeting purposes, do you have any advice on estimating the total cost of installing outdoor lighting, especially when it comes to ongoing maintenance and energy efficiency versus upfront costs of fixtures and wiring?
When budgeting for outdoor lighting, start by listing all anticipated expenses: fixtures, wiring, transformers, and labor if hiring a professional. Energy-efficient options like LEDs may cost more upfront but save money over time through lower electricity bills and less frequent bulb replacements. Don’t forget to include regular maintenance, such as cleaning fixtures and replacing bulbs, into your annual costs. Comparing the long-term savings of efficient systems to the initial investment can help you make a well-informed decision.
You mention budgeting in the planning process, but I’m not sure what a realistic ballpark is for installing a basic outdoor lighting system myself. Are there any unexpected costs that most DIYers overlook when doing this project, especially when it comes to safety and compliance?
For a basic DIY outdoor lighting setup, you can expect to spend anywhere from $100 to $500 depending on the number and quality of fixtures. Many DIYers overlook costs like outdoor-rated wiring, weatherproof junction boxes, and GFCI outlets for safety. Also, you may need permits or inspections to ensure electrical compliance. It’s wise to budget a little extra for tools or unexpected safety upgrades.
I noticed you mention respecting safety codes and wiring options—how do I know if my current outdoor outlets and wiring are up to code before starting a new lighting installation?
To check if your outdoor outlets and wiring meet current safety codes, consider their age and features first. Look for weatherproof covers, GFCI protection, and grounded outlets—these are required by modern codes. If you’re unsure, hiring a licensed electrician to inspect your setup is the safest approach. They can verify compliance and recommend upgrades if needed before you begin your lighting project.
You mention budgeting as part of the process. Can you provide a rough estimate for the average cost difference between DIY installation versus hiring a professional, especially for a medium-sized yard with a mix of path and accent lights?
For a medium-sized yard with both path and accent lights, DIY installation typically costs around $300 to $700, covering materials and basic tools. Hiring a professional for the same project can range from $1,200 to $3,000, depending on labor rates and complexity. The main cost difference comes from labor and expertise, but going pro ensures code compliance and reliability.
The article talks about mapping out the lighting layout with a scaled diagram. Any tips on the best way to measure and sketch things out if my yard is oddly shaped or has a lot of landscaping features? I want to avoid missing anything important.
When dealing with an oddly shaped yard or lots of landscaping features, start by measuring the longest and widest points, then break the area into smaller sections that are easier to draw. Use graph paper so each square represents a set measurement, like one foot. Sketch fixed features such as trees, paths, and structures first, then plot your lighting fixtures around them. Taking photos from different angles can also help you double-check your diagram later.
The article mentions considering both functionality and aesthetics when picking fixtures. Is there a certain order to choose them in, or should I be deciding placement before shopping for lights? I’m worried I’ll buy something that doesn’t fit my space.
It’s wise to start by mapping out where you need light for both practical and visual reasons. Once you know the key spots—like pathways, entryways, or accent areas—you can measure those locations. With your placement and measurements in hand, you can shop confidently, choosing fixtures that fit your space and style. This prevents buying lights that are too large, too small, or out of proportion.
The article mentions both energy efficiency and code compliance, but I was wondering if there are specific types of fixtures or wiring methods that are best for meeting both, especially for DIY installations.
When aiming for both energy efficiency and code compliance in a DIY outdoor lighting project, LED fixtures are an excellent choice since they use less energy and often meet modern code standards. For wiring, use outdoor-rated (UF or THWN) cables and weatherproof junction boxes. Always follow local code requirements, including using ground fault circuit interrupters (GFCI) for added safety. Double-check that all fixtures and components are rated for exterior use to ensure compliance and longevity.
Could you explain more about how to estimate the overall budget for a DIY outdoor lighting project? I’m trying to balance energy efficiency and durability without overspending, so any tips on fixture selection or wiring options to get the best value would be appreciated.
To estimate your DIY outdoor lighting budget, start by listing the number of fixtures you need and comparing LED options, as they use less energy and last longer. Choose fixtures with weather-resistant ratings for durability. Use low-voltage wiring to save on materials and installation costs. Include costs for transformers, connectors, and any tools you’ll need. Add a 10-15% buffer for unexpected expenses. By prioritizing LEDs and durable materials, you’ll save over time even if upfront costs are a bit higher.
Could you clarify how to estimate the overall budget for an outdoor lighting project, factoring in both fixture costs and potential electrical upgrades? I’m not sure how to account for hidden expenses, especially if I need to add more outlets outdoors.
To estimate your outdoor lighting budget, start by listing all desired fixtures and their prices. Next, factor in costs for cables, connectors, and controls. For electrical upgrades, such as adding outlets, get quotes from licensed electricians, as costs can vary. Include permit fees if required. Also, allow a buffer for unexpected expenses, like extra labor or materials due to site conditions. This way, your budget covers both visible and hidden costs.
When mapping out the lighting layout as suggested, how do you determine the right spacing between path lights to ensure both safety and good aesthetics? Is there a formula or rule of thumb for this?
For path lights, a common rule of thumb is to space them about 6 to 8 feet apart. This provides enough overlap to avoid dark spots, ensuring both safety and an attractive look. For narrower or winding paths, you might place lights a bit closer—around 4 to 6 feet apart. Always consider the brightness and beam spread of your lights, as stronger or wider lights may allow for wider spacing.
I noticed you mentioned both accent lighting for aesthetics and floodlights for security. If I’m on a limited budget, which type of lighting should take priority to get a good balance between safety and appearance?
When working with a limited budget, it’s best to prioritize floodlights in key areas like entrances, driveways, and backyards for security and safety. Once those essentials are covered, you can add a few accent lights near pathways or landscaping features to enhance appearance. This approach ensures you maintain security while still adding some aesthetic value.
You mentioned budgeting as a step in the planning process. Could you give a rough estimate or a simple formula for calculating the expected cost difference between running new electrical wiring versus using low-voltage or solar options for outdoor lighting?
A rough way to estimate costs is to consider that installing new standard electrical wiring often runs $8–$15 per foot (including materials and labor), while low-voltage systems usually cost $3–$7 per foot. Solar options have higher upfront fixture costs (around $20–$100 per light), but there’s no wiring or electricity expense. For a simple comparison, multiply the per-foot rate by your total wiring length, or add up the number of lights times the cost per light for solar. This should give you a ballpark figure to compare options.