
Introduction: Why Home Generator Installation Demands Informed Planning
Power outages are more than an inconvenience—they can disrupt daily life, compromise safety, and potentially cause expensive damage to your home. As extreme weather events and grid instability become more frequent, homeowners increasingly look to standby generators as a reliable solution for uninterrupted electricity. But installing a home generator is not a simple plug-and-play scenario. Successful, safe, and compliant installation requires careful planning, sound budgeting, adherence to local codes, and ongoing maintenance. In this comprehensive guide, we’ll walk you through every critical stage of home generator installation, from choosing the right type and size, to understanding safety protocols, permitting, cost breakdowns, and long-term maintenance. Whether you’re considering a whole-house standby system or a smaller, circuit-specific backup, this resource will empower you to make informed decisions and avoid costly, dangerous mistakes.
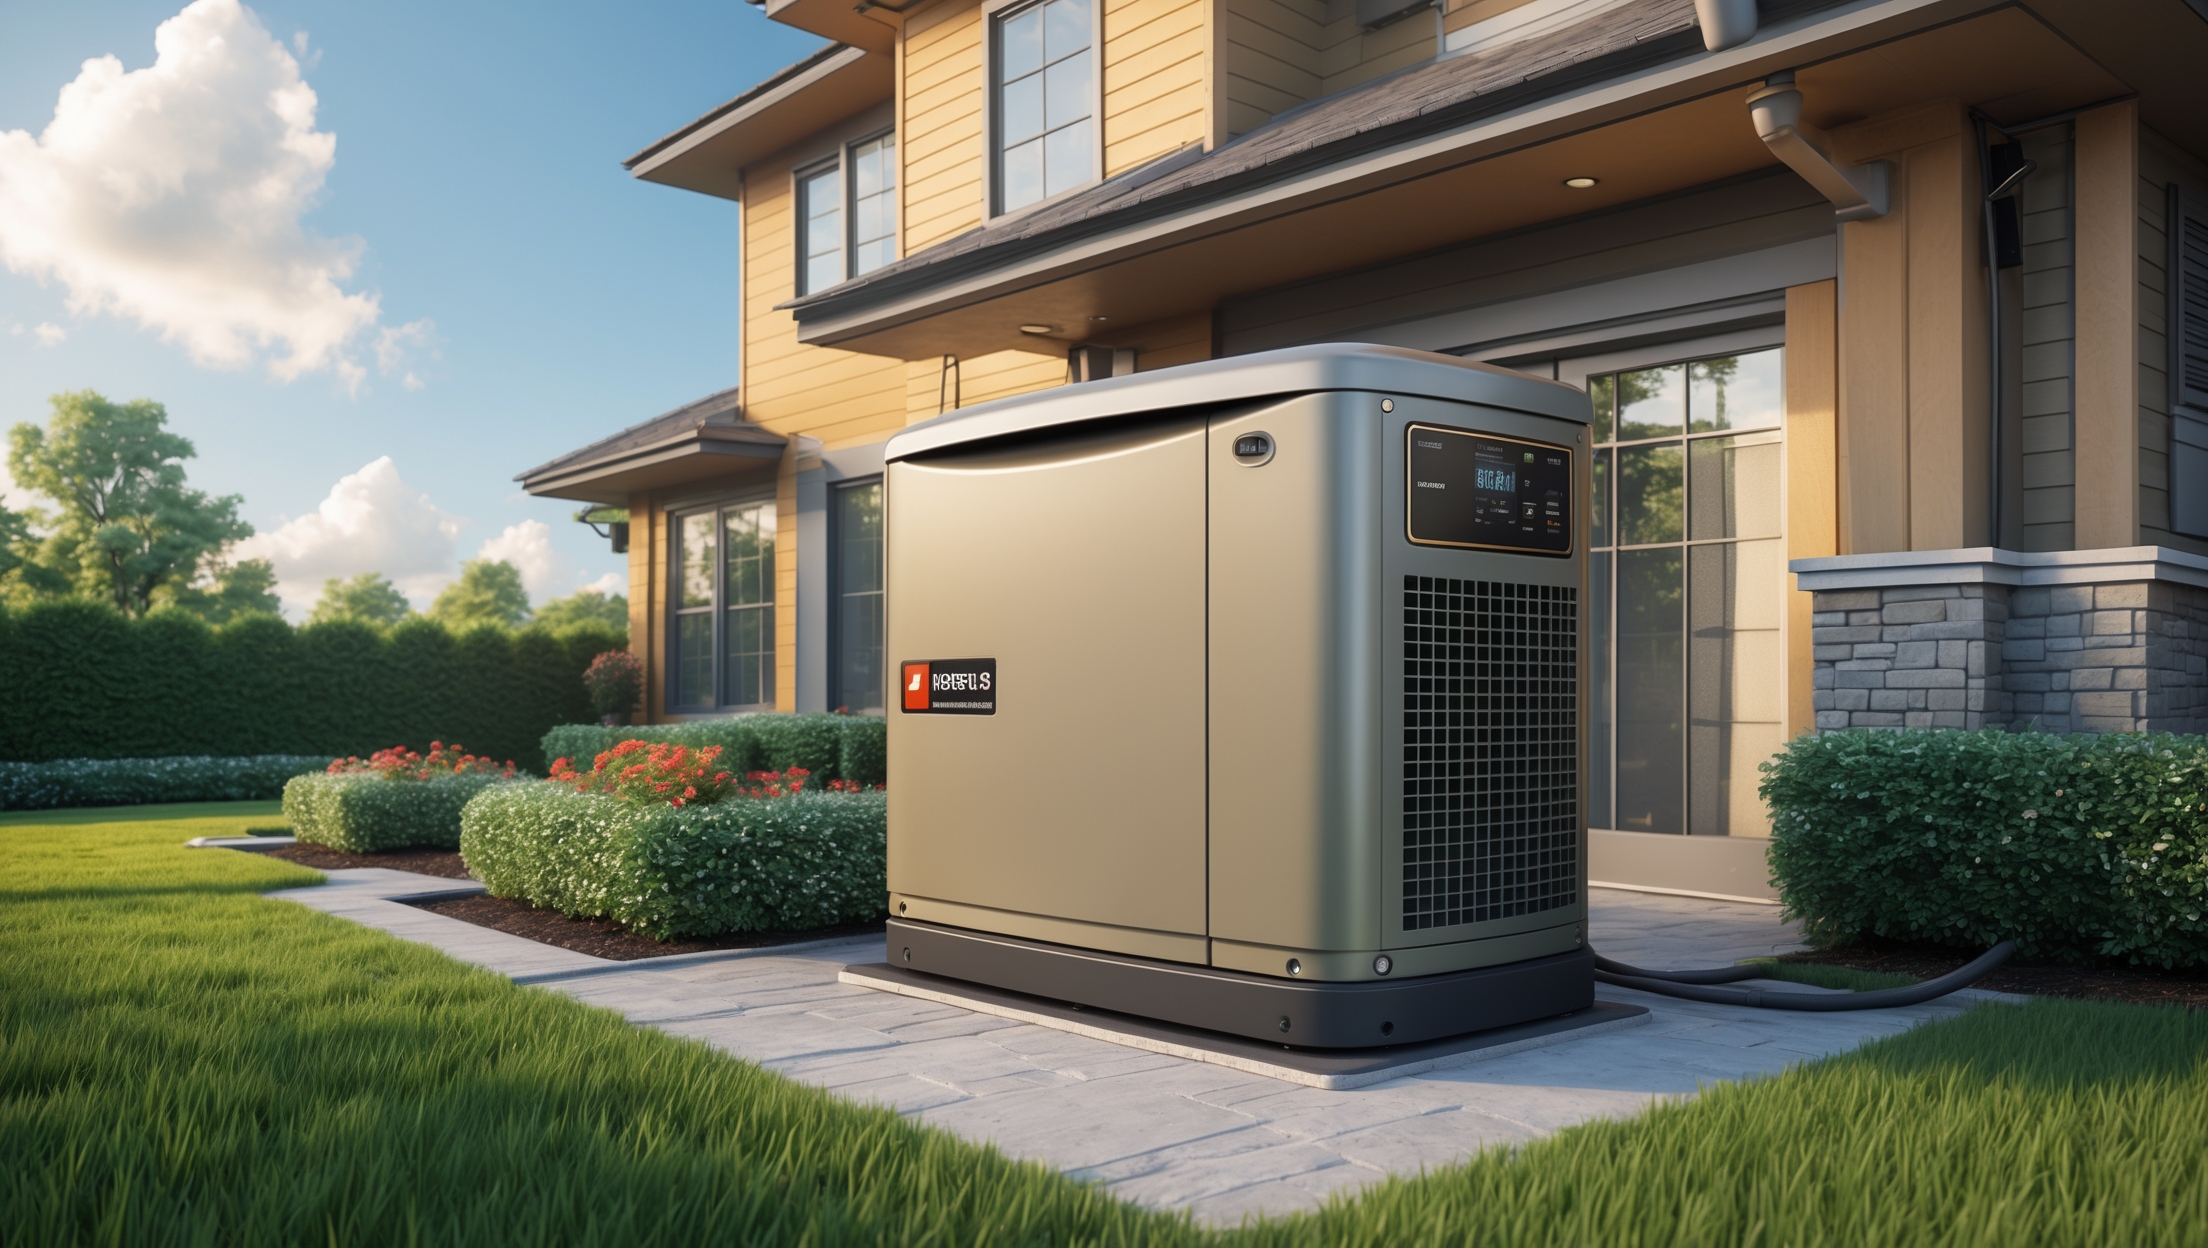
Understanding Home Generator Options
Portable vs. Standby Generators
There are two main categories of home generators: portable and standby. Each has distinct pros, cons, and installation considerations.
- Portable Generators: Designed for temporary use, these units typically power select appliances via extension cords or a manual transfer switch. They run on gasoline or propane but require manual setup during outages.
- Standby Generators: Permanently installed outside the home, these systems automatically detect power loss and switch on within seconds. They’re hardwired to your electrical panel and connected to a fuel supply (natural gas or propane).
Choosing the Right Size
Generator sizing is crucial for safe, effective operation. Undersized units can overload, while oversized systems waste money and fuel. Calculate your total wattage needs by listing essential circuits and appliances (refrigerator, HVAC, sump pump, etc.). Add starting watts for devices with motors. Most homes require standby units in the 7kW–22kW range, but a professional load calculation is strongly recommended.
Pre-Installation Planning: Site Assessment and Permitting
Site Selection and Preparation
Proper placement ensures safe operation, compliance, and ease of maintenance. Key considerations include:
- Distance from Home: Most manufacturers recommend at least 18–60 inches from walls and windows to prevent exhaust intrusion.
- Accessibility: Leave enough clearance for servicing and keep away from growing shrubs or fences.
- Surface: Install on a level, stable surface—preferably a concrete or composite pad to prevent settling and water pooling.
- Noise: Consider proximity to bedrooms or neighbor’s property, as even quiet models generate 60–70 dB during operation.
Permits and Local Code Compliance
Most jurisdictions require permits for standby generator installation due to the integration with your home’s electrical and gas systems. Common requirements include:
- Electrical Permits: For panel modifications and transfer switches.
- Plumbing/Gas Permits: If connecting to natural gas or propane.
- Site Inspections: Pre- and post-installation inspections to verify compliance with the National Electrical Code (NEC) and local ordinances.
Consult your local building authority early in the process. Unpermitted work can void insurance and lead to fines or forced removal.
Cost Breakdown: Budgeting for Backup Power
Generator Unit Cost
Expect to pay:
- Portable Generators: $500–$2,500 depending on wattage and features.
- Standby Generators: $2,500–$7,500 for most residential models, not including installation.
Installation Labor and Materials
Professional installation is strongly advised for standby systems. Budget for:
- Electrical Labor: $1,200–$3,000 for wiring, transfer switch, and panel work.
- Plumbing/LPG Work: $500–$2,500 depending on gas line distance and complexity.
- Concrete Pad: $250–$700 if not included.
- Permits and Inspections: $100–$500 total, varying by locality.
Additional Costs
- Transfer Switch: $400–$1,200 for automatic models.
- Upgraded Electrical Panel: $800–$2,500 if your existing panel can’t support the new load.
- Fuel Storage (Propane): $400–$1,000 for tank purchase or lease and initial fill.
Total Project Cost: For a typical whole-house standby generator, expect $6,000–$14,000 all-in. Partial backup systems can be completed for less, but always factor in future needs and local climate risks.
Safety Essentials: Protecting People and Property
Electrical Safety
Improper generator installation can cause shock, fire, and even deadly backfeed into utility lines. Key safety steps include:
- Transfer Switch Installation: A transfer switch safely isolates your home from the grid during generator operation. Never connect a generator directly to your panel without one.
- Proper Grounding: Follow manufacturer and NEC guidelines for grounding to prevent electrical faults.
- GFCI and AFCI Protection: Certain circuits may require ground-fault or arc-fault protection—especially outdoors and in damp locations.
Carbon Monoxide and Fire Risks
Generators produce carbon monoxide (CO), a deadly, odorless gas. Always:
- Install outdoors—never in garages or enclosed spaces.
- Place CO detectors inside your home, especially near bedrooms.
- Maintain clear exhaust pathways at all times.
- Keep flammable materials away from the generator and exhaust.
Weather and Environmental Considerations
Generators must withstand rain, snow, and temperature extremes. Choose models with weatherproof enclosures and ensure your installation meets local wind and flood protection codes. In hurricane- or wildfire-prone areas, additional anchoring and defensible space may be required.
Step-by-Step Installation Process
1. Professional Assessment and Sizing
Have a licensed electrician perform a load calculation based on your essential needs. Confirm your home’s existing electrical panel can accommodate a transfer switch and additional amperage.
2. Site Preparation
Clear the chosen location of debris, level the ground, and pour a concrete or composite pad. Ensure the area is accessible for future maintenance.
3. Mounting the Generator
Position the generator on its pad, aligning fuel and electrical inlets for efficient routing. Anchor the unit per manufacturer specifications to resist shifting and wind.
4. Fuel Line Installation
- Natural Gas: Licensed plumber runs a line from your meter. Check for leaks and proper pressure.
- Propane: Install and secure a compliant storage tank; run approved piping to the generator.
5. Electrical Connections
- Install the transfer switch near your main panel.
- Connect generator wiring to the transfer switch and panel according to NEC and manufacturer instructions.
- Bond all grounds per code.
6. Testing and Inspection
- Conduct a full system test under load to ensure proper transfer and operation.
- Schedule required inspections with your local building department.
- Address any deficiencies before final sign-off.
7. Owner Training
Have your installer demonstrate safe operation, including starting procedures, transfer switch use, and basic troubleshooting. Review the manufacturer’s maintenance schedule and keep manuals accessible.
Maintenance Best Practices for Reliable Power
Routine Inspections
Perform monthly visual checks for leaks, debris, and animal nests. Inspect fuel and electrical connections for signs of wear or corrosion.
Exercise Cycles
Most standby generators should be run for 10–20 minutes at least once per month to keep internal parts lubricated and batteries charged. Set automatic exercise timers if available.
Oil and Filter Changes
Follow the manual for oil and filter intervals—typically every 100–200 hours of run-time or annually, whichever comes first. Use only approved oils and filters.
Battery Maintenance
Check battery voltage monthly and replace every 2–3 years or as needed. Clean terminals and ensure secure connections to avoid startup failures.
Professional Service
Arrange annual servicing by a qualified technician. This includes load testing, electrical inspections, and firmware updates for newer models. Keep all records for warranty and insurance purposes.
Insurance and Documentation Essentials
Notifying Your Insurer
Many insurance policies require notification of major home upgrades. Properly installed generators can reduce claims risk, but unpermitted or DIY work may void coverage. Provide documentation of permits, inspections, and professional installation.
Warranty Considerations
Register your generator promptly with the manufacturer. Most warranties require proof of professional installation and scheduled maintenance logs. Save all receipts and service records in a dedicated folder.
Common Mistakes to Avoid
- Skipping load calculations and under-sizing the generator.
- Installing without required permits or inspections.
- Neglecting transfer switch installation, risking backfeed hazards.
- Improper siting, leading to exhaust or noise complaints.
- Failing to schedule regular maintenance or exercise cycles.
- Ignoring manufacturer and local code requirements for grounding and clearances.
Learning from these mistakes can protect your investment and your family’s safety.
Conclusion: Invest in Peace of Mind with a Professional Approach
Backup generators offer invaluable security during unexpected outages, but only when installed with precision, care, and respect for safety protocols. By thoroughly planning your installation—selecting the right generator, securing permits, hiring qualified professionals, and budgeting for both upfront and lifetime costs—you lay the groundwork for reliable, long-term performance. Ongoing maintenance isn’t optional; it’s essential for keeping your system ready when you need it most. Don’t overlook the importance of keeping documentation current for insurance and warranty purposes, and always stay up to date with manufacturer recommendations and local code changes.
A properly installed home generator is more than a convenience: it’s a resilient investment in your household’s comfort, safety, and value. Take the time to do it right, and you’ll be prepared for whatever the future—and the power company—throws your way.
Does the installation process for a standby generator usually require bringing in a licensed electrician, or are there some steps a homeowner can safely handle themselves if they’re handy? I want to make sure I’m staying within local codes and not risking safety.
For standby generator installation, most electrical work—like connecting to your home’s panel—should legally be done by a licensed electrician to comply with local codes and ensure safety. Homeowners can usually handle simpler prep tasks, such as site clearing or pouring a pad, but anything involving wiring or fuel connections should be left to qualified professionals. Checking local permit requirements is always a smart step before starting.
The article explains the difference between portable and standby generators, but I’m wondering about long-term maintenance. What are some typical upkeep tasks or costs associated with standby systems that homeowners should expect after installation?
After installing a standby generator, homeowners should expect regular maintenance for reliable operation. Typical tasks include changing the oil and air filter, checking the battery, inspecting wiring and connections, and running periodic test cycles. Most manufacturers recommend servicing the unit annually or after a set number of hours. Annual maintenance can cost between $200 and $500, depending on the generator’s size and location. It’s also wise to budget for occasional part replacements over the years.
The article mentions sizing being really important for both safety and efficiency. What’s the best way for a homeowner to accurately calculate total wattage needs when there are several large appliances that cycle on and off, like an HVAC and a well pump?
To accurately calculate your wattage needs, list every appliance you want the generator to run and check each one’s running and starting wattage—these figures are often on appliance labels or in manuals. For appliances like HVAC systems or well pumps that cycle on and off, use the higher starting wattage in your total. Add everything up, then include a buffer of 10–20 percent to handle unexpected surges. If you’re unsure, an electrician can perform a load analysis for you.
When calculating the total wattage for sizing, how do you handle appliances like HVAC systems that have high starting watts or fluctuating power needs? Is there an easy way for homeowners to get accurate numbers for these?
For appliances like HVAC systems that have high starting watts, you’ll need to factor in both their running and starting wattage—often the starting wattage is much higher. Check the labels on your appliances or the user manual for these numbers. If they’re not listed, you can use a watt meter or contact the manufacturer. For more precise results, many electricians offer wattage measurement services, which can help homeowners get an accurate total for generator sizing.
For homes in areas where the power grid is unstable but natural gas lines are not available, what’s the best fuel option for a standby generator, and are there any special considerations during installation?
For homes without natural gas lines, propane is often the best fuel option for a standby generator. Propane can be stored onsite in tanks and is widely used for residential generators. During installation, you’ll need to ensure that the tank is placed according to local codes, with proper ventilation and safe distance from the house. It’s also important to account for regular refilling and periodic inspection of the tank and lines.
I understand that whole-house standby generators are installed permanently and connect directly to natural gas or propane lines. Do you need to get a special permit or approval before hooking up the fuel supply, and if so, what does that process usually involve?
Yes, you will typically need a permit before connecting a standby generator to a natural gas or propane line. The process usually involves submitting an application to your local building or permitting office, where they check your plans for code compliance and safety. An inspection is often required after installation to ensure everything is up to standard before the system is approved for use. It’s important to check with your city or county for the exact steps and requirements in your area.
Could you explain more about how to properly calculate the total wattage requirements for essential appliances when sizing a whole-house standby generator? I want to avoid under- or overestimating and make sure I choose the right unit.
To accurately calculate your total wattage needs, make a list of all essential appliances you want powered during an outage. Check each appliance’s nameplate or manual for its running wattage and note any with higher starting (surge) wattage, like refrigerators or AC units. Add the running wattages together, and use the highest single surge wattage in your total if multiple appliances might start at once. This gives you a realistic estimate, helping you select a generator that can handle both your steady and peak power needs without being oversized.
When budgeting for a whole-house standby generator, does the initial quoted price usually include ongoing maintenance costs, or should homeowners expect separate contracts for routine service and repairs down the road?
The initial quoted price for a whole-house standby generator typically covers only the purchase and installation. Ongoing maintenance and repair costs are usually not included and are handled through separate service contracts. Homeowners should budget for annual maintenance, which can include inspections, oil changes, and minor repairs, as an additional and recurring expense.
If I’m considering a standby generator that runs on natural gas, what kind of permits or inspections should I expect before installation in most states? I want to make sure I follow all the right steps so there are no issues down the line.
For a standby generator running on natural gas, you’ll typically need an electrical permit, a plumbing or gas permit, and sometimes a building permit before installation. Inspections are usually required after installation to check electrical connections, gas lines, and compliance with local codes. It’s a good idea to check with your local building department or a licensed installer, as requirements can vary by state and municipality.
For budgeting purposes, can you give a ballpark estimate of how much it might cost to professionally install a standby generator versus handling a portable generator setup myself, including any permitting fees and expected maintenance costs?
Professional installation of a standby generator typically costs $5,000 to $12,000, including the unit, installation, permitting fees (often $100–$500), and essential electrical work. A DIY portable generator setup is far less expensive—usually $400 to $2,000 for the generator, with minimal permitting costs if any. Annual maintenance for standby units runs $200–$400, while portable generators usually need $50–$100 per year in upkeep.